z40 Quick Install Guide for full SD-WAN Deployment
-
Unbox and Verify Package Contents
Remove the z40 and accessories from the boc. Verify the following items are included:
- 1x z40
- 1x power supply
- 4x 5G antennae
- 2x 4G antennae
- 2x Wi-Fi antennae
- 1x GPS antenna
-
Attach antennae
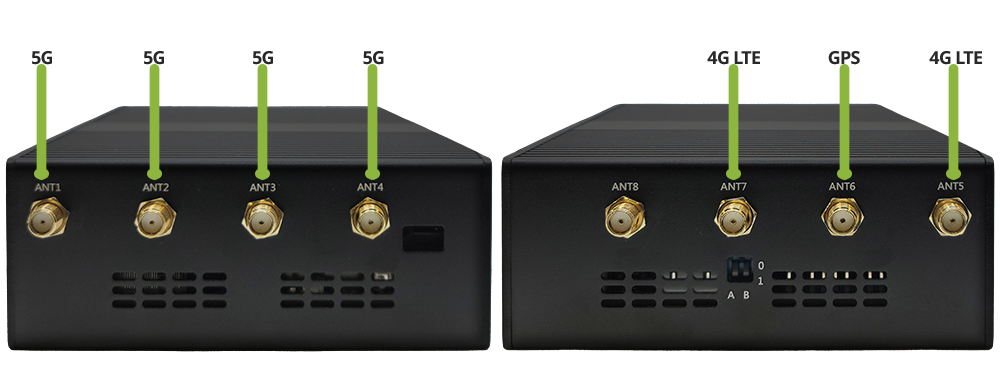
Left Panel / Right Panel 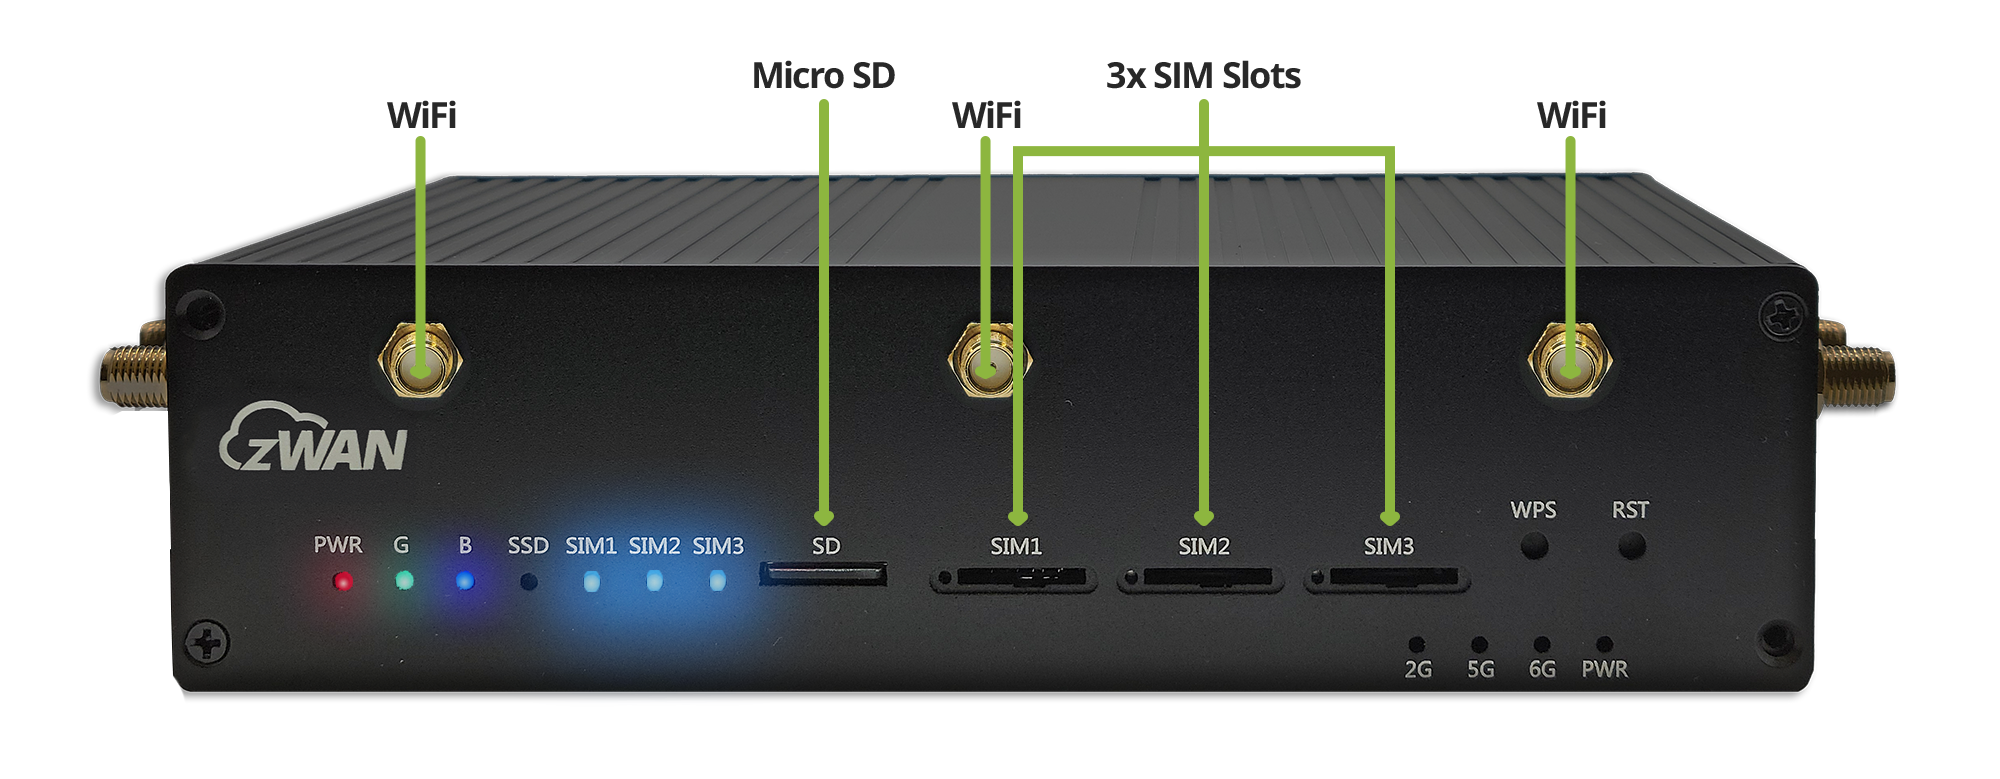
Front Panel 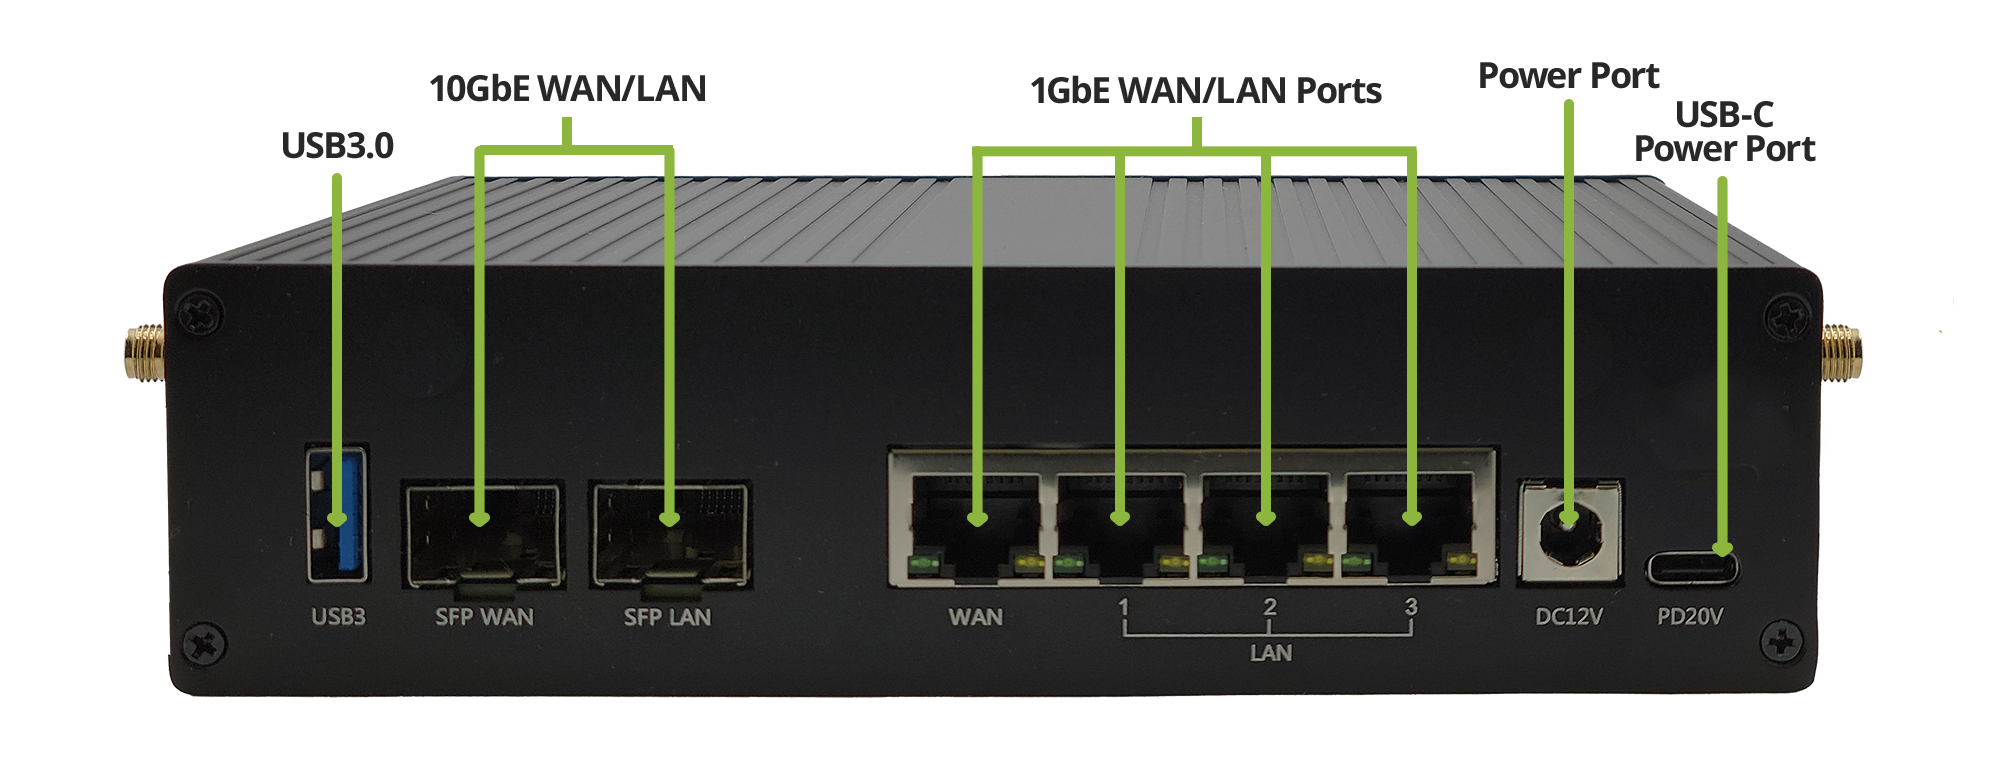
Rear Panel Follow the labeled indicators on each antenna and the z40 to connect correctly:
-
5G antennae
Attach the four 5G antennae to the designated ports on the left side of the z40 when viewing the front.
-
4G antennae
Connect the two 4G antennae on the right side of the z40 when viewing the front.
-
Wi-Fi antennae
Secure the two Wi-Fi antennae to the front panel ports.
-
GPS antenna
Attach the single GPS antenna in the slot between the 4G antenna ports on the left side.
-
-
Power On the z40 Unit
- Plug the included power adapter into the DC12V power port on the back right of the z40.
- Connect the adapter to a wall outlet.
- Wait for the z40 to boot up; the B LED should turn solid blue to indicate readiness.
-
Configure the Mobile Connection
To verify Mobile (LTE/5G) functionality:
-
- Connect a computer to LAN2 port on the z40 or connect to Wi-Fi.
- From that same computer, open up your preferred web browser and navigate to the URL found on the label on the bottom of the z40 device.
-
- Default Credentials You may find the default credentials on the label on the bottom of the z40 device.
-
- In the console, go to the Network settings and confirm that the LTE/5G signal(s) and connectivity are active
-
Run Initial Performance Benchmarks
to confirm basic setup functionality, perform these tests:
-
Wi-Fi Speed Test
Connect a PC or mobile device to the z40’s Wi-Fi network and perform a speed test on Fast.com.
- The default SSID can be found by logging into the z40 Management Console and going to Wi-Fi in the navigation tree, clicking on the Access Point Mode tab, and checking the entry under SSID in the WLAN Info table.
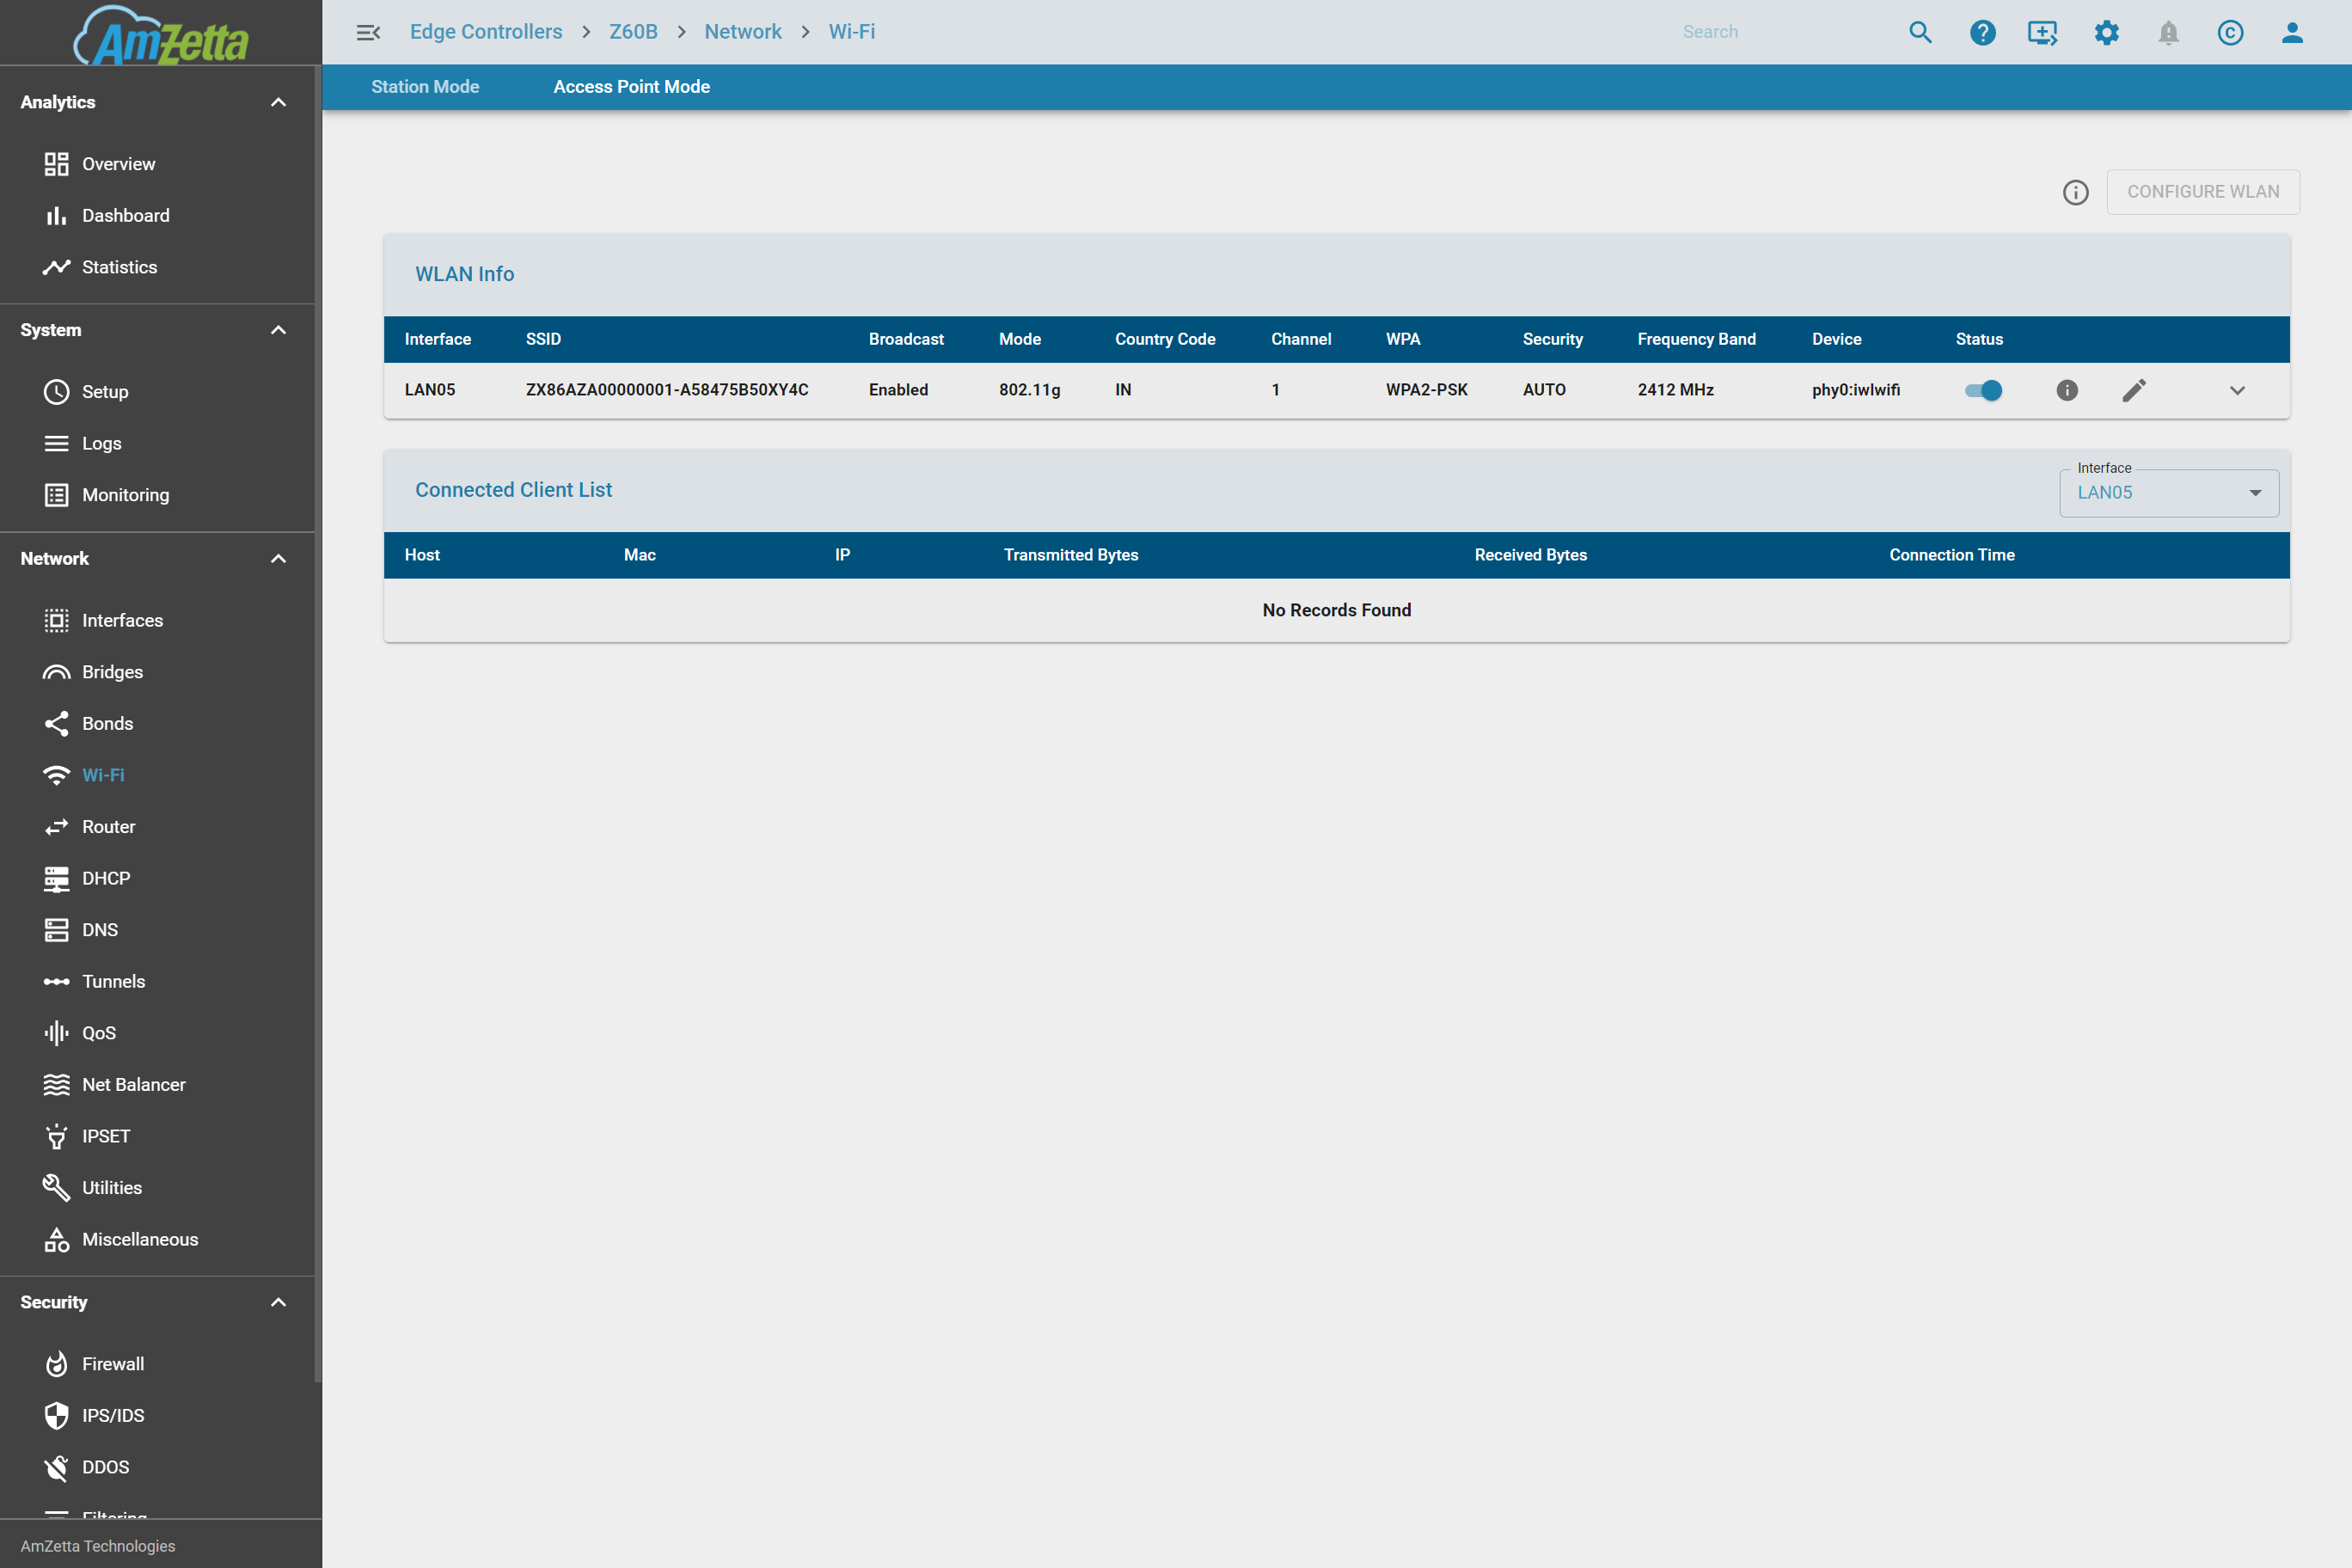
- Default Password: Check the label on the bottom of the z40 device.
- The default SSID can be found by logging into the z40 Management Console and going to Wi-Fi in the navigation tree, clicking on the Access Point Mode tab, and checking the entry under SSID in the WLAN Info table.
-
LAN and Mobile Network Speed Test
Conduct a speed test over LAN and Mobile (LTE/5G) to confirm both wired and mobile network functionality.
Document the speed test results and confirm they meet expected performance metrics.
-
-
Connect Network Cables
-
WAN Ports
Plug in the main internet (ISP) connection(s) into the ‘WAN’ port(s) on the back of the z40.
-
LAN Ports
Connect the required LAN cables to the designated ‘LAN’ ports
-
-
Configure zWAN Director Onboarding
For SD-WAN and multi-office deployment, onboard the z40 to your zWAN Director tenant.
- Login to your tenant with the credentials provided to you by the AmZetta Support Team.
- Click on Onboarding in the left-hand navigation tree and look for any Pending Edge Controllers and click the Onboarding button next to each device you would like to onboard.
- Enter a Name and a Description and click ONBOARD
- Login to your tenant with the credentials provided to you by the AmZetta Support Team.
-
Integrate the z40 into the Network Fabric
Choose one of the following two integration methods:
-
Option A: Behind Existing Firewall
The quickest method of integration is to integrate the z40 behind an existing network firewall. A few simple steps will get the z40 up and running:
- Connect the z40’s ‘WAN’ port on the z40 to one of the existing firewall’s LAN port.
- Access the z40 management console and assign a static IP on the WAN port.
- Go to Interfaces in the left-hand navigation tree and then click the three dots on the top-right corner of ‘WAN00’ to bring up a menu and select Add IP.
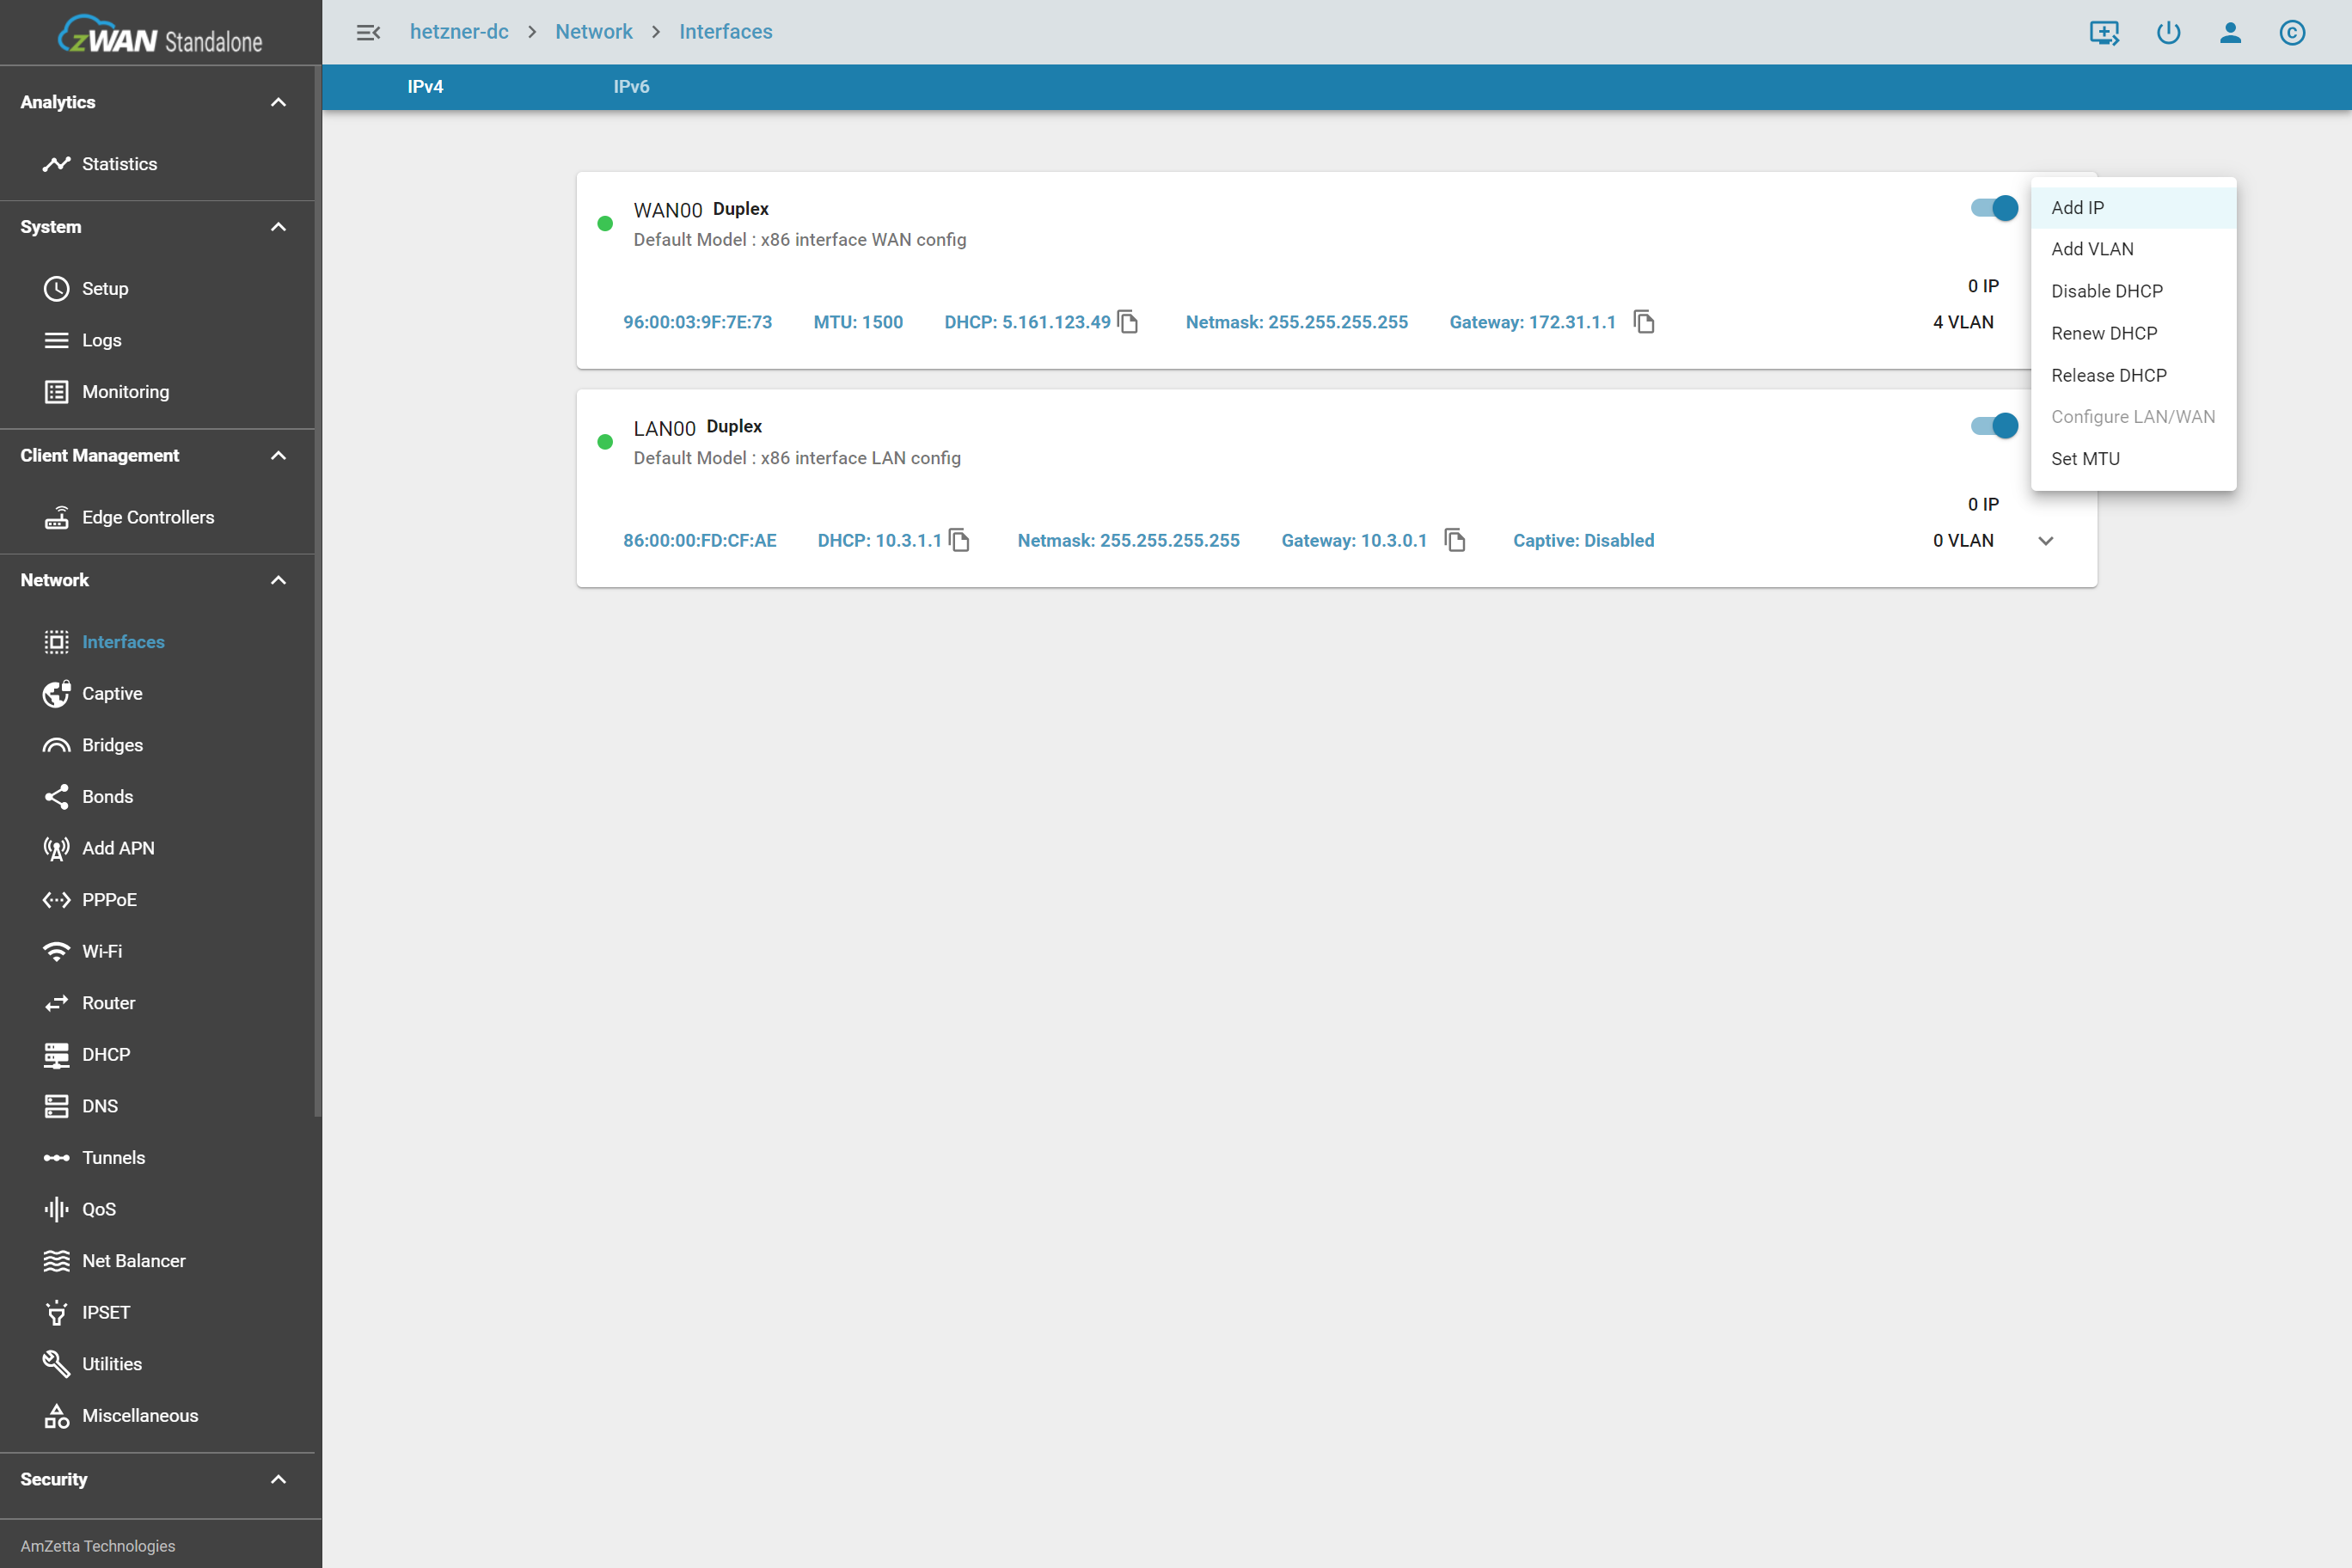
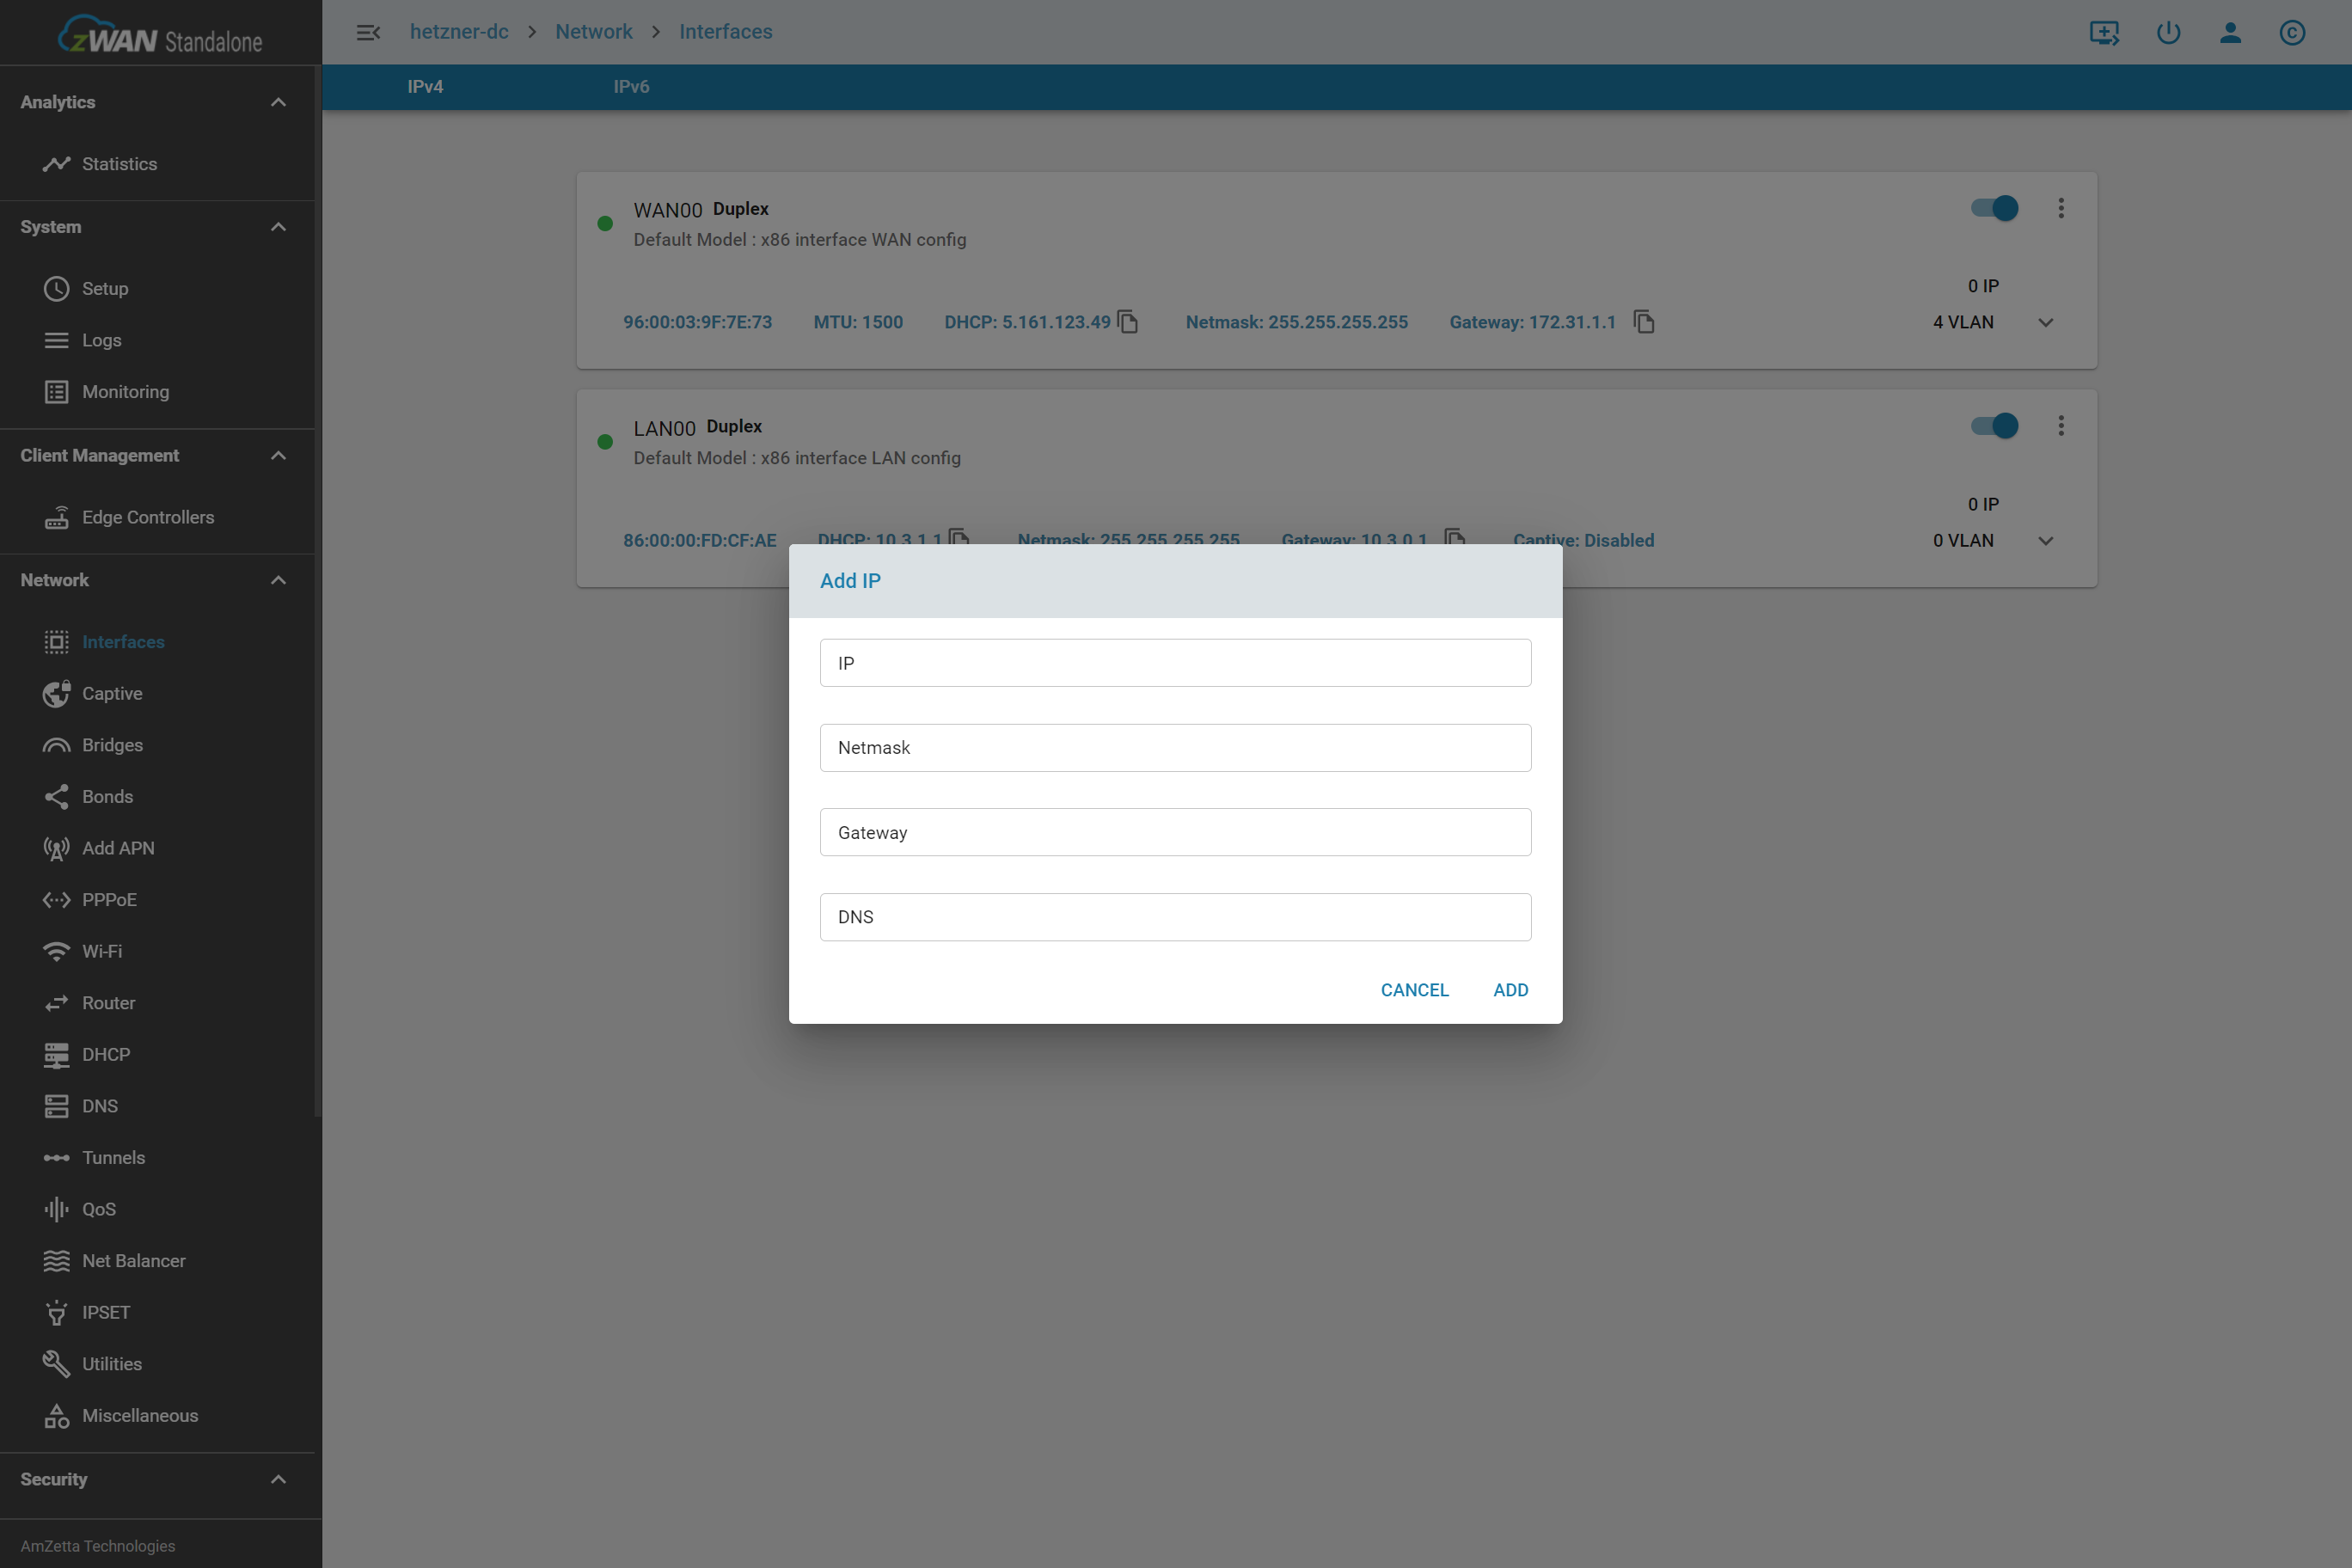
- Type in the required information for the static IP and click Add.
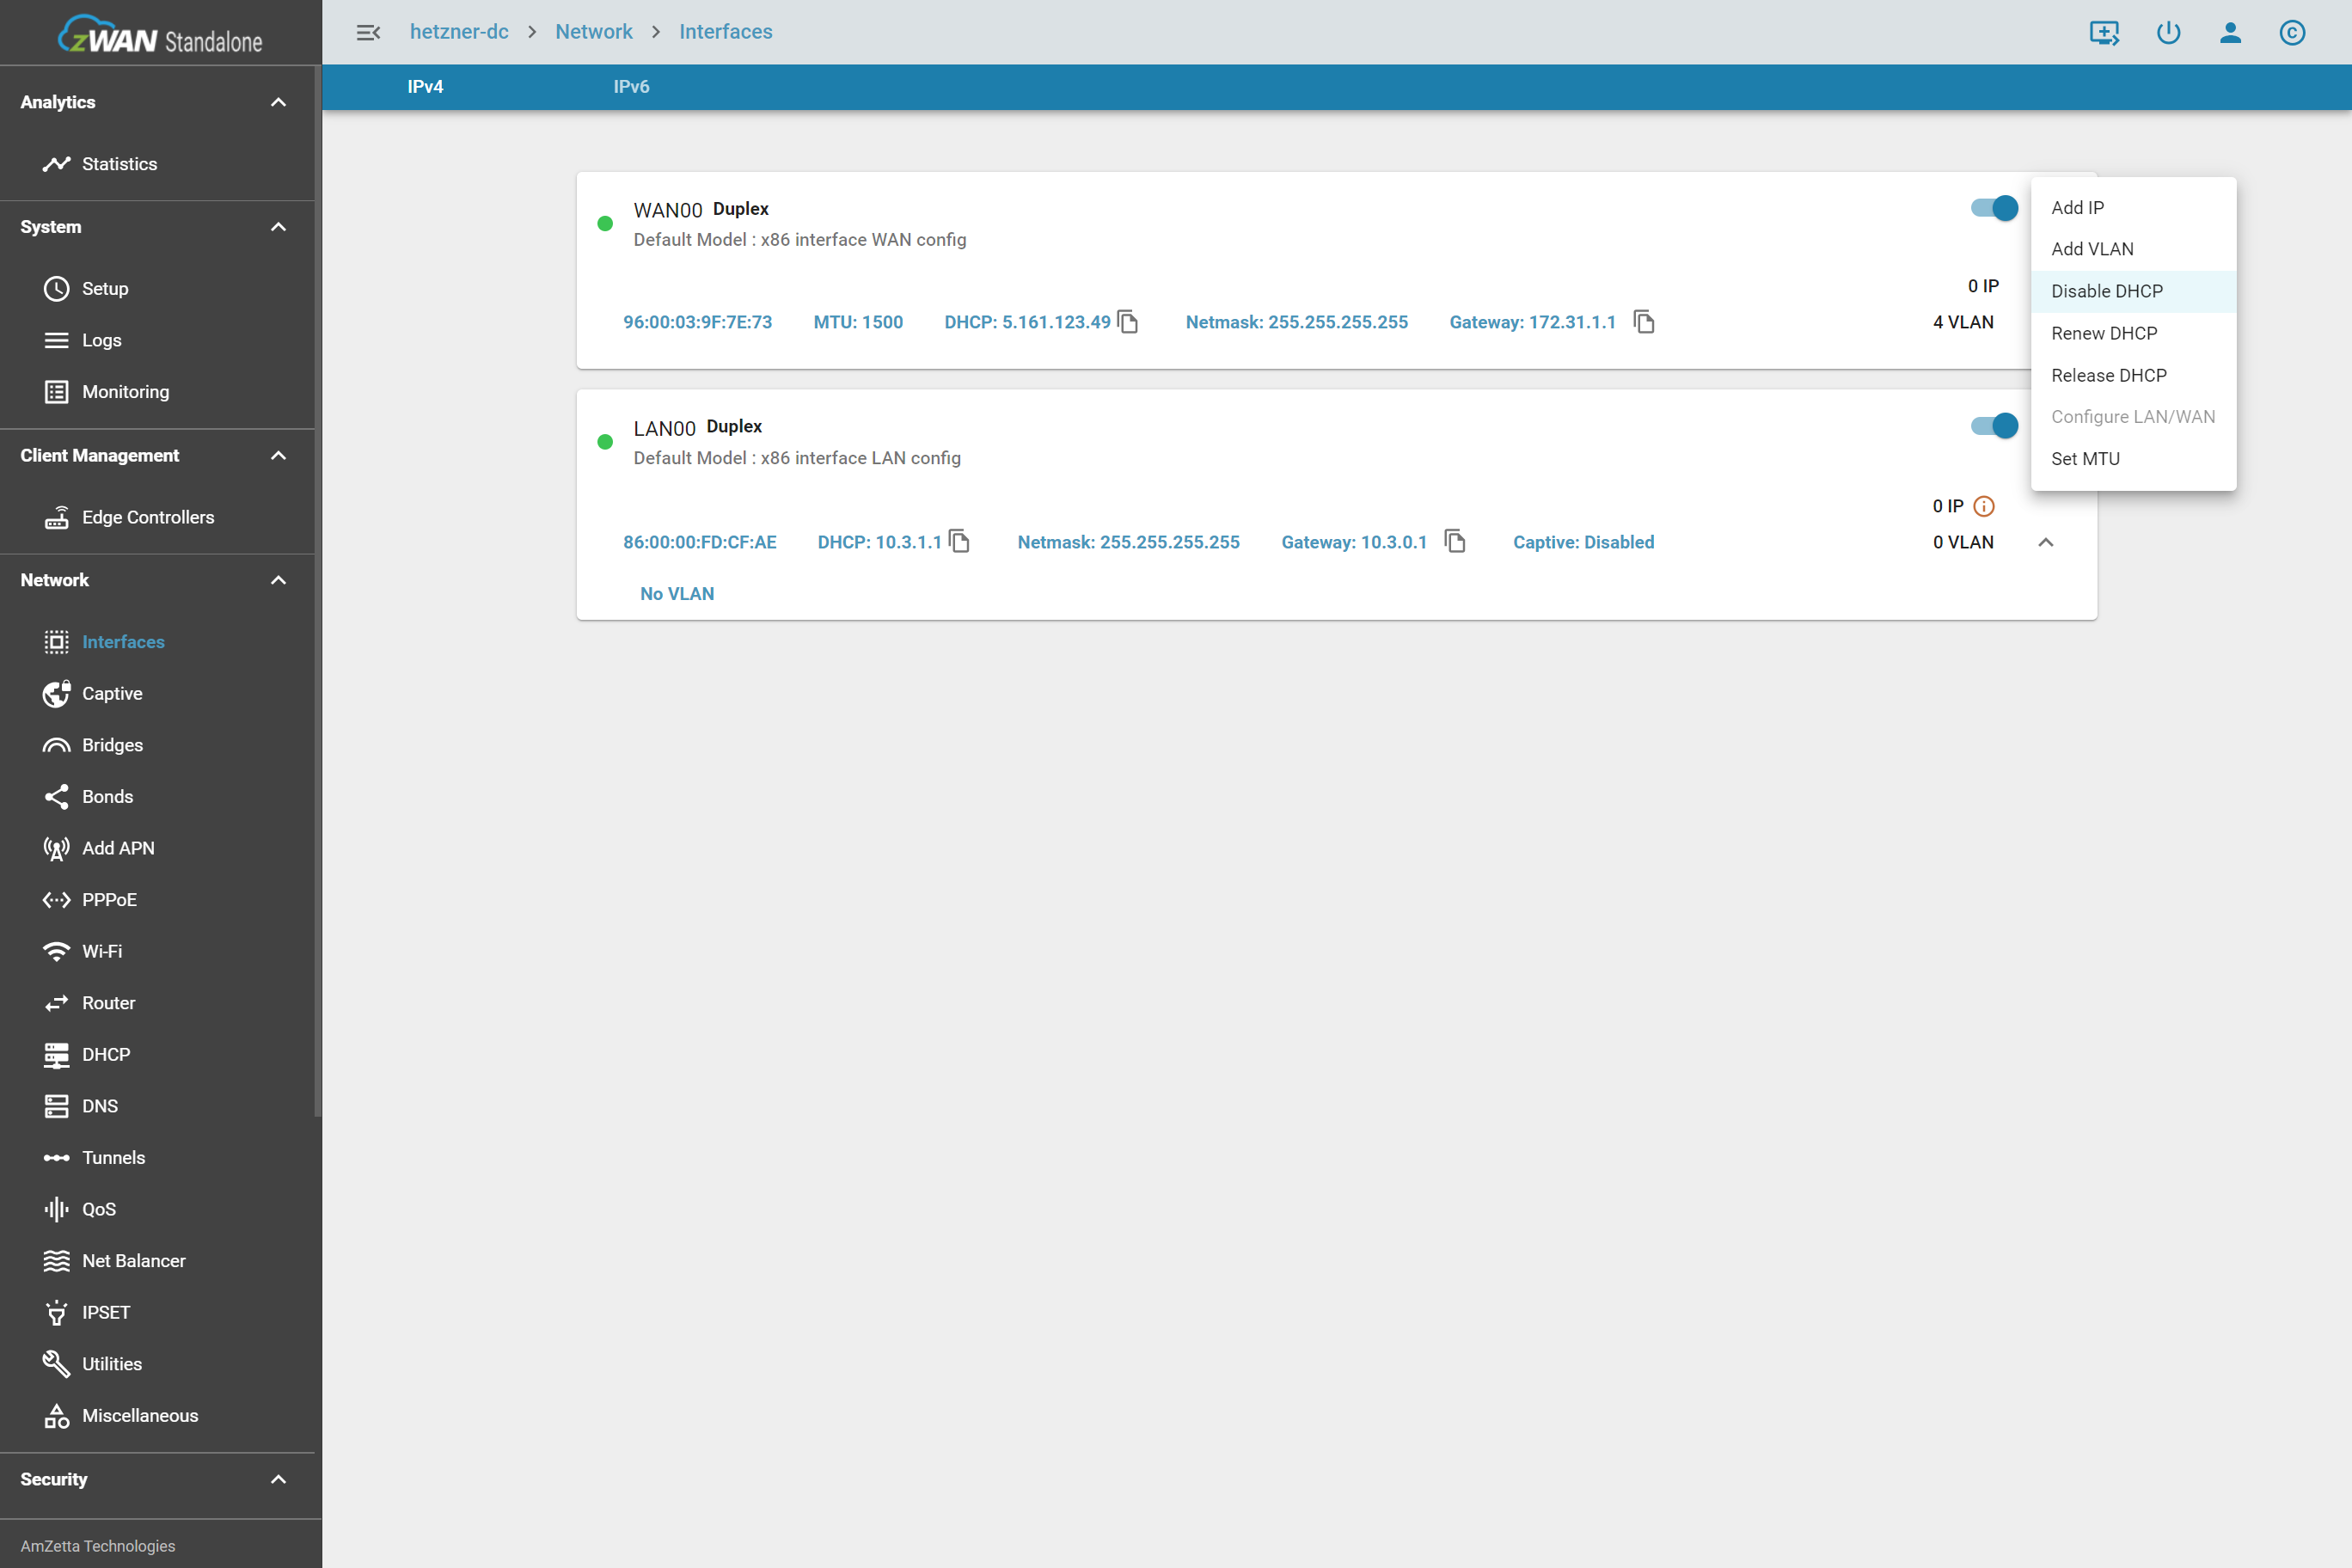
- Click on the three dots again and select Disable DHCP. This will remove the DHCP IP and ensure only the static IP is running on the WAN interface.
-
- Update the corporate network’s default gateway to direct to the z40.
-
Option B: Replace Existing Firewall with z40 as Primary Firewall
The z40 can act as the primary firewall, replacing an existing firewall.
- Connect the main ISP line(s) to the ‘WAN’ port(s) on the z40.
- Attach LAN port(s) to the corporate network switches for connectivity.
- In the z40 Management Console, define DHCP scopes for each LAN Port.
- Setup firewall rules to mirror the previous firewall’s configurations, if any.
-
Test WAN failover
Complete a WAN failover test to ensure uninterrupted connectivity in case the primary connection fails.
- Disconnect the primary WAN connection temporarily and confirm the z40 switches to a backup connection (such as Mobile network).
- Reconnect the primary WAN line and verify it resumes as the active connection.
Additional Tips for Success
-
Resetting to Factory Settings
If any issues arise during configuration, the z40 can e reset by pressing and holding the reset button (located on the front bottom right corner) for 10 seconds.
-
Firmware Check
Ensure the z40 is running the latest firmware. The z40 is always shipped with the latest firmware version at time of shipment. The AmZetta support team will reach out with any additional firmware updates during your POC.
-
Documentation
Retain screenshots or notes of each configuration step in case adjustments are required later.
-
Support Contact
If issues arise beyond the scope of this guide, please contact support at [email protected] or call 1-800-892-6625.