How can we help?
-
zWAN
-
-
-
-
- Firewall & Layer 7 Application Filtering
- VPN Site-to-Site Tunnel Setup & Connectivity (z40 to Cloud vGR)
- Intrusion Prevention System (IPS) / Intrusion Detection System (IDS) Testing
- DNS Filtering
- DDoS Protection & Logging
- MAC Address Filtering & Geo-fencing
- Application Control & Protocol Blocking
- Authentication & Access Control (zID)
-
- WAN Link Failover & Load Balancing (ACI Mode)
- Dynamic Path Selection & Application-Aware Routing
- SaaS & Internet Breakout Validation
- QoS for Microsoft Teams (Datacenter vGR + Branch z40)
- Tunnel Failover (z40 ↔ vGR) — WAN00 (wired) primary, WAN03 (4G) & WAN04 (5G) backups
- IP Routing & Static Route Steering (z40 Branch)
- VLAN & Layer-2 Bridging
-
-
-
-
-
-
- Articles coming soon
-
-
-
- Articles coming soon
-
- Articles coming soon
-
-
-
-
-
-
- Articles coming soon
-
- Articles coming soon
-
- Articles coming soon
-
- Articles coming soon
-
-
- Articles coming soon
-
- Articles coming soon
-
- Articles coming soon
-
- Articles coming soon
-
- Articles coming soon
-
- Articles coming soon
-
-
-
-
-
-
- Articles coming soon
-
- Articles coming soon
-
- Articles coming soon
-
- Articles coming soon
-
-
- Articles coming soon
-
- Articles coming soon
-
- Articles coming soon
-
- Articles coming soon
-
- Articles coming soon
-
- Articles coming soon
-
-
-
-
-
-
- Articles coming soon
-
- Articles coming soon
-
- Articles coming soon
-
- Articles coming soon
-
-
- Articles coming soon
-
- Articles coming soon
-
- Articles coming soon
-
- Articles coming soon
-
- Articles coming soon
-
- Articles coming soon
-
-
-
- Articles coming soon
-
- IPsec Tunnel not Establishing
- SSL-VPN Tunnel not Establishing
- Mobile Network Issues
- Management Tunnel does not Establish
- DNS not Resolving from Local Network Appliance
- DNS Resolution Issues in Tunnel Configuration
- DHCP Server not Leasing IP to LAN PC
- Debugging EC Events - Unknown Status Issue
- Trusted-MAC Geofencing Issues
- DNS Issues from DC LAN PC
- Troubleshooting LAN Connectivity to Internet via WAN, Remote Branch LAN, or Local Branch LAN
- NetBalancer gateways displaying Faulty/Inactive
- Packet Drop Issues
-
-
zTC
-
-
-
-
-
- Citrix HDX + USB Headset (Call-Center Baseline)
- VMware Horizon + Smart Card / CAC Login
- Microsoft AVD/RDP + Teams Optimized Video
- Multi-Monitor & 4K Performance
- USB Device Management - Block Storage
- Printing to Local USB & Network Printers
- Barcode Scanner (HID) with Line-of-Business App
- Kiosk / Assigned-Access Auto-Launch
- Wi-Fi Roaming & Link Change Mid-Session
- Power Management and Session State
- OS/Firmware Update & Rollback
-
-
StorTrends
-
zAccess
-
zGuardian
You are here:
Print
Virus Scan
0 out Of 5 Stars
| 5 Stars | 0% | |
| 4 Stars | 0% | |
| 3 Stars | 0% | |
| 2 Stars | 0% | |
| 1 Stars | 0% |
Quick Overview
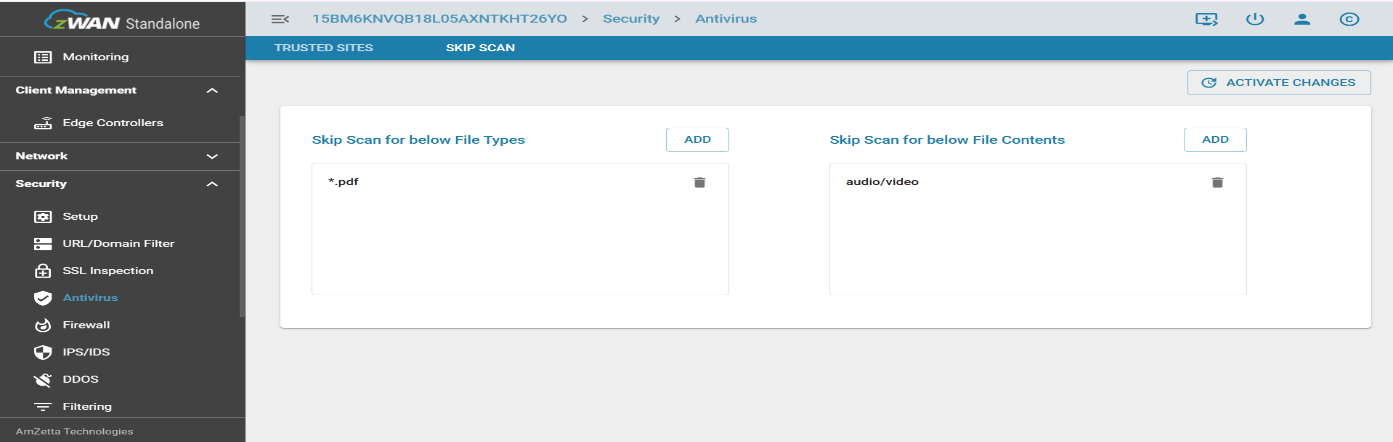
The Virus Scan feature in zGuardian inspects files and content for malware, viruses, and other malicious payloads. It works in conjunction with SSL Inspection to scan encrypted traffic and provides options to bypass non-critical content types for performance optimization.
How to Use This Feature in the UI
- Ensure SSL Inspection is enabled, as Virus Scanning requires decrypted HTTPS traffic.
- Navigate to
Security > Antivirus > Virus Scanin the zGuardian interface. - Enable the Virus Scan toggle.
- Configure optional exclusions:
- File Types to Skip: e.g.,
.png,.pdf,.exe - Content Types to Skip: e.g.,
video/mp4,audio/mp3
- File Types to Skip: e.g.,
- Click Apply Configuration to save and activate changes.
Concepts & Use Cases
- Primary Purpose: To detect and block malicious files before they reach the user device.
- Virus scanning is essential for inspecting downloadable files and attachments delivered over HTTPS.
- Exclusion of non-risk content types like images, audio, and video helps maintain performance without reducing security posture.
Note: Virus scanning is only effective for HTTPS traffic if SSL Inspection is enabled.
Troubleshooting & FAQs
- Q: Why is virus scanning not working?
A: Confirm that SSL Inspection is enabled. Without it, encrypted content cannot be scanned. - Q: Why are downloads slow when virus scanning is enabled?
A: Consider excluding high-bandwidth, low-risk content types like media files to reduce inspection overhead. - Q: Can I whitelist files from scanning?
A: Yes. Use the file type and content type exclusion options in the Virus Scan settings.
Was this article helpful?
0 out Of 5 Stars
| 5 Stars | 0% | |
| 4 Stars | 0% | |
| 3 Stars | 0% | |
| 2 Stars | 0% | |
| 1 Stars | 0% |
5
Table of Contents