Network Perfomance Monitor
Overview
zWAN Traffic Shaping (QoS) enables precise bandwidth management across physical interfaces (Ethernet, Bond, Bridge). The system utilizes a Hierarchical Token Bucket (HTB) queuing discipline to enforce policies.
Unlike traditional "First-In-First-Out" systems, zWAN employs a Hybrid Allocation Model. This allows administrators to mix strict Fixed Bandwidth Guarantees (e.g., "VoIP gets 10Mbps") with Percentage-Based Sharing (e.g., "Video gets 50% of whatever is left"), ensuring critical traffic is prioritized while maximizing link utilization.
1. Hybrid Allocation Model (The 3-Tier Hierarchy)
The QoS engine processes traffic in a strict hierarchy to ensure fairness and priority:
- Tier 1: Fixed Guarantees (Priority): Classes configured with
Allocation Type: Bandwidthare served first. These are absolute guarantees (e.g., 5Mbps). Traffic in these classes is deducted "off the top" of the total link capacity. - Tier 2: Percentage Sharing (Dynamic): Classes configured with
Allocation Type: Percentageshare the remaining bandwidth after Tier 1 is served.
Example: If a 100Mbps link has 20Mbps of Fixed traffic, the Percentage classes share the remaining 80Mbps. - Tier 3: Unclassified Traffic: Any traffic not matching a specific rule falls into the "Unclassified" bucket, which shares the Tier 2 bandwidth pool to prevent starvation.
2. Dynamic Adaptation (NPM Integration)
zWAN QoS is network-aware. It integrates with the Network Performance Monitor (NPM) to adapt to real-time WAN conditions.
- Scenario: If a physical link configured for 100Mbps degrades to 50Mbps (measured by NPM), the QoS engine automatically recalculates all Percentage-based classes to fit the new 50Mbps reality.
- Benefit: Prevents the router from sending more traffic than the WAN link can handle, avoiding packet loss at the ISP level.
3. Bufferbloat Protection
To prevent latency spikes (Bufferbloat), the system automatically sets the effective "Rate Limit" to 90% of the interface's maximum capacity. This ensures the zWAN router controls the queueing, rather than the ISP modem.
4. Guaranteed Local traffic
Locally generated critical traffic—such as Management tunnels, Event publishing, DNS resolution, and NTP syncing—is automatically prioritized with fixed bandwidth allocations to ensure system stability.
Functionality
A QoS Class contains one or more Flow Classification Rules and the Shaping parameters called a Policy (Bandwidth limit & Priority). When a packet flows through an interface, it is checked against each QoS Class in order until it matches a rule. If a match is found, the packet is shaped according to that class's bandwidth limits.
Summary of Logic:
- Create one or more Flow Classification Rules.
- Create a QoS Class with bandwidth controls (Fixed or Percentage) and Priority.
- Associate the Flow Classification Rule with the QoS Class.
- Add one or more QoS Classes to an Interface.
- Enable the QoS Class within the interface settings.
- Enable QoS globally for that Interface.
- Save all changes to apply the hierarchy.
QoS Policies
- Priority: (High or Low) - Higher priority classes are processed first during traffic shapping (congestion).
- Guaranteed Bandwidth: The minimum bandwidth reserved for this class.
- Maximum Bandwidth: The absolute ceiling (Burst limit) for this class.
- DSCP Marking: (Optional) Packets matching this class will be tagged with a specific DSCP mark/code.
QoS Rule
Refer to the Flow Classification section for creating rules. You must set a QoS Class [created in QoS Class Manager] as the Target for the rule.
Configuration steps
Step 1: Create Class Managers
Define your traffic classes under the Class Manager menu.
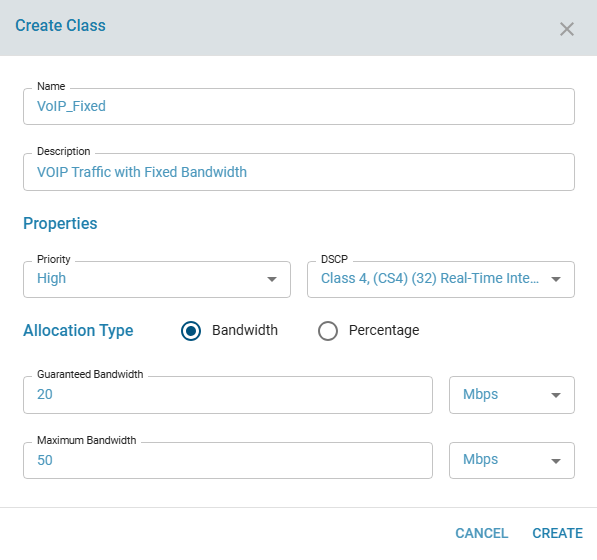
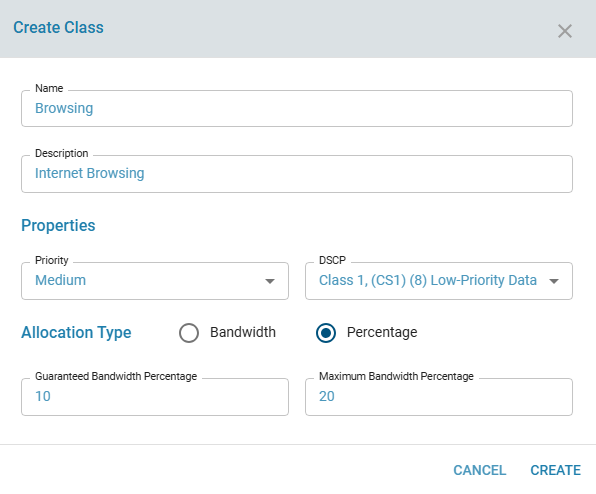
- Name: Give the class a short name (e.g.,
VoIP_Fixed,General_Web). - Descrition: Give the class description (e.g.,
VoIP Traffic with Fixed Bandwidth). - Priority & DSCP: Select the traffic Priority level and optional DSCP tag.
- Allocation Type: Select Bandwidth for critical apps or Percentage for general data.
- Limits: Set your Guaranteed and Maximum values.
- All the created classes will be listed in QoS Class Manager

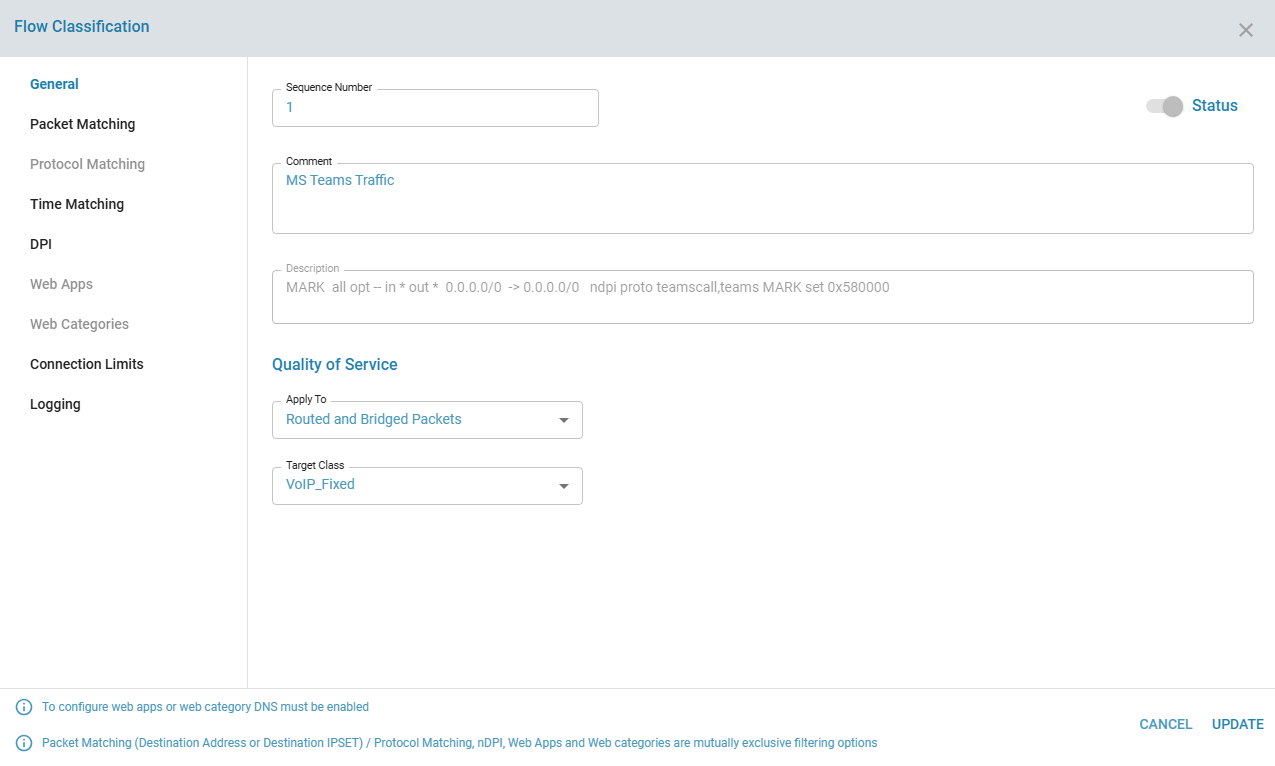
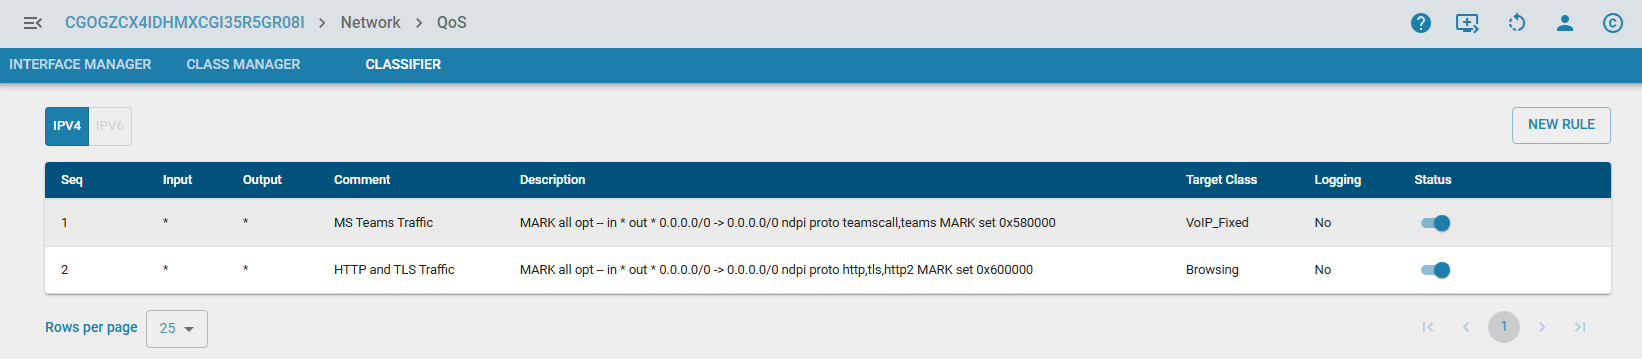
Step 2: Define Flow Classification Rules
Define one or more Flow Classification Rule for each QoS Class [i.e., Link traffic types to your Classes.]
- Create a Flow Classification Rule.
- Define the match criteria (
Source/Dest IP, Port, Application, DSCP). - Target: Select the Class Manager created in Step 1.
Step 3: Assign Classes to Interface
Assign one or more QoS Classes to an Interface (under Interface Manager)
- Select the physical interface.
- Add the Class Managers you wish to active on this port.

- List the classes that are assigned to the interface.

- Local Overrides (Interface-Specific Settings): Once a Class is added to an interface, its parameters (Bandwidth, Priority, Allocation Type) can be modified directly in this list.
- Scope: These changes are local to this interface only. They do not alter the original "Global" Class Manager definition.
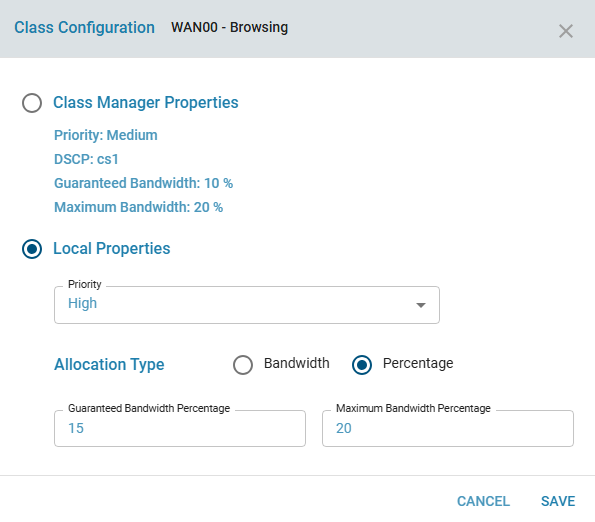
- Exception: DSCP Marking cannot be overridden locally. It is strictly inherited from the global Class Manager configuration.
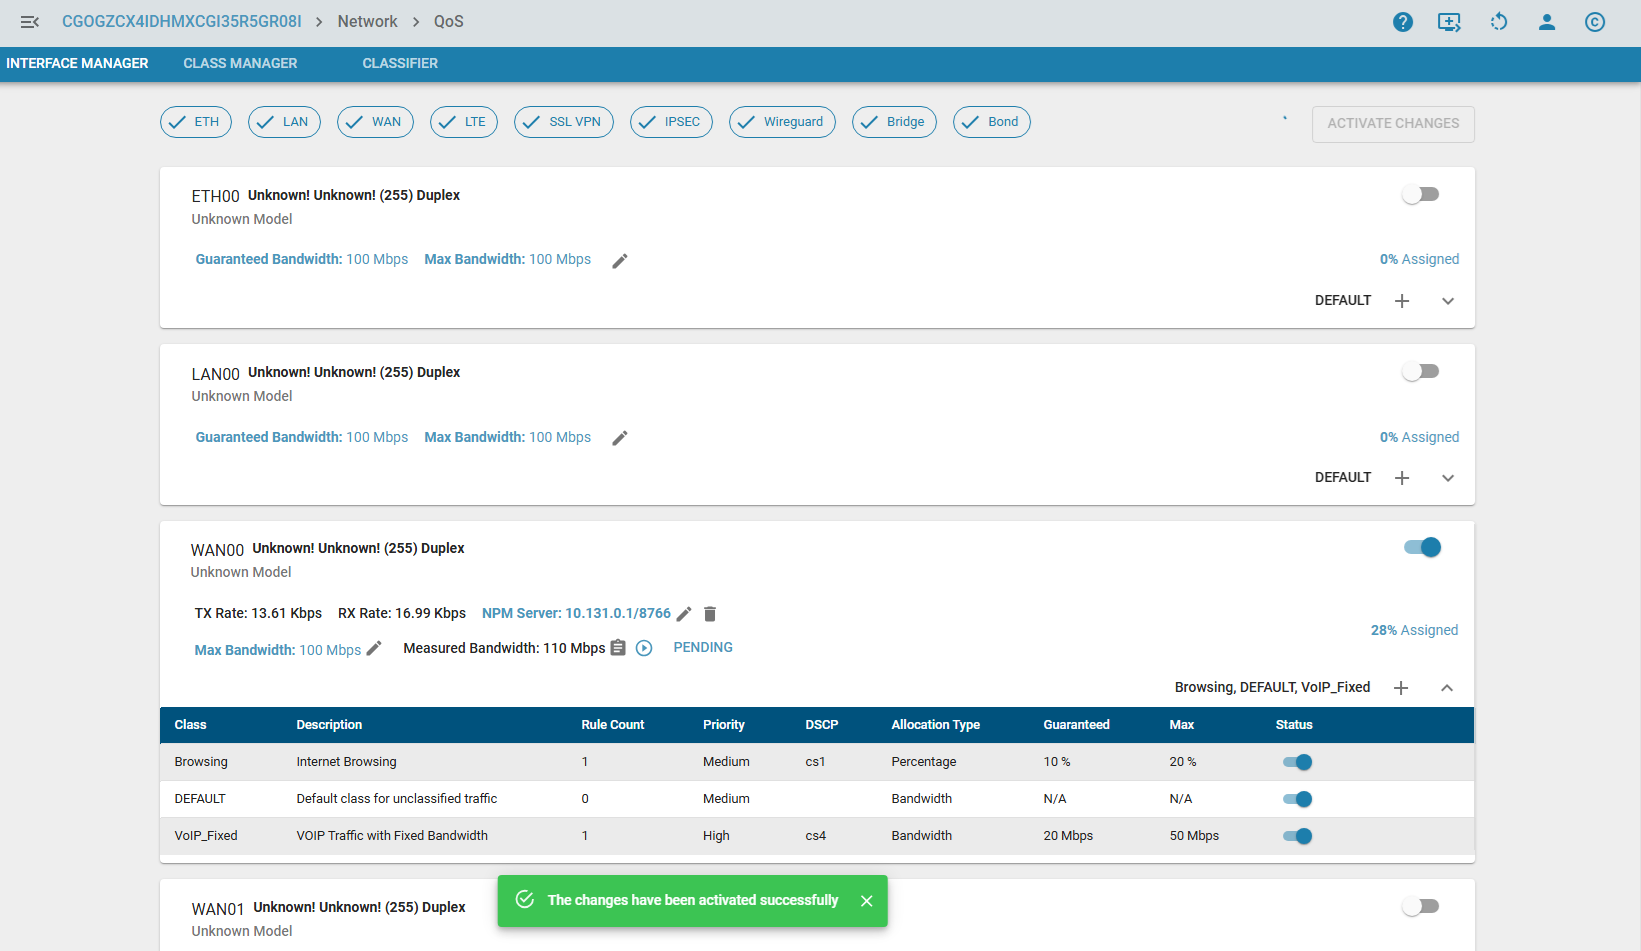
- Activate the changes. The
iicon indicates activation is required.
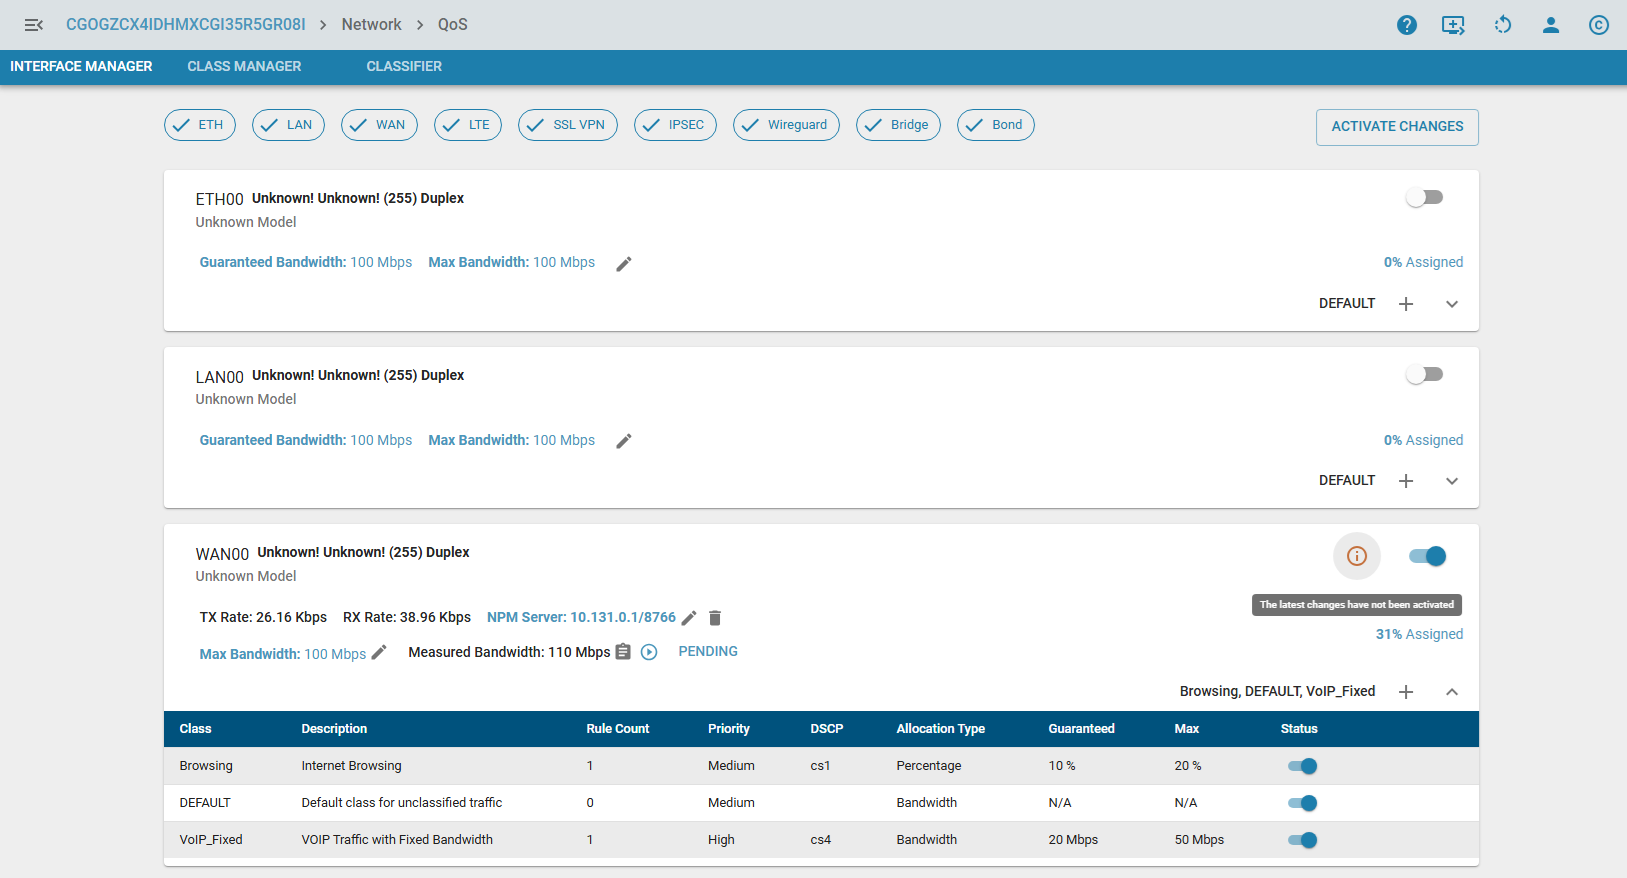
Once activated, the bandwidth allocation logic is applied immediately.
- Enable/Disable QoS globally for the interface.
Or Individual QoS classes also can be enabled or disabled.
Step 4: Set Interface Capabilities & Bandwidth
The Maximum Bandwidth for an interface acts as the ceiling for all QoS calculations. This value is determined in one of three ways, prioritized in the following order:
- Dynamic Measurement (NPM): If configured on a WAN interface, the actual measured throughput (
via active speed testing) overrides all other values.

- Manual Configuration: The user explicitly sets the Maximum/Guaranteed Bandwidth in the Interface Manager.

- Auto-Detection (Ethtool): During system bring-up, the OS detects the negotiated link speed (
e.g., 1000Mbps or 100Mbps).
Note: Make sure all the Bandwidth specified in QoS Class manager is within the limit of an Interface.
Step 5: Configure Network Performance Monitor (NPM)
For WAN interfaces, NPM can be enabled to dynamically measure Bandwidth, Packet Loss, Jitter, and Latency. NPM generates synthetic TCP and UDP load on Port 5206 against a target server.
Prerequisites:
Internet BreakoutMust be configured on the specific WAN interface to ensure the measurement traffic flows correctly through the Gateway.
Configuration Parameters:
- Measure Interval: How often the test runs. Default is 12 Hours. Can be customized.
- Remote Server: The IP address of the target NPM Server.
- Remote Port: The port the server listens on for control commands.
Default is 8766. (Note: The actual data test runs on port 5206).
Firewall Note: If the remote NPM Server is behind a router/NAT, you must forward Ports 8766 (Control) and 5206 (Data) to the server.
- Enable/Disable: Toggle to activate the feature.

NPM States & Operations: On-Demand test can manually triggered by clicking the Play/Run icon.

The status indicator will show:
- PENDING: Waiting for the next scheduled interval or manual trigger.
- NOT READY: Interface is down, NPM is disabled, or current link usage is >50% (tests are
skipped to avoid disrupting user traffic). - RUNNING: Speed test is in progress.
- FAILED: Test failed (e.g., server unreachable).
- SUCCESS: Measurement completed.
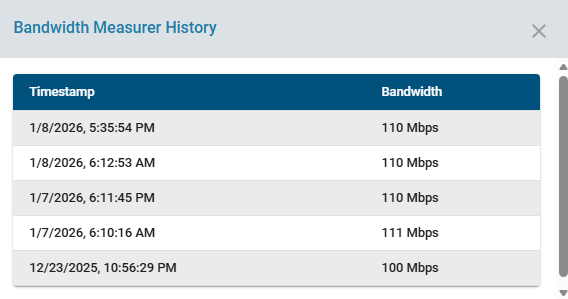
History: Click the Book icon next to the bandwidth value to view historical performance data.
Utility: CPE as NPM Server
A zWAN CPE can act as an NPM Server for other devices.
- Navigate to:
Network --> Utilities --> N/W Perf Monitor - Action:
Enable to Start NPM Server.

Note:
NPM Server/Client Mutuality:If a CPE is running as an NPM Server, it cannot simultaneously be an NPM Client. The NPM configuration options in the Interface Manager page will be disabled.Usage
QoS Class manager is used for Traffic Shaping. Packet belong to particular QoS class can take more precedence and get guaranteed bandwidth when the Interface has more packets to process. QoS class manager helps the Traffic Shaping module to sort the collision and prioritize the packet processing based on priority and bandwidth specified in QoS Class manager.
Known Behaviors & Limitations
- Oversubscription: If the sum of all Fixed Bandwidth classes exceeds 90% of the Interface Max, the system will clamp (reduce) the bandwidth of the lowest priority fixed class to fit within the limit. A warning will be logged.
- Minimum Floor: To prevent calculation errors, the minimum allowed bandwidth for any class is 10 Kbps.
- Atomic Application: When applying QoS changes, the interface may drop packets for a fraction of a second. This is intentional (Atomic Drop) to prevent packet leakage while the kernel switches queuing disciplines.
- Percentage Calculation: "100%" in a Percentage Class means "100% of the Remaining Bandwidth," not 100% of the total Link.
Formula: Class Rate = (Total Link - Fixed Classes) * (Class %)