Captive Portal Manage
Overview
zWAN’s Captive portal / Guest Access (Wi-Fi & LAN) provides a simple high performance, secure internet access.
Scope
The main purpose of captive portal is to block guest users from accessing the internet before they are validated and verified (authenticated) by the system, Users who are directly connected to the switch/port are authenticated via the captive portal before they can access the network.
Physical Environment / HW Dependencies
•zWAN Router with LAN Port and AP Wi-Fi
•ISP
•zWAN DNS
•VLAN not supported
•BOND not supported
  •IPv6 not supported
Configurations / SW Dependencies
Software Requirements: NodeJS,lighttpd,zID,OAuth,PassportJS & SQLite DB
zWAN FW version above 1.3-05xx
Security
- REST communication with JWT Authentication
- HTTPS for UI
Compatibility
Web interface will be compatible with the following browsers:
- OS Above Windows 10 1803
- IE 11.0 and later
- Firefox 17.0 and later
- Chrome 33.0 and later
The interface (LAN/Wi-fi) is set in a captive-portal-enabled state so that all network traffic coming to it from the unauthenticated user (client) is dropped when the unauthenticated user tries to connect to the network, their HTTP traffic is redirected to zWAN Captive authentication page, using AD/Local/zID users are validated and the corresponding QoS setting is applied based on user profile.
Overall Architecture

-Enable Captive:Without completing 'Configure Captive' with anyone of the AuthType or adding atleast one locaUser the 'Enable Captive' option will be in default state in 'Interface' page.
OAUTH-zID
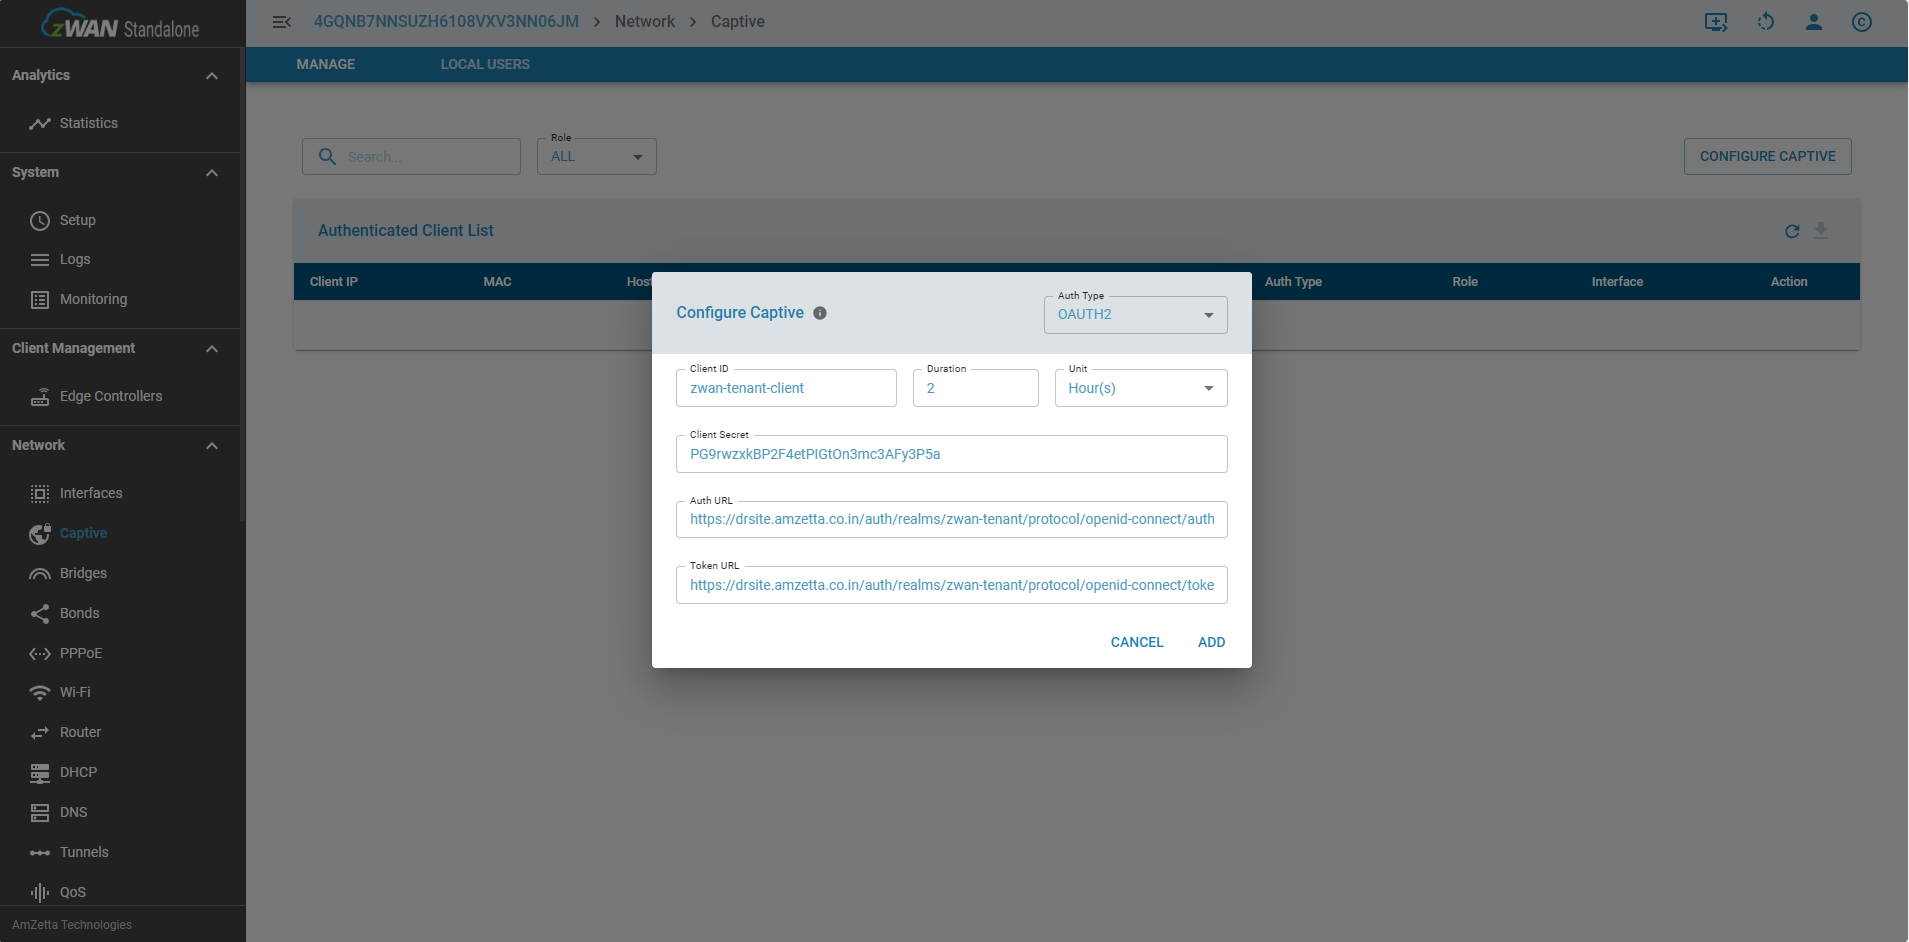
- Once logging in to standalone UI, To configure captive portal, we need to enter the zID configuration info by selecting the ‘Configure Captive’ menu as shown in the image

- Fill in the appropriate details of zID info in the menu
- To fill in the zID configuration details, which can be taken by logging in zID portal as shown in the image

- Once logged in zID portal,select the respective tenant/realm from the dropdown as shown

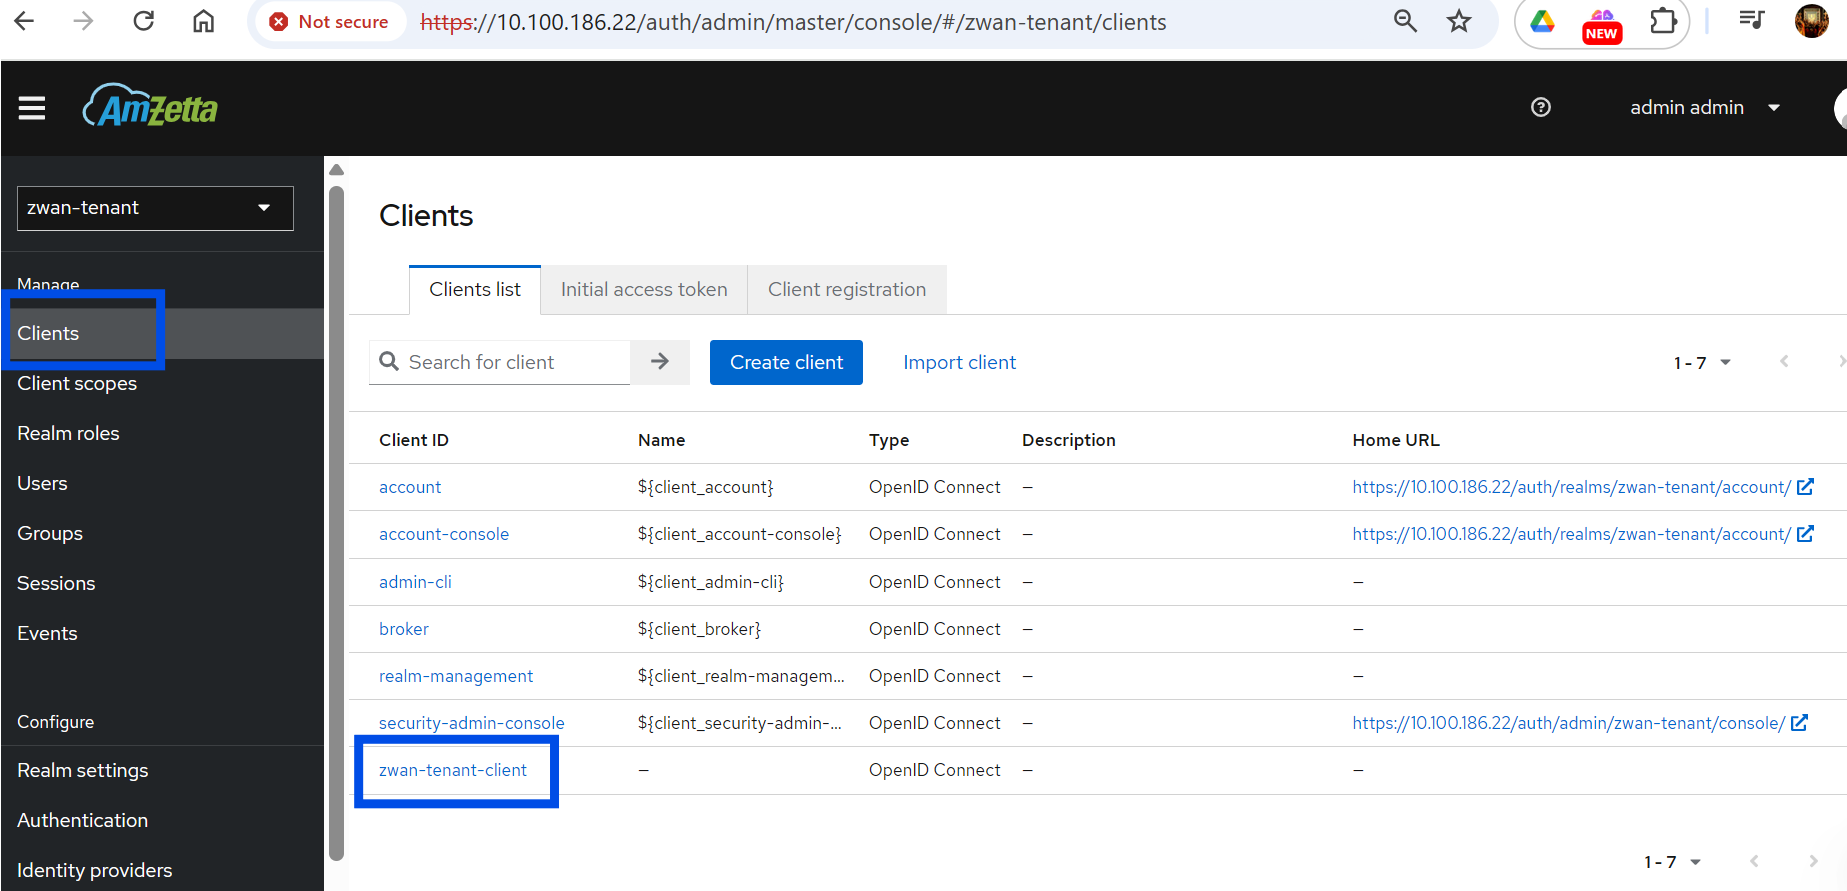
- Get the 'clientID' as shown below from the settings tab
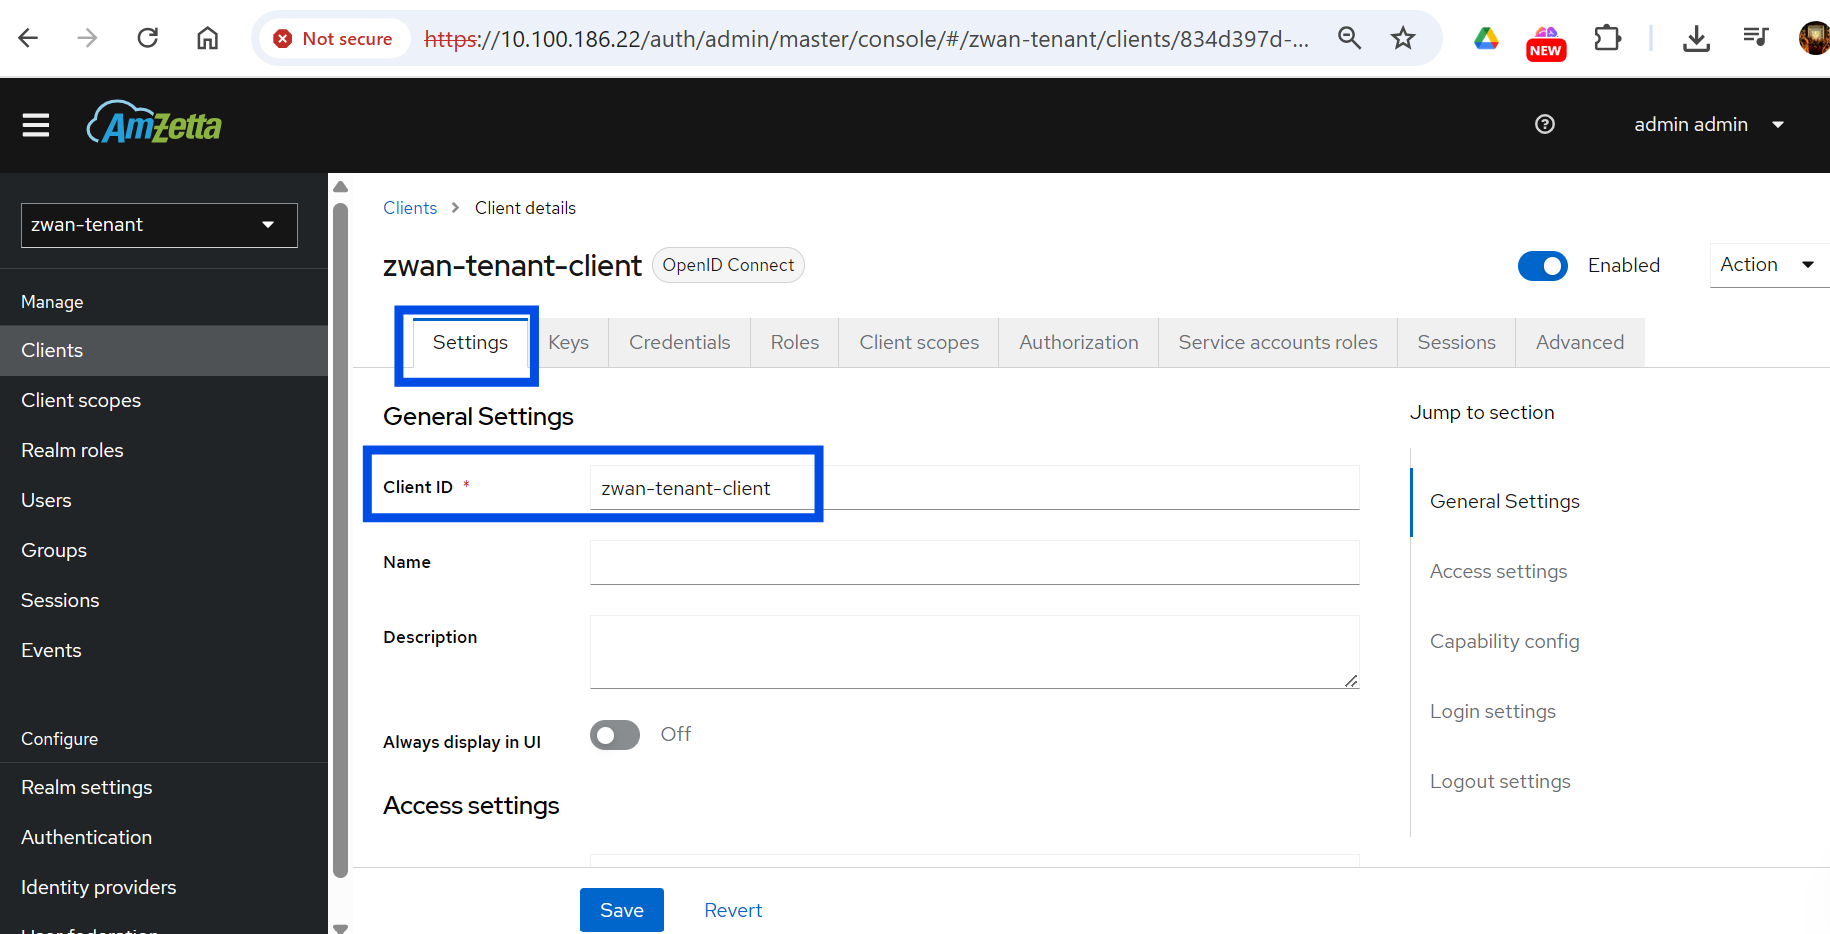
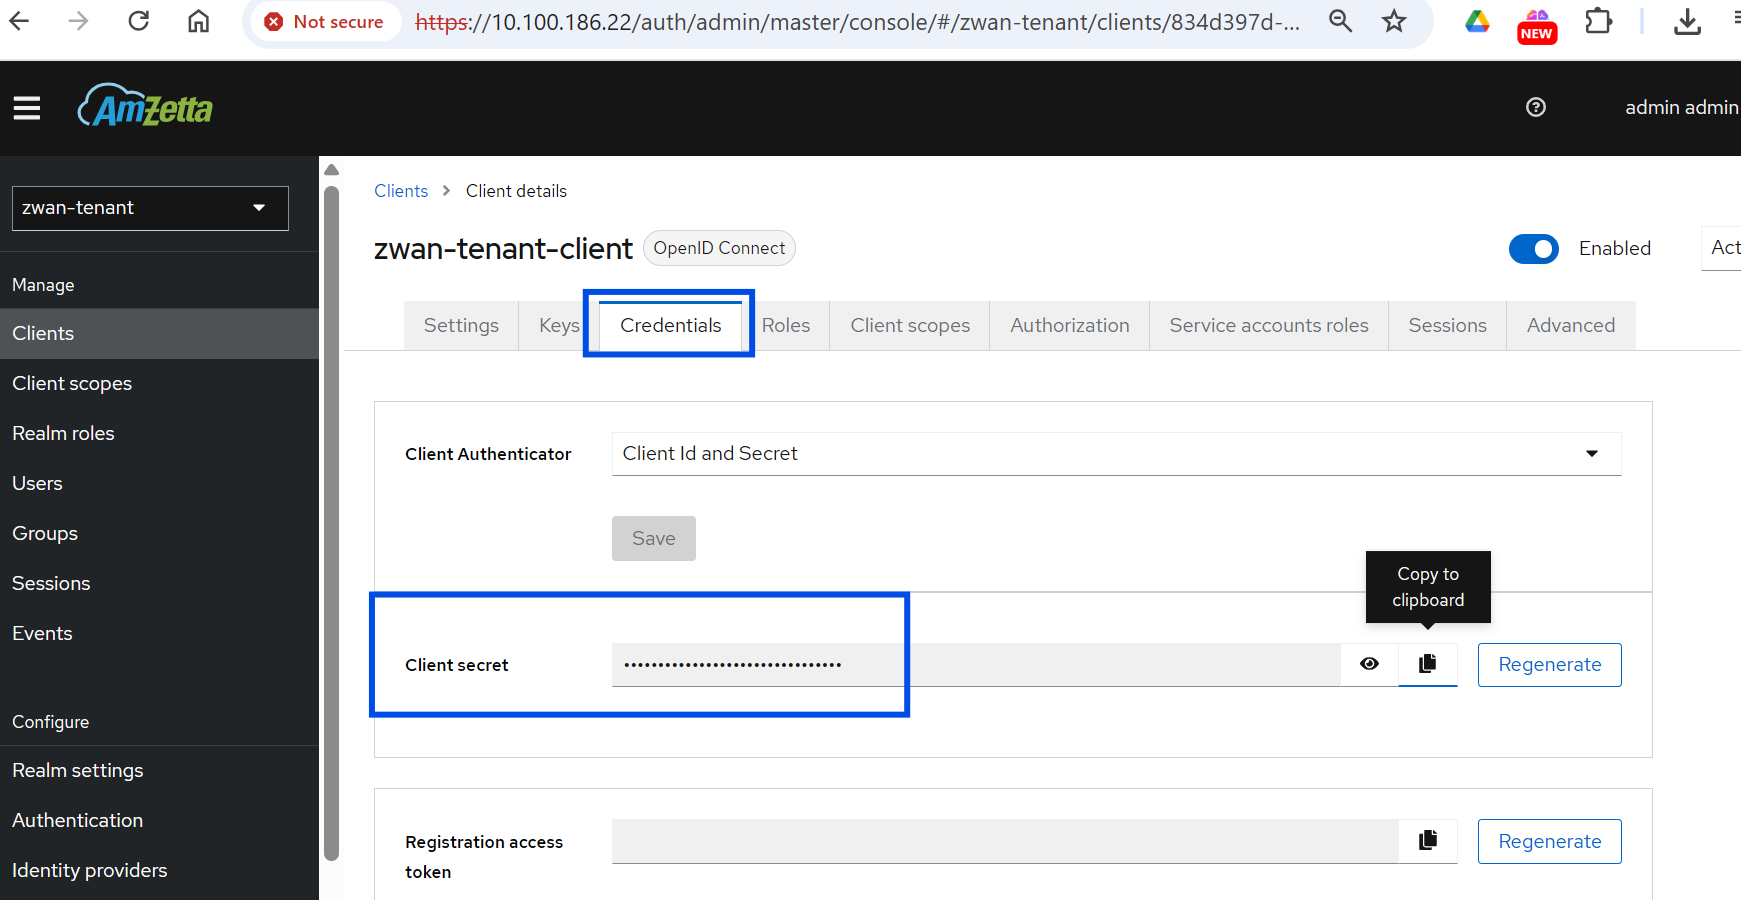
- Get 'client Secret' from credentials tab as shown below
- For getting the Auth,token and User pofile URL select 'realm settings' and look for 'openID endpoint configuration' with a .well-known/openid-configuration under general tab as shown below

- A new tab with config json will open select the 'pretty-print' option and look for 'authorization_endpoint','token_endpoint'.
copy the two URL's.
- Once all the required field's data is collected paste them in the appropriate fields and click 'Add' which will give you a success message as shown below
Auth Type = OAUTH2,
Auth URL = authorization_endpoint,
Token url = token_endpoint.
TimeOut Format
When a auth-type/localuser is created, each user authenticated through that auth-type will be allowed a max duration of 24 days for a login, which can be extended any number of times, below is the format
Maximum timeout values by unit:
Seconds: 2073600 seconds
Minutes: 34560 minutes (24 days)
Hours: 576 hours (24 days)
Days: 24 days
freeRADIUS-zID
After successfully configuring the zID server details, users connected through freeRADIUS-zID can also be fetched thru zID but only flat-file users alone can be synced.
login thru zID and select the respective tenant and create a realm-role for radius as shown below

For a more detailed explaination, pls refer the doc below
Users fetched from freeRADIUS need to once login in their zID to select ROLE for captive portal access
AD
- Once logging in to standalone UI, to configure Active Directory, we need to enter the AD server settings info by selecting the ‘Configure Captive’ menu as shown in the image
- Fill in the appropriate details of AD server info in the menu.

LOCAL USERS
Single User
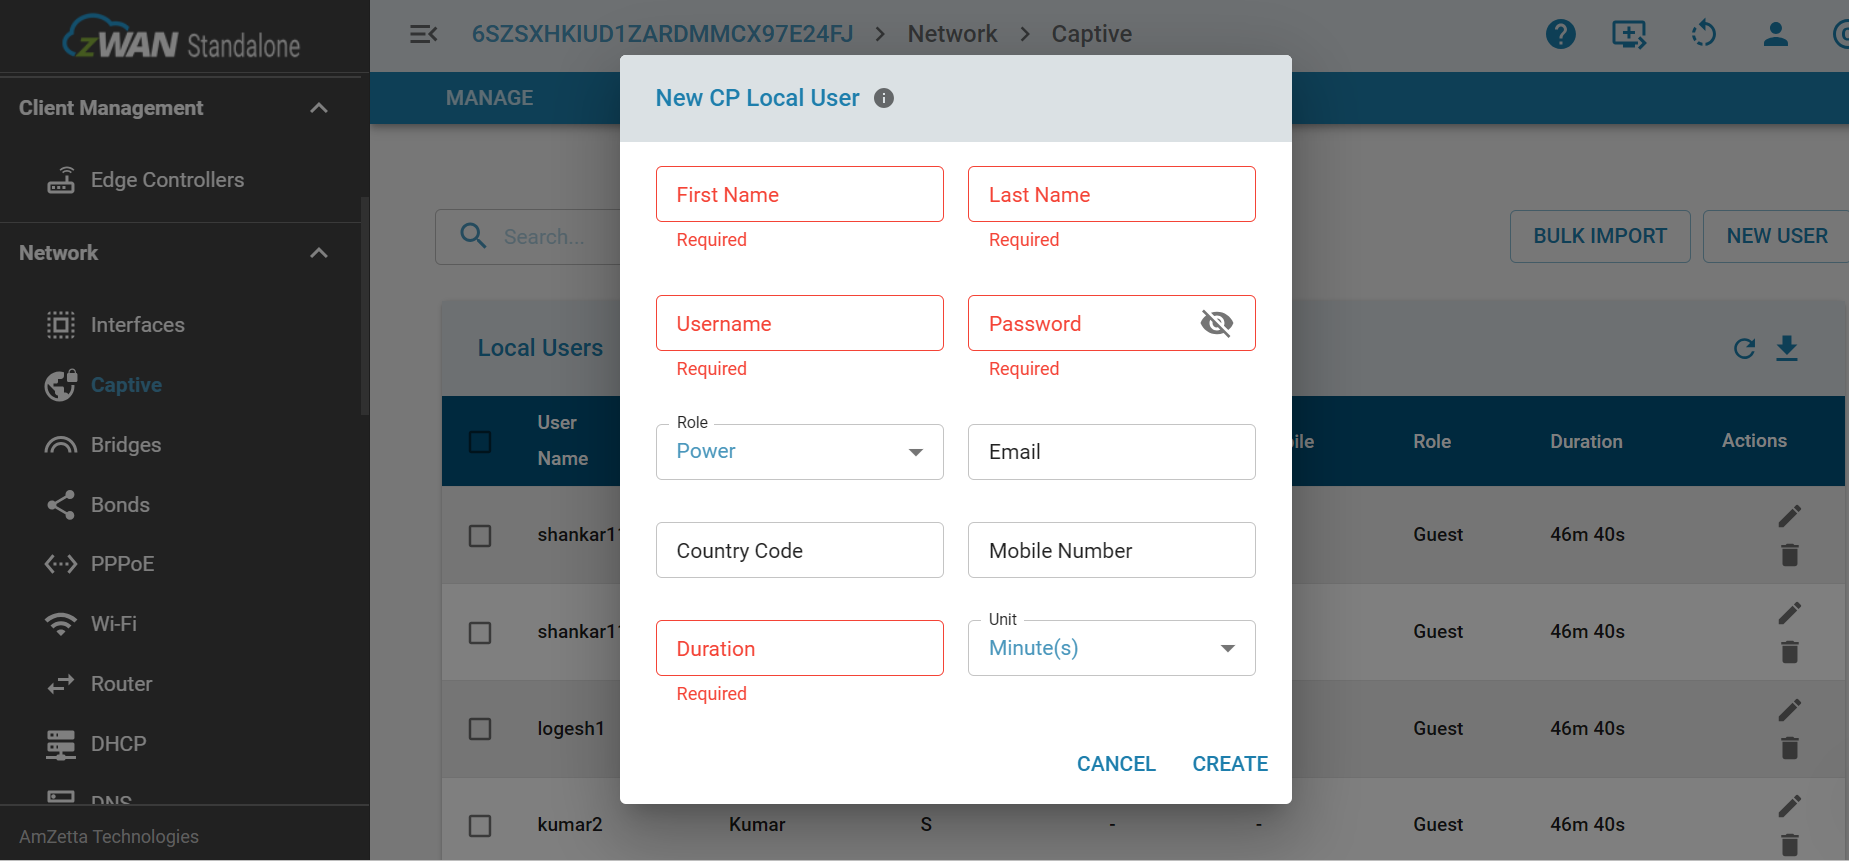
Users can also be added locally which will be saved in our local db. In 'LOCAL USERS' tab click 'NEW USER' which will show a pop-up dialogue box as shown below. Once all the required fields are enetred a new local user will be created
User Name,First Name,Last Name ==> Only alpha_numeric, up to 16 characters
Bulk Insert Local Users
Users can also be bulk inserted by selecting 'BULK IMPORT' option as shown below, once the 'download sample option' is clicked a .csv file named 'sample_users_template.csv' will be downloaded with sample data. Make sure you have filled the mandatory appropriate data User Name,First Name,Last Name under the appropriate headers only
Password will be created with a default password as 'pass@123'
Role: will be assigned to 'Guest'
Duration: will be assigned to '45mins'
Users can further search a particular user and update as needed.

Captive setting
- After successful configuration of zID or AD, In the interface menu select the LAN for enabling captive portal as shown
Captive portal is enabled here by selecting the respective interface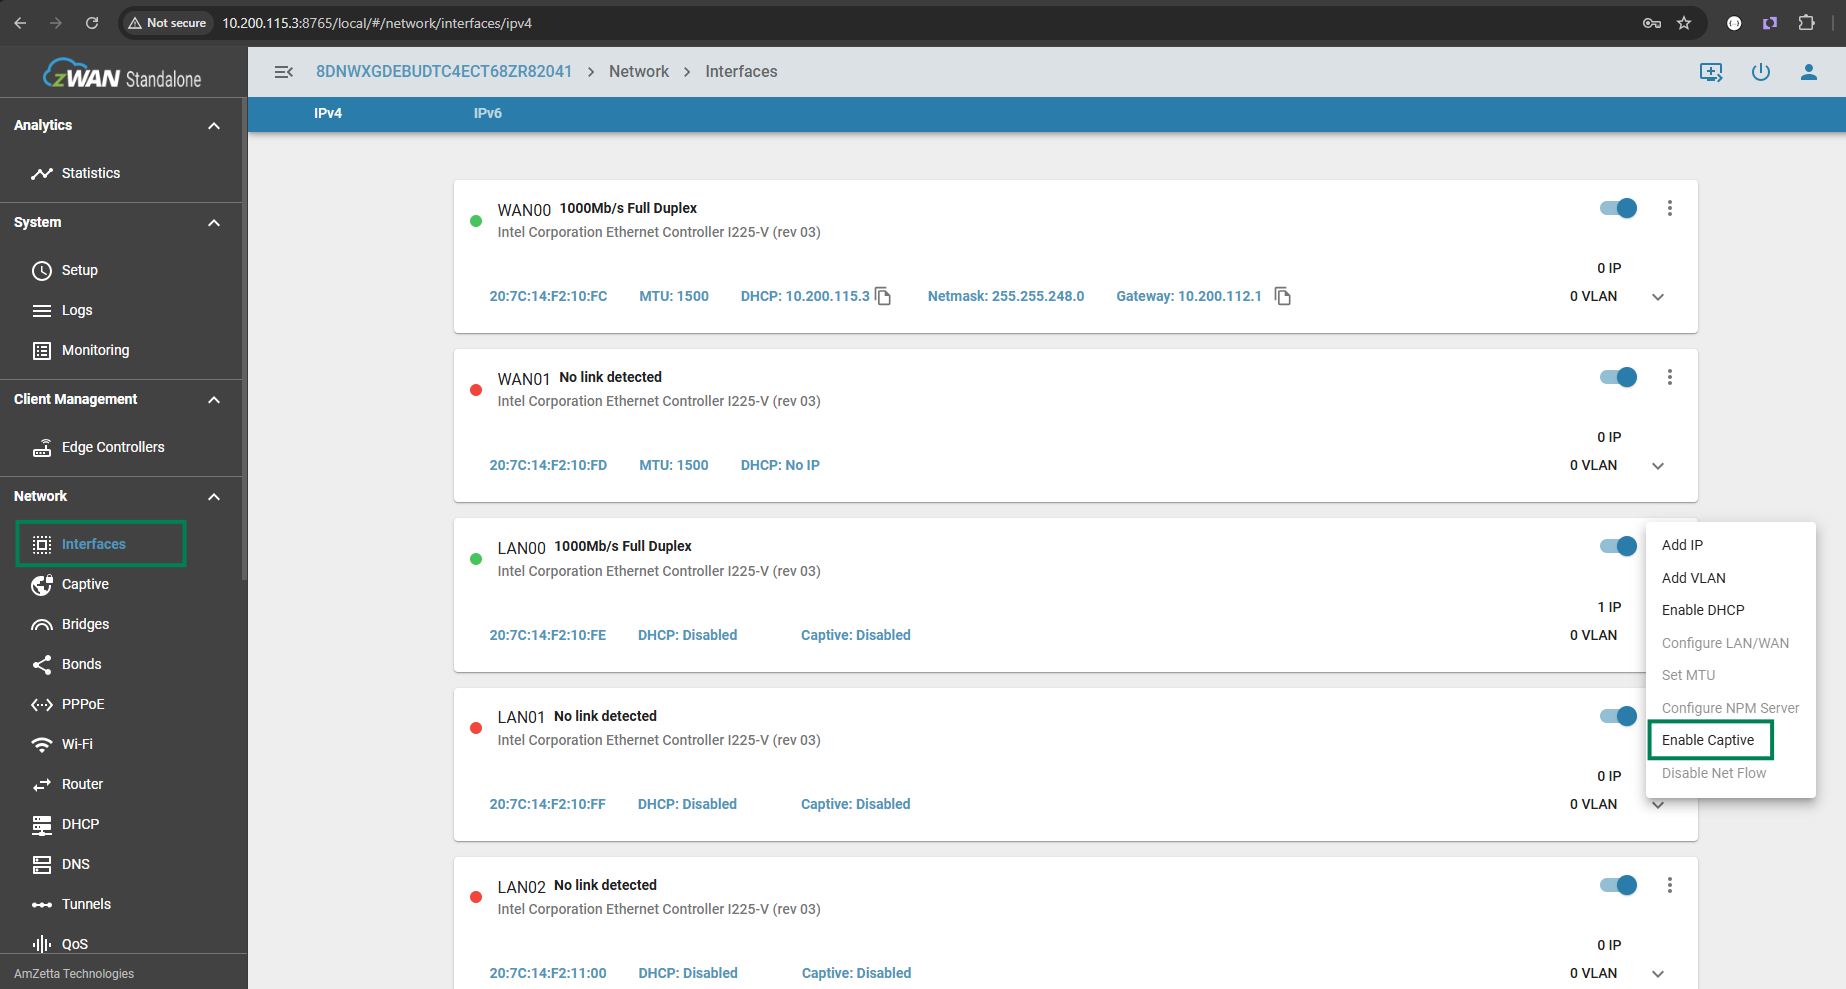
- Find the status of the captive portal once the process is completed
QoS setting
- Update the class manager with the specific DSCP and bandwidth for the respective role as shown below
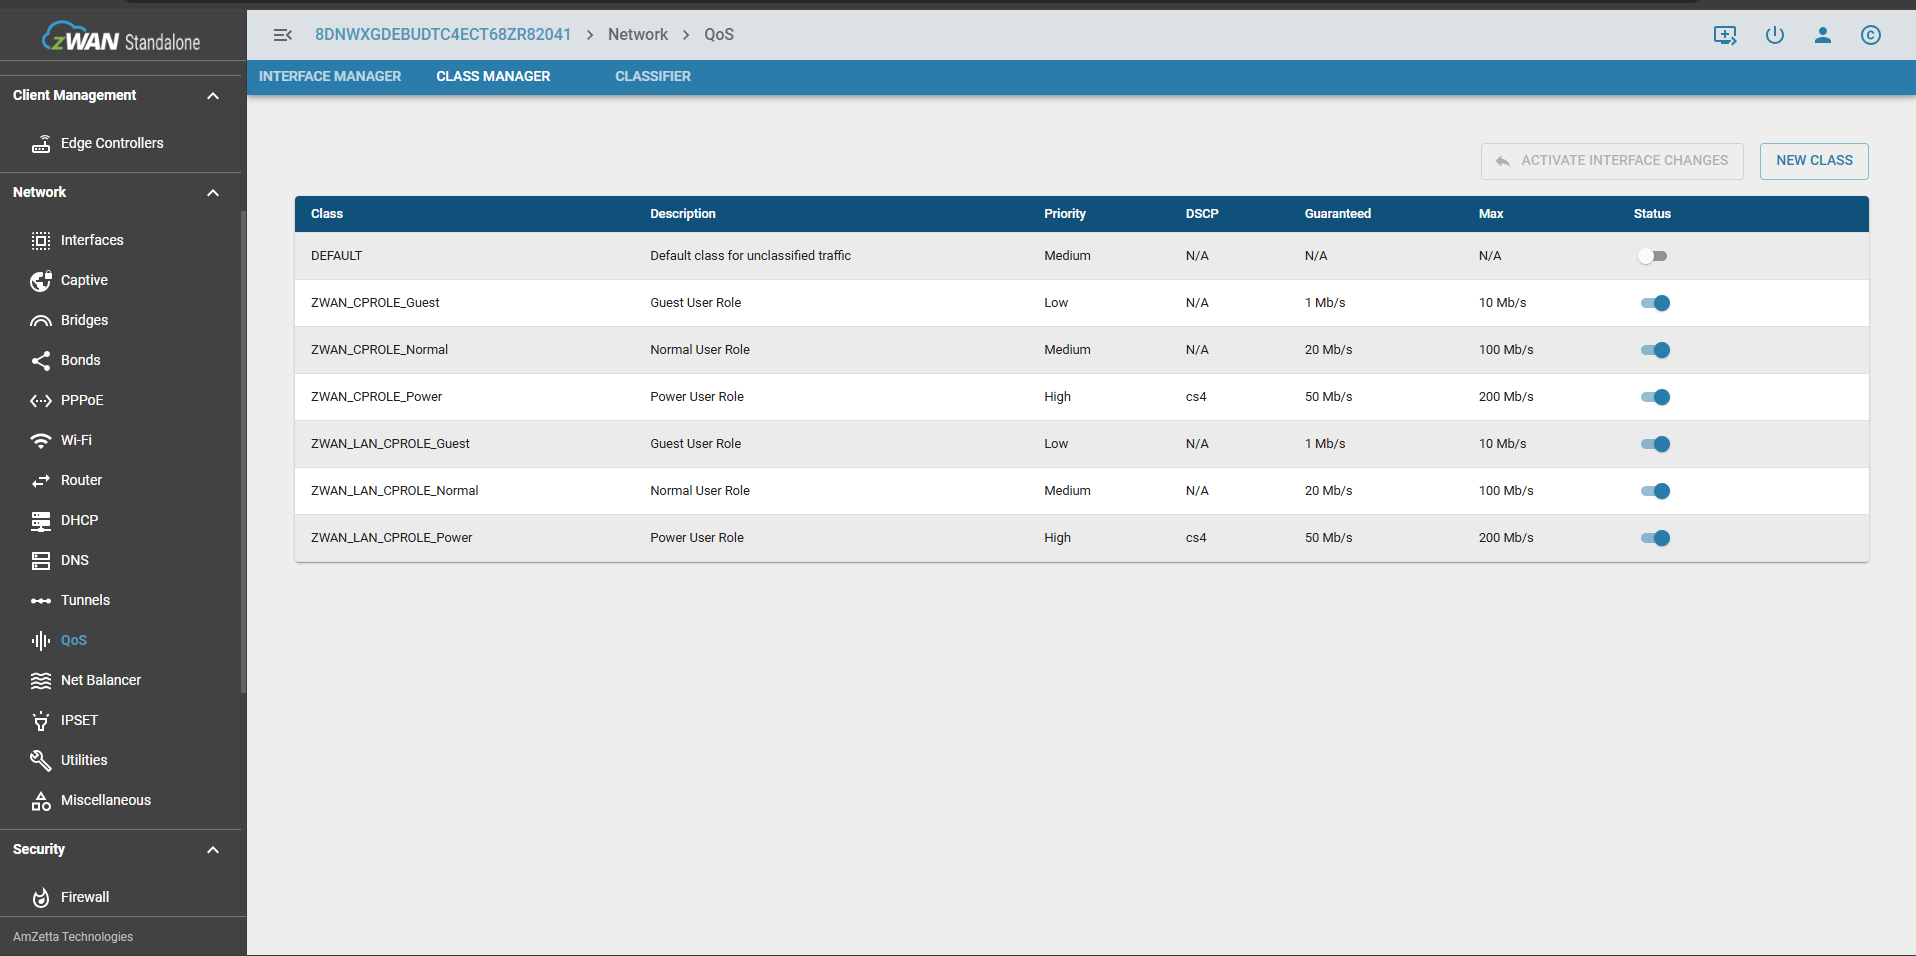
- Traffic prioritization rules are configured here for the respective QoS classes
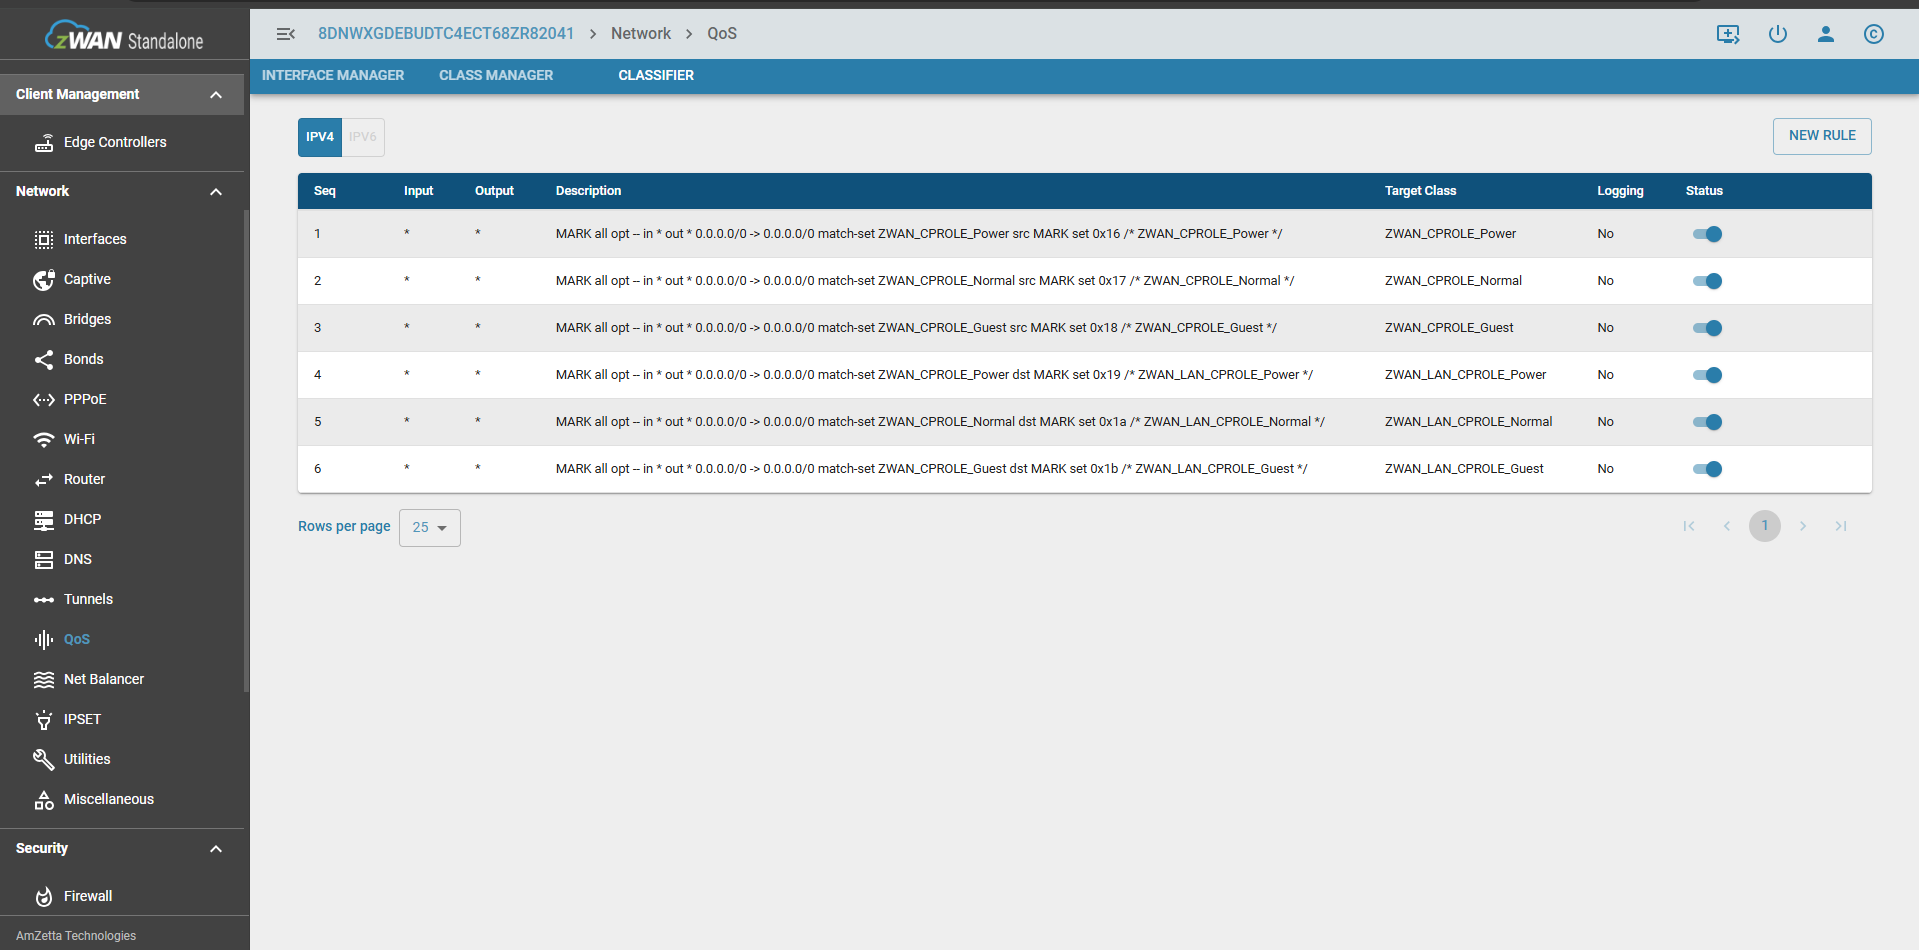
- All the WAN Interfaces are applied with the class managers source IPSET and all the LAN interfaces are applied with the destination IPSET

Client
Redirection-Windows
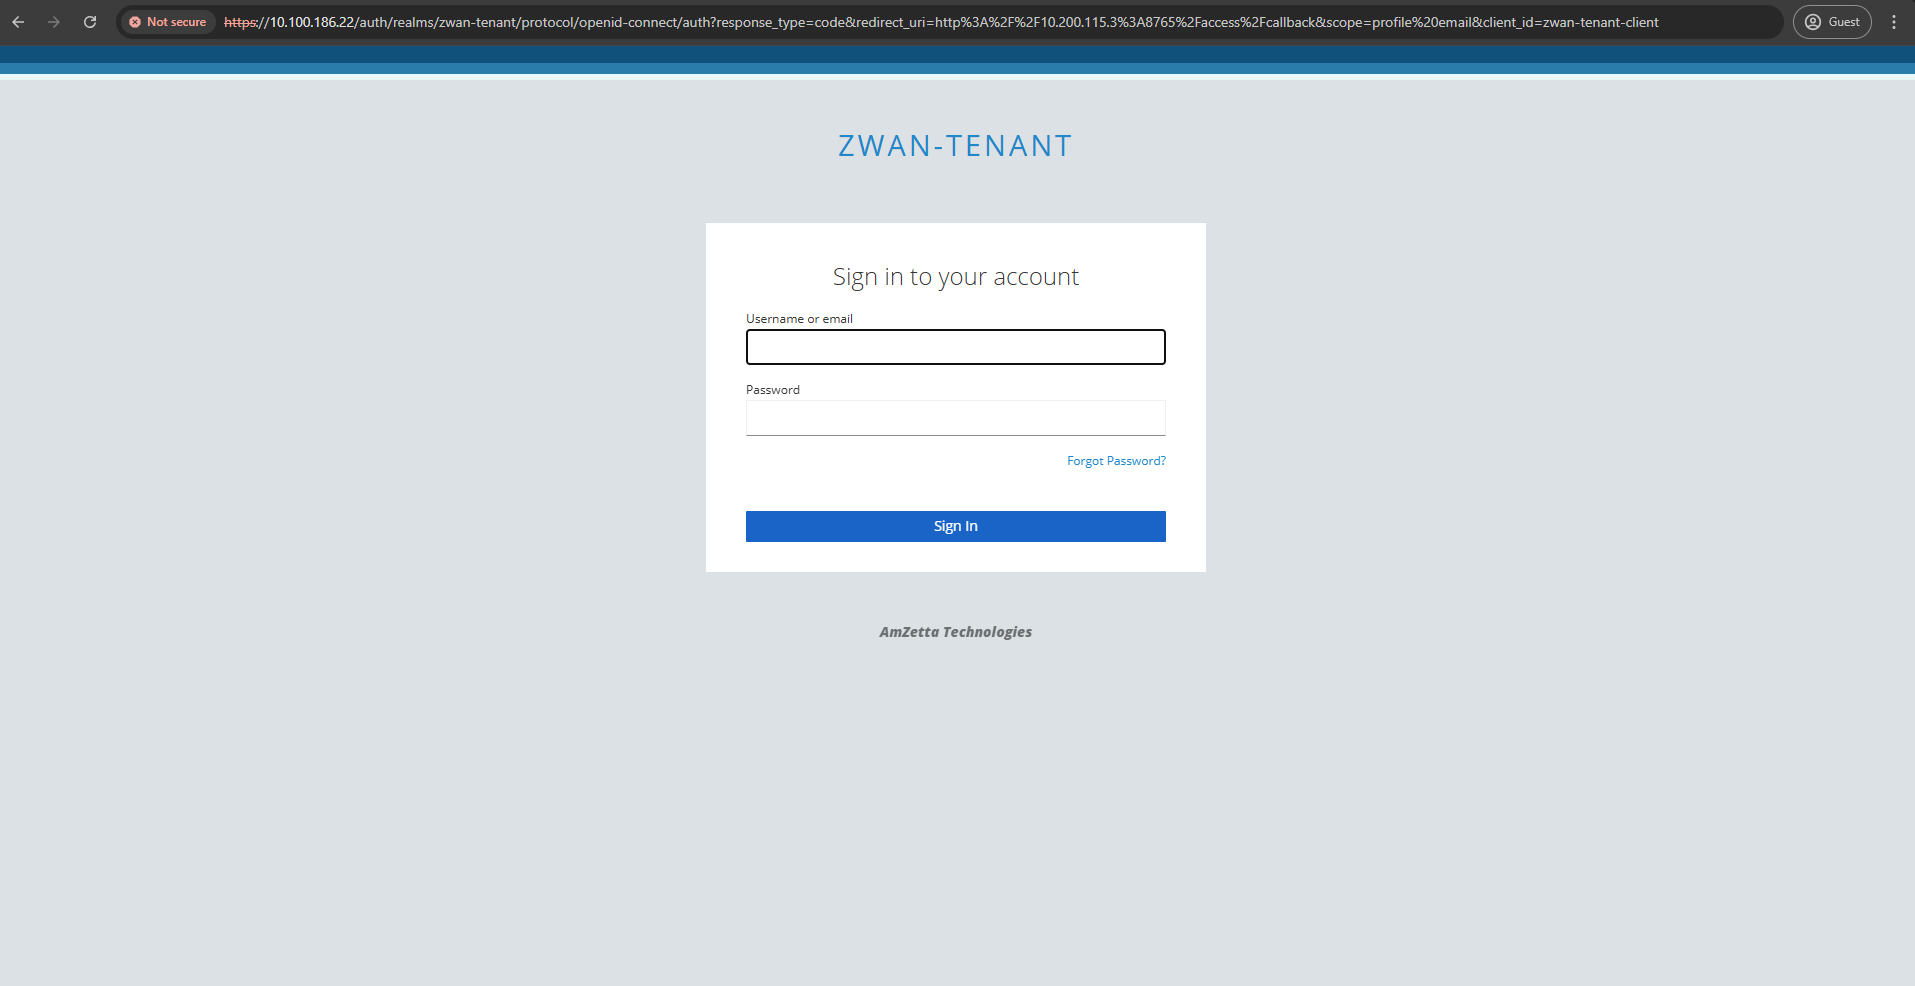
Once connected to Captive Network windows will open the default browser and will try loading http://www.msftconnecttest.com/redirect

which intern redirects to https://zwan-sdwan.local/access
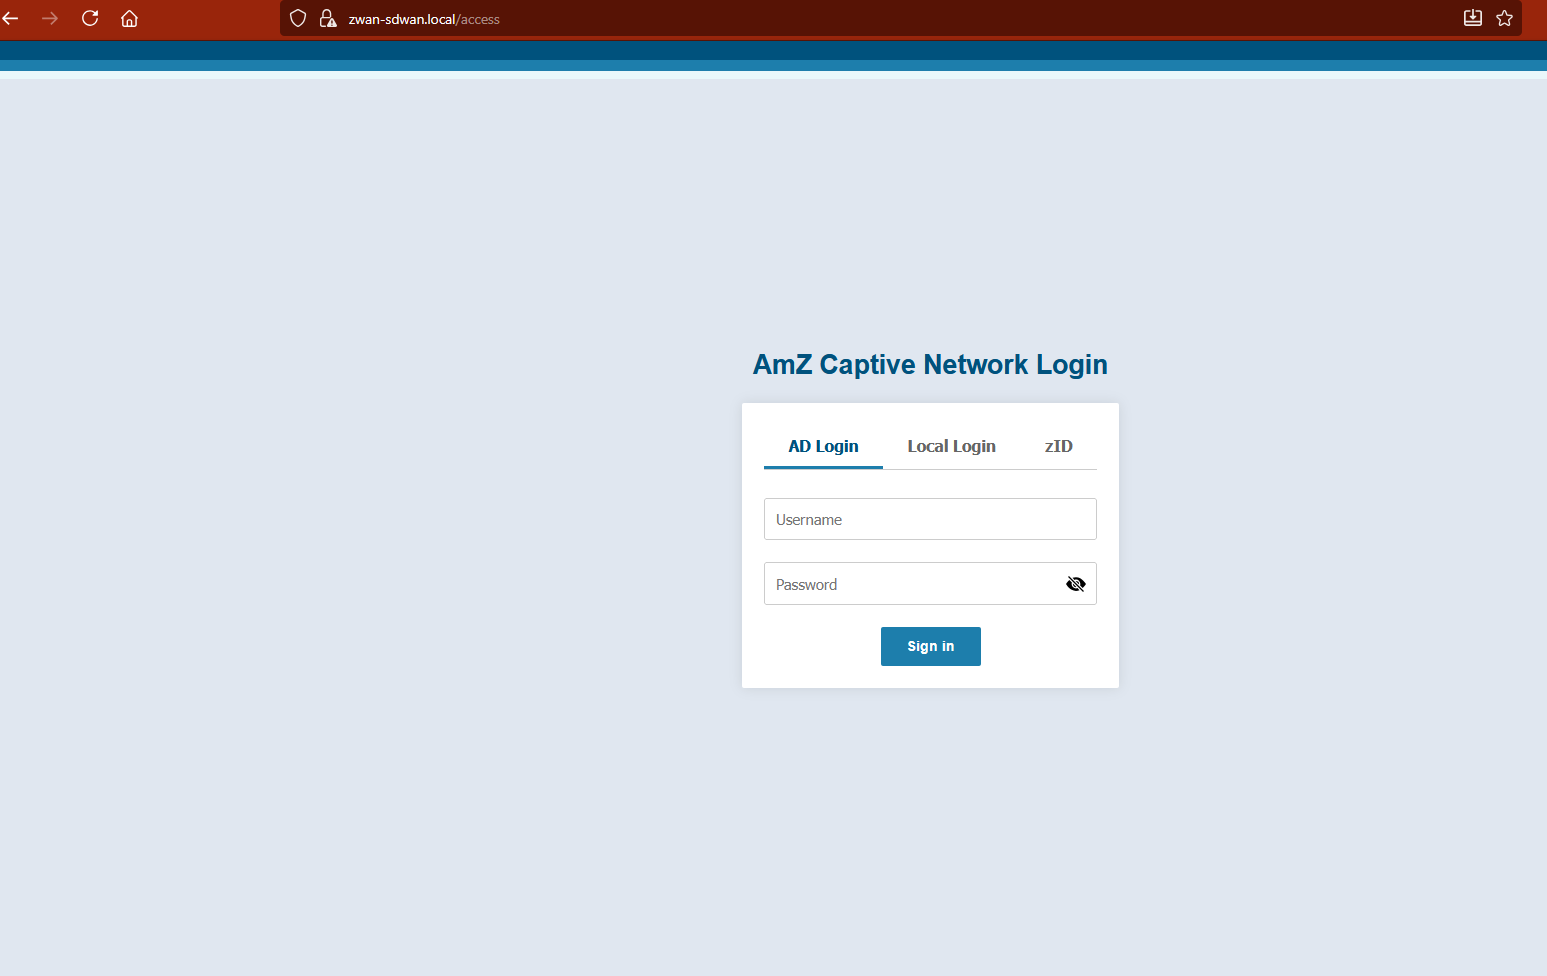
Pls select your preferred login method - AD or zID or LocalUser
- zID Session logout
Once a user is successfully authenticated in zID, after 5 secs the success page auto-redirect to login page by which we will do a session sign-out in zID for that particular login user
Starting with Windows 10 1803+, Microsoft added limited native mDNS support, but to access a .local page on Windows, you need mDNS support (either built-in or via Bonjour), because .local domains are resolved using Multicast DNS, not standard DNS.
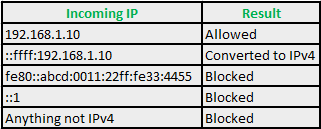
- Client-IP
zWAN Captive portal only supports IPv4 IP's and if the client IP is in IPv6 format it is converted to IPv4
if it is a IPv4-mapped address, other format are rejected.Below is the IP format accepted during authentication
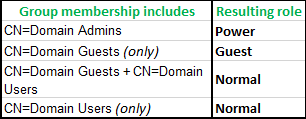
- AD User Role Mapping
Below mapping shows where users needs to configured in AD for accessing different userRole in captive portal
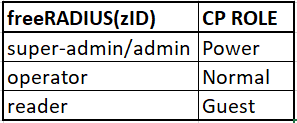
- zID/freeRADIUS User Role Mapping
Below mapping shows where users needs to configured in zID/freeRADIUS for accessing different userRole in captive portal
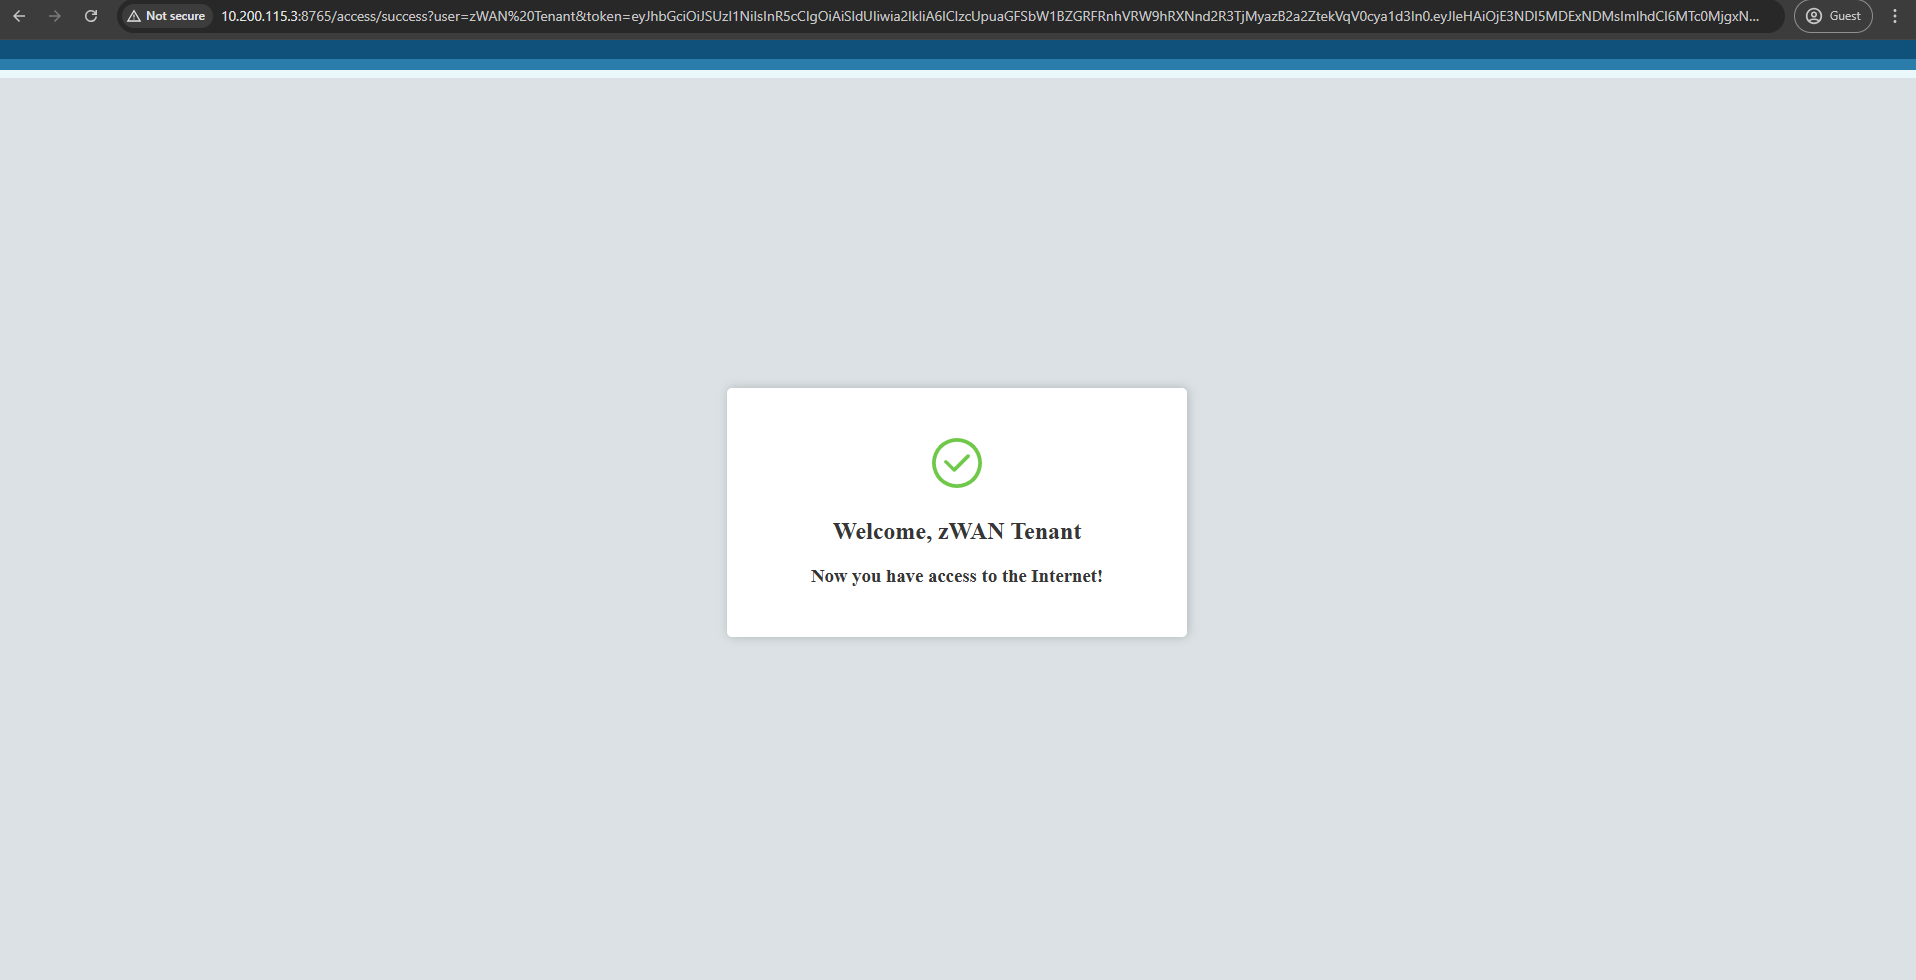
- Successful Authentication
Once authenticated successfully user will be allowed to access the internet
- Device-OS
zWAN captive portal detects the following device OS type after successful authentication as per details given below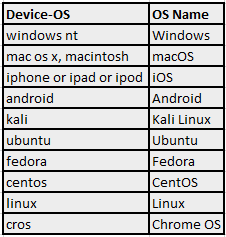
- Ethernet icon shows "No Internet Access"
Since windows network takes some time to acknowledge the new network, any possible reasons found as below
When connecting to a captive portal network via LAN in Windows 10/11, the delay in displaying the network icon in the system tray is due to several factors related to how Windows handles network detection and authentication. Here’s a concise explanation of the reasons:
Network Detection and Negotiation:
Windows 10 performs a series of checks to identify the network type (e.g., public, private, or domain) and establish a connection. This includes obtaining an IP address via DHCP, which can take a few seconds, especially if the network infrastructure is slow or congested.
Captive Portal Detection:
Captive portals require authentication (e.g., a login page). Windows uses Network Connectivity Status Indicator (NCSI) to probe network connectivity by attempting to access a Microsoft server (e.g., http://www.msftconnecttest.com/connecttest.txt). If the probe is redirected to a captive portal login page, Windows detects this and may delay updating the network icon until the authentication process is complete.
LAN-Specific Behavior:
Unlike Wi-Fi, LAN connections are assumed to be more stable, so Windows may prioritize verifying physical connectivity and link status before updating the UI. This can cause a slight lag in reflecting the connection status in the system tray.
System Tray Icon Refresh:
The network icon in the system tray is updated by the Windows Shell, which may not refresh instantly. The delay can be exacerbated by system resource usage, background processes, or a slow response from the network stack.
Captive Portal Redirect Handling:
After connecting, the browser or system must handle the captive portal’s redirect. If the portal’s response is slow or the login page takes time to load, Windows may delay updating the network icon until it confirms full internet access.
Firewall or Security Software:
Third-party firewalls or antivirus software can interfere with network detection by scanning or filtering traffic, adding to the delay
Redirection-KaliLinux Once connected to Captive Network ubuntu and kaliLinux handles in their own way as shown below
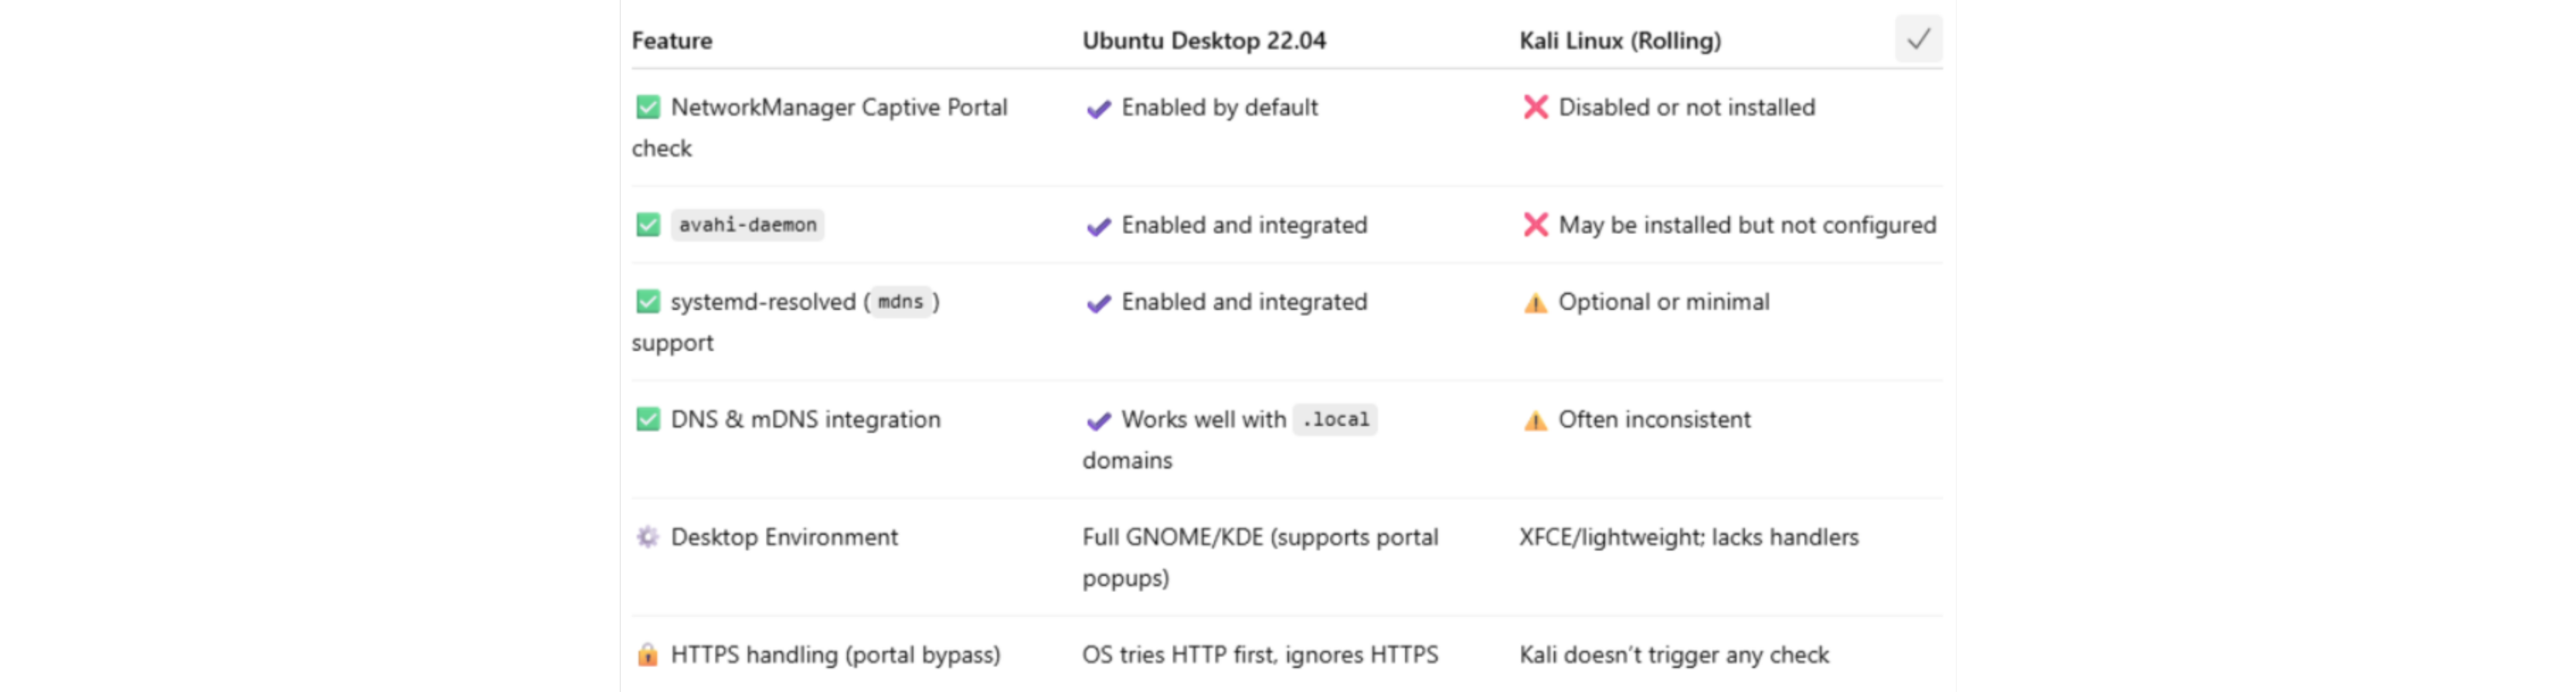
Redirection-Ubuntu-18 & 22 Redirection to Captive Network for ubuntu 18 and 22 has a minor but significant differences

Redirection-macOS Wi-Fi clients will be automated to our landing page but not in LAN, This is a classic behavior difference between Wi-Fi and Ethernet (LAN) connections in how captive portal detection is triggered on macOS.
When a device connects to a Wi-Fi network, macOS automatically probes for internet access using a known URL like:http://captive.apple.com/If the response isn’t what Apple expects (a 200 OK with specific content), it assumes there's a captive portal, and launches the Captive Network Assistant window.
This detection happens only for Wi-Fi by default.On Ethernet (LAN), macOS often does not perform captive portal detection automatically.Android OS-Type For android devices Certain occasions after a successful authentication, OS Type might get displayed as 'Linux' - to avoid this users can do the changes in
settings->Privacy of the captive network's SSID by disabling 'Use randomised MAC' and disabling the 'Send Device name' options, Your device will send the actual MAC id and device name.- In the Client side, user will be prompted to enter the credentials:
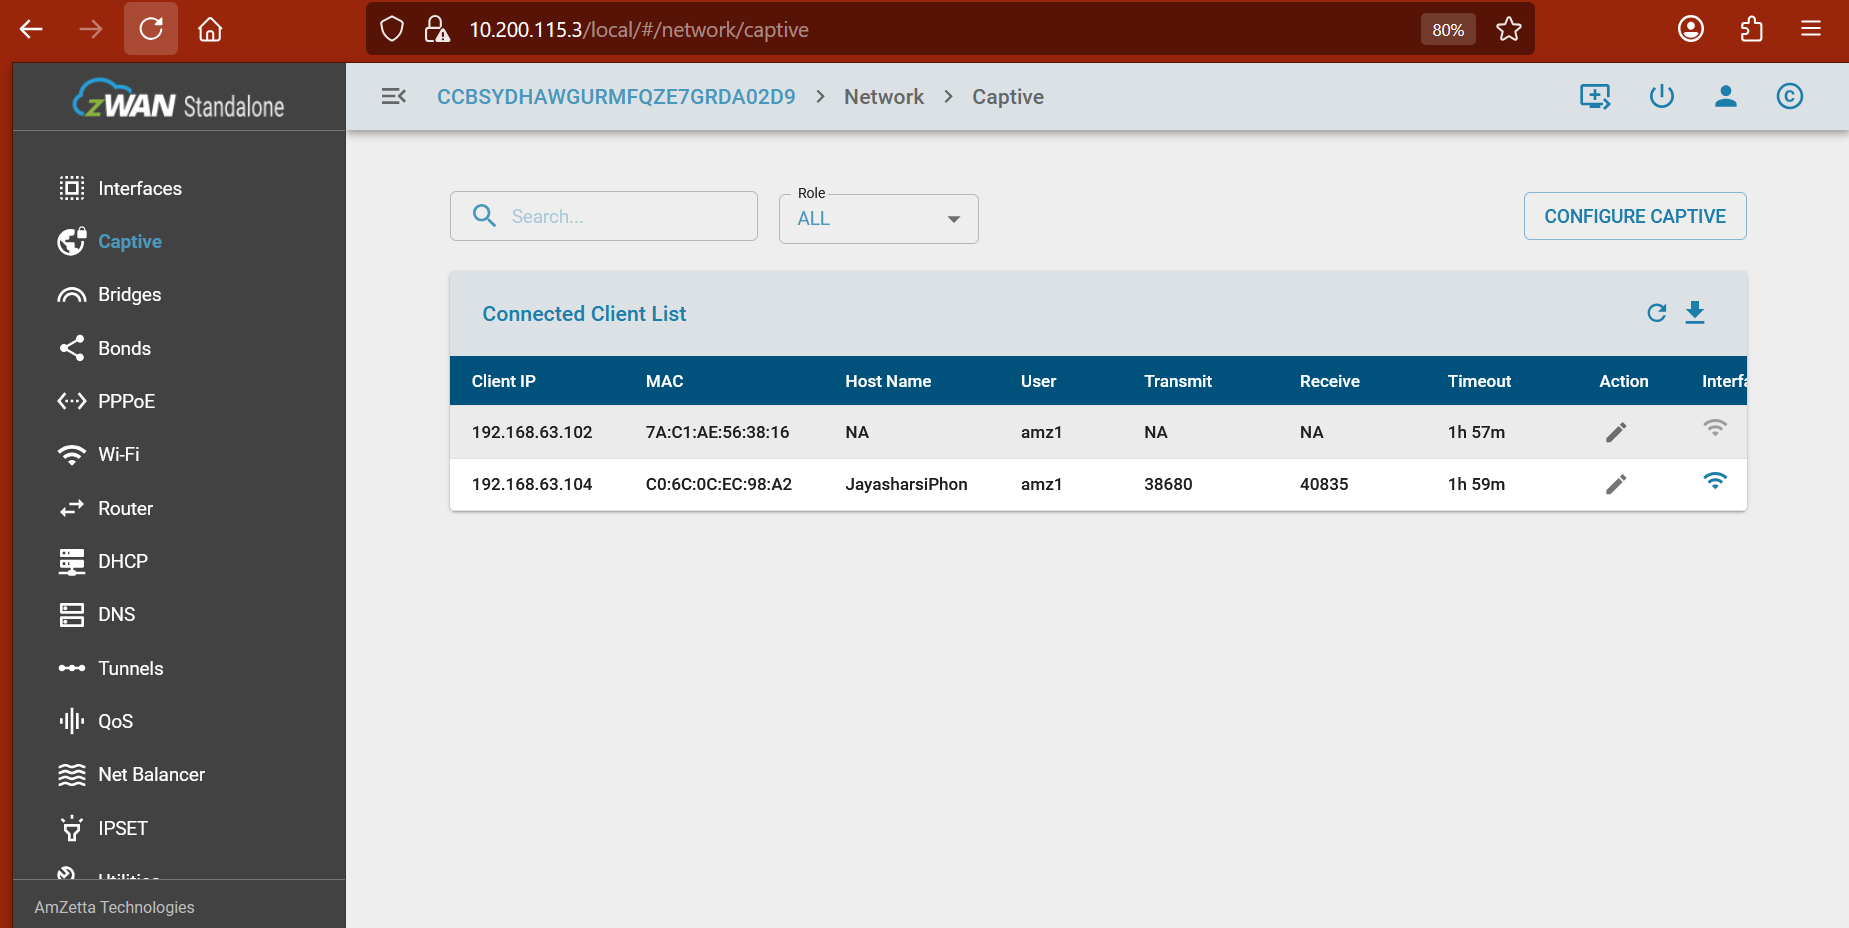
- Role based connected clients
All the connected client’s details will be displayed role wise

- iOS-HostName
It’s likely due to privacy features in iOS that limit the sharing of device information such as host names on Wi-Fi networks. The most common reason is that the “Private Wi-Fi Address” feature is enabled on your iPhone, causing it to randomize its MAC address and not consistently report a host name to the network.
to resolve this:(iOS 14 or later)1) Go to your iPhone’s Wi-Fi settings.
2) Tap the “i” next to the Wi-Fi network you are connected to.
3) Disable “Private Wi-Fi Address.”
4) Reconnect your iPhone to the captive network.
iPadOS: The feature is present starting from iPadOS 14 and later, and works almost identically to how it does on iPhone.
macOS: The feature is available from macOS 14 (Sonoma) and newer. You can toggle Private, Fixed, or Rotating modes on a per-network basis from macOS 15 onward
Backend will have the OAuth/AD/LocalUser server which is running with passport.js node package and having data communications between CPE & UI
zID/AD/Local_User will manage user profile.