-
SnapOS
-
-
- Articles coming soon
-
-
-
- Citrix HDX + USB Headset (Call-Center Baseline)
- OS/Firmware Update & Rollback
- Power Management and Session State
- Wi-Fi Roaming & Link Change Mid-Session
- Kiosk / Assigned-Access Auto-Launch
- Barcode Scanner (HID) with Line-of-Business App
- Printing to Local USB & Network Printers
- USB Device Management – Block Storage
- Multi-Monitor & 4K Performance
- Microsoft AVD/RDP + Teams Optimized Video
- VMware Horizon + Smart Card / CAC Login
-
-
-
-
zWAN
-
-
-
-
- Firewall & Layer 7 Application Filtering
- VPN Site-to-Site Tunnel Setup & Connectivity (z40 to Cloud vGR)
- Intrusion Prevention System (IPS) / Intrusion Detection System (IDS) Testing
- DNS Filtering
- DDoS Protection & Logging
- MAC Address Filtering & Geo-fencing
- Application Control & Protocol Blocking
- Authentication & Access Control (zID)
-
- WAN Link Failover & Load Balancing (ACI Mode)
- Dynamic Path Selection & Application-Aware Routing
- SaaS & Internet Breakout Validation
- QoS for Microsoft Teams (Datacenter vGR + Branch z40)
- Tunnel Failover (z40 ↔ vGR) — WAN00 (wired) primary, WAN03 (4G) & WAN04 (5G) backups
- IP Routing & Static Route Steering (z40 Branch)
- VLAN & Layer-2 Bridging
-
-
-
-
-
-
- Articles coming soon
-
-
-
-
- Articles coming soon
-
- Articles coming soon
-
-
-
-
-
-
- Articles coming soon
-
- Articles coming soon
-
- Articles coming soon
-
- Articles coming soon
-
-
-
-
-
- Articles coming soon
-
- Articles coming soon
-
- Articles coming soon
-
- Articles coming soon
-
-
-
-
-
- Articles coming soon
-
- Articles coming soon
-
- Articles coming soon
-
- Articles coming soon
-
-
- Articles coming soon
-
- IPsec Tunnel not Establishing
- SSL-VPN Tunnel not Establishing
- Mobile Network Issues
- Management Tunnel does not Establish
- DNS not Resolving from Local Network Appliance
- DNS Resolution Issues in Tunnel Configuration
- DHCP Server not Leasing IP to LAN PC
- Debugging EC Events - Unknown Status Issue
- Trusted-MAC Geofencing Issues
- DNS Issues from DC LAN PC
- Troubleshooting LAN Connectivity to Internet via WAN, Remote Branch LAN, or Local Branch LAN
- NetBalancer gateways displaying Faulty/Inactive
- Packet Drop Issues
-
-
zAccess
-
StorTrends
Print
SnapOS Live Boot Installation Guide
Requirements
- A flash drive with the SnapOS live boot image.
- Access to a computer with USB ports (USB 3.0 or higher preferred for a quick install).
- Any x86 computer with a USB 3.0 port for installation.
Instructions
- Plug the flash drive into any available USB 3.0 or higher port on the computer.
- Power on the device and enter the boot menu (Depending on your system hardware, press either F11, F10, Delete, or F2).
- Select the flash drive as the boot device and boot into the SnapOS live environment.

4. Once the live environment loads, locate the installer icon on the desktop and double-click it to launch the installer.
5. Proceed through the installation wizard.
Note: This process will erase all existing data on the targeted disk. Confirm and continue when prompted.
6. Repeat the installation process for each device, ensuring the correct version is successfully installed on each one.

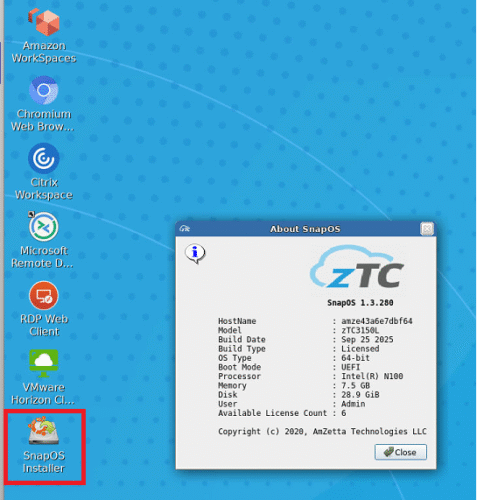
Verify SnapOS version
- Click the Start button at the bottom right of the screen.
- You should now see a list of things to choose from, click About SnapOS.
- Verify that you see the version of SnapOS you've installed underneath the zTC icon.
Table of Contents