
Active Directory Configuration Guide
zID – zMan Director
zID serves as the identity provider (IdP) for zMan Director. It is built on the open-source identity and access management platform Keycloak, providing a centralized authentication and authorization mechanism.
With zID, users from multiple external identity sources, such as Active Directory (AD), Google Authentication, and other federated providers, can be integrated into a single authentication framework. This enables seamless and secure login access for:
- zMan Director UI
- SnapOS endpoints
zID supports identity federation, allowing organizations to leverage existing user directories without duplicating or manually managing user credentials within the platform.
Scope of This Document
This document outlines the steps required to configure Active Directory (AD) integration with zID. The configuration enables:
- User authentication for SnapOS endpoint login
- User authentication for zMan Director UI access
User Authentication for SnapOS
Follow the steps below to configure Active Directory integration and enable users to log in to SnapOS endpoints.
- Log in to zMan Tenant.
URL: https://10.200.xx.xx/zman-tenant
Username: [email protected]
Password: xxxxxxxx
After successful login:
- In the right pane, click the Settings icon at the top.
- Select ZID Login – zTC.

-
Access the zID Portal.
- Upon selecting ZID Login – zTC, a new browser tab opens the zID login page.
- Enter the tenant credentials to log in.
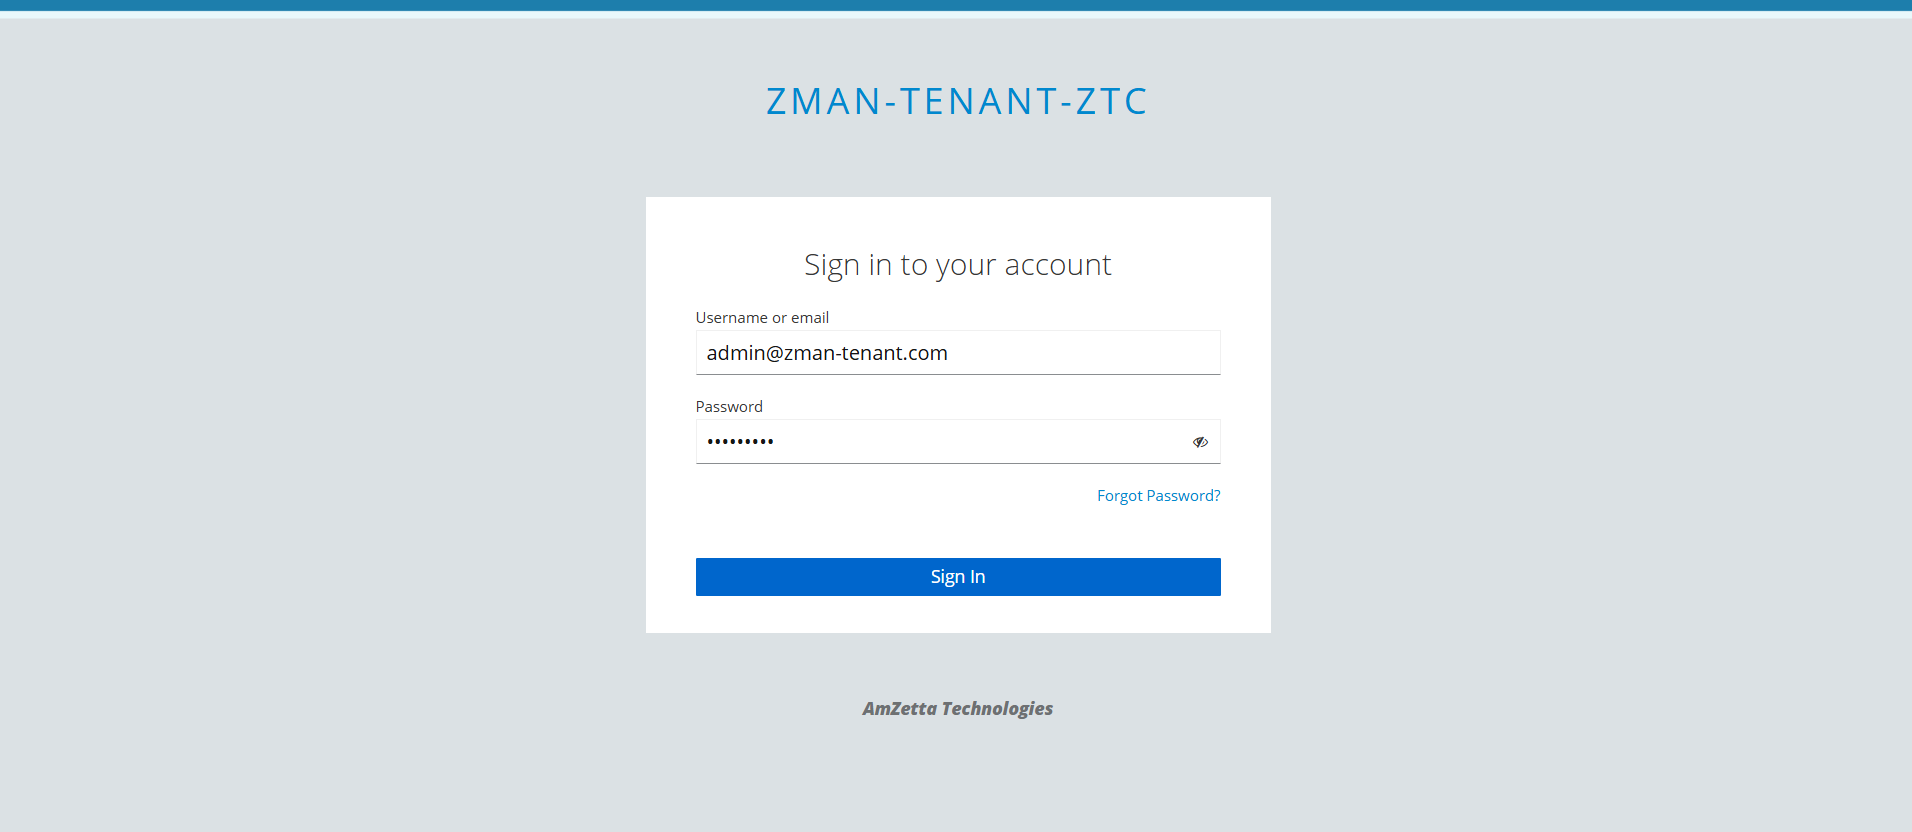
- Configure the LDAP Provider for Active Directory.
Add LDAP Provider
- From the left navigation pane, select User Federation.
- Click Add LDAP Providers.
- Select Vendor: Active Directory.
- Provide the following connection details:
Connection URL: ldap://<ip>:<port>
Example: ldap://10.200.43.xx:389- Click Test Connection.
Ensure the connection test is successful before proceeding.
Please refer to the screenshots below.


Configure Bind Credentials
Provide the following details:
Bind Type: Simple

Bind DN:
cn=Administrator,cn=Users,dc=xxxx,dc=xxxx

Example:
cn=Administrator,cn=Users,dc=testdomain,dc=local

Bind Credentials: <domain-password>
Click Test Authentication.
Ensure authentication is successful.

Configure LDAP Searching and Updating
The LDAP Searching and Updating configuration plays a critical role in retrieving users, group users, and users from nested subgroups. The users that are synchronized depend on the settings configured in this section. It is recommended that administrators configure these settings according to their organizational requirements.
Section 1. Identify All Users
Step 1:
- Set the following parameters under the LDAP Searching and Updating section to retrieve all users.
Edit Mode: WRITABLE
Users DN: cn=users,dc=xxxx,dc=xxxx
Example: cn=users,dc=ztna,dc=local

Username LDAP Attribute: cn
RDN LDAP Attribute: cn
UUID LDAP Attribute: objectGUID
User Object Classes: organizationalPerson, user
User LDAP Filter: (&(objectCategory=Person)(sAMAccountName=*))
Search Scope: Subtree
Click Save after entering the above details.

Step 2:
Refer to Default Configuration Settings.
Step 3:
Refer to Synchronize LDAP Users.
Step 4:
Refer to Verify Imported Users.
Step 5:
Refer to Configure zTC for zID Authentication.
Section 2. Identify Users Who Are Members of One Group
Step 1:
- Set the following parameters under the LDAP Searching and Updating section to retrieve users from one group only.
Edit Mode: WRITABLE
Users DN: cn=users,dc=xxxx,dc=xxxx
Example: cn=users,dc=ztna,dc=local

Username LDAP Attribute: cn
RDN LDAP Attribute: cn
UUID LDAP Attribute: objectGUID
User Object Classes: organizationalPerson, user
User LDAP Filter: (&(objectClass=user)(memberOf=CN=zacdev,CN=Users,DC=ztna,DC=local))
Search Scope: Subtree
The above example configuration fetches users from one group, zacdev, at the top level only.
Click Save after entering the above details.

- Follow Section 1, Step 2 through Step 5.
Section 3. Identify Users Who Are Members of One Group Recursively, Including Users from Subgroups
Step 1:
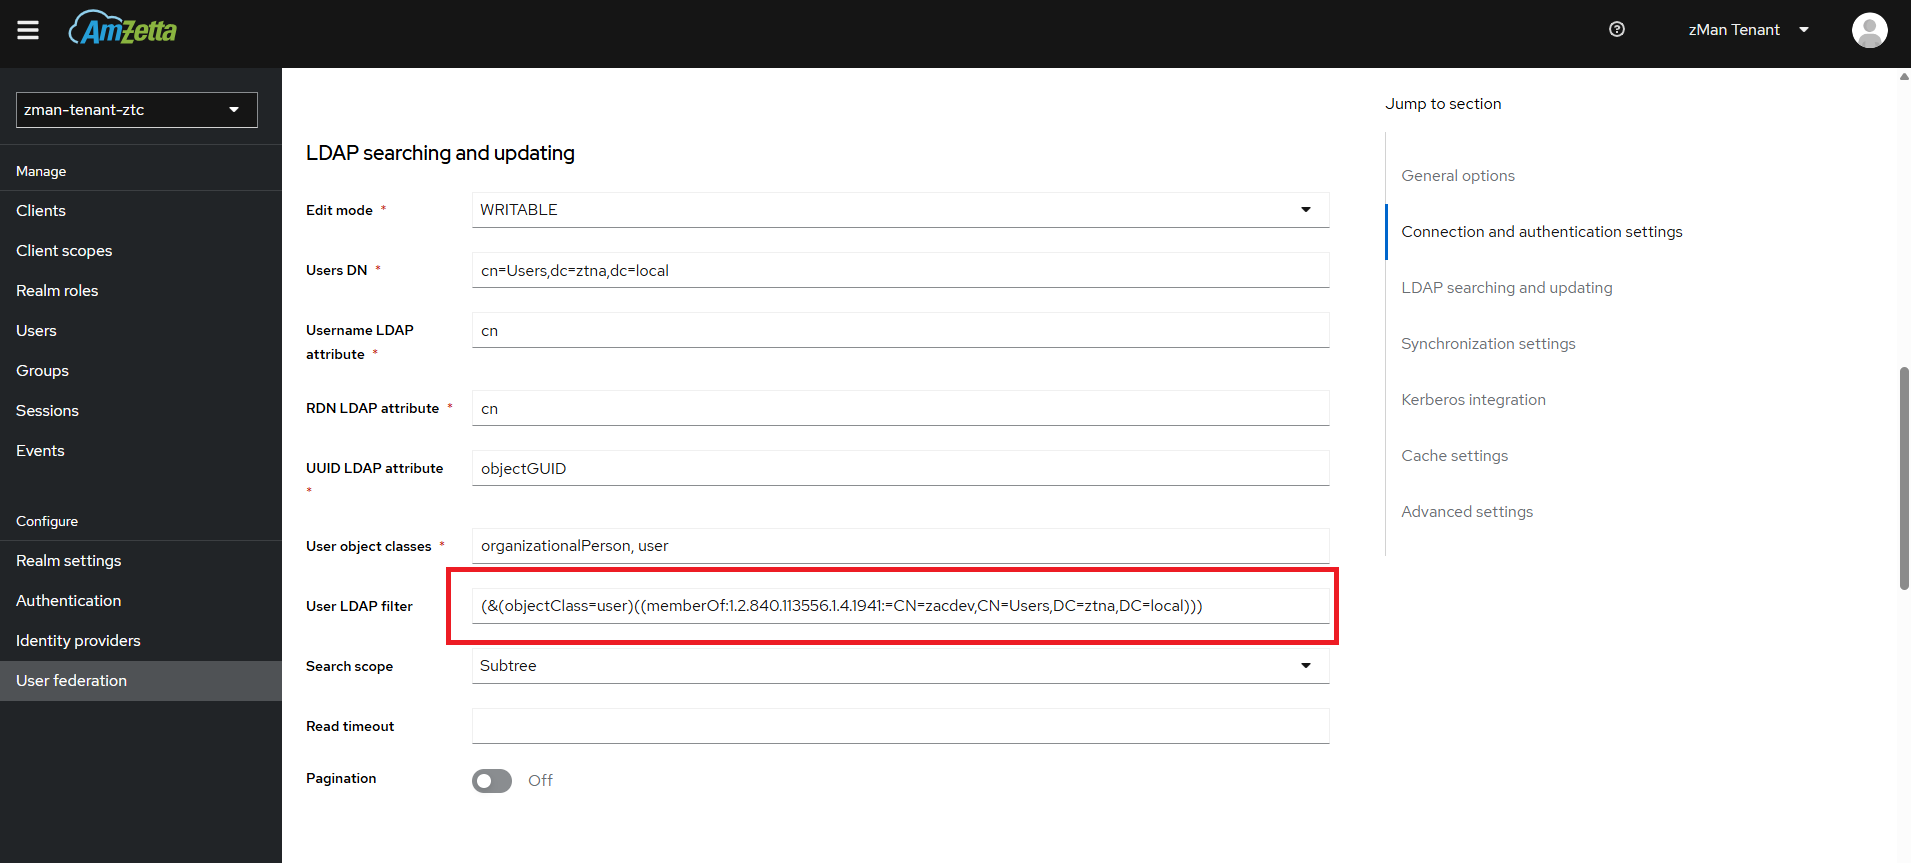
- Set the following parameters under the LDAP Searching and Updating section to retrieve users from one group recursively.
Edit Mode: WRITABLE
Users DN: cn=users,dc=xxxx,dc=xxxx
Example: cn=users,dc=ztna,dc=local

Username LDAP Attribute: cn
RDN LDAP Attribute: cn
UUID LDAP Attribute: objectGUID
User Object Classes: organizationalPerson, user
User LDAP Filter: (&(objectClass=user)(memberOf:1.2.840.113556.1.4.1941:=CN=zacdev,CN=Users,DC=ztna,DC=local))
Search Scope: Subtree
The above example configuration fetches users from one group, zacdev, recursively, including users from subgroups. The string memberOf:1.2.840.113556.1.4.1941 is hardcoded and should remain unchanged in the filter.
Click Save after entering the above details.
- Follow Section 1, Step 2 through Step 5.
Section 4. Identify Users from Multiple Groups
Step 1:
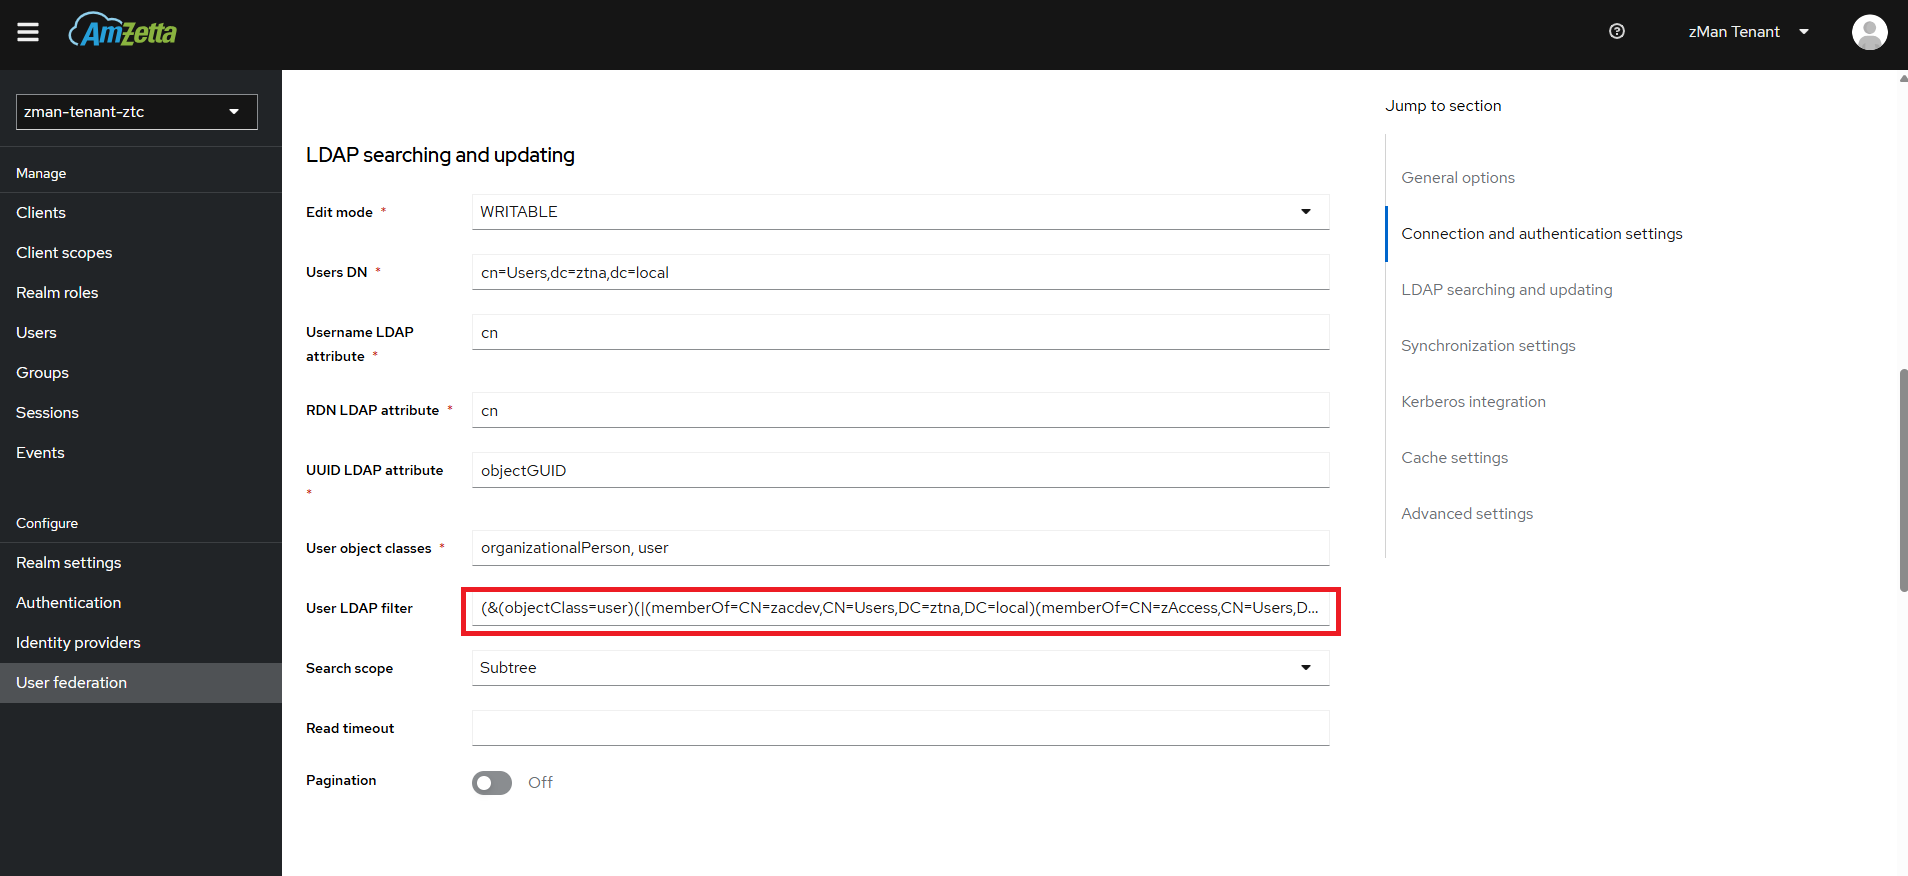
- Set the following parameters under the LDAP Searching and Updating section to retrieve users from multiple groups.
Edit Mode: WRITABLE
Users DN: cn=users,dc=xxxx,dc=xxxx
Example: cn=users,dc=domainname,dc=local

Username LDAP Attribute: cn
RDN LDAP Attribute: cn
UUID LDAP Attribute: objectGUID
User Object Classes: organizationalPerson, user
User LDAP Filter: (&(objectClass=user)(|(memberOf=CN=zacdev,CN=Users,DC=ztna,DC=local)(memberOf=CN=zAccess,CN=Users,DC=ztna,DC=local)))
Search Scope: Subtree
The above example configuration fetches users from more than one group, such as zacdev and zAccess, at the top level only.
Click Save after entering the above details.
- Follow Section 1, Step 2 through Step 5.
Section 5. Identify Users from Multiple Groups Recursively, Including Users from Subgroups
Step 1:
- Set the following parameters under the LDAP Searching and Updating section to retrieve users from multiple groups recursively.
Edit Mode: WRITABLE
Users DN: cn=users,dc=xxxx,dc=xxxx
Example: cn=users,dc=domainname,dc=local

Username LDAP Attribute: cn
RDN LDAP Attribute: cn
UUID LDAP Attribute: objectGUID
User Object Classes: organizationalPerson, user
User LDAP Filter: (&(objectClass=user)(|(memberOf:1.2.840.113556.1.4.1941:=CN=zacdev,CN=Users,DC=ztna,DC=local)(memberOf:1.2.840.113556.1.4.1941:=CN=zAccess,CN=Users,DC=ztna,DC=local)))
Search Scope: Subtree
The above example configuration fetches users from more than one group, such as zacdev and zAccess, recursively, including users from subgroups. The string memberOf:1.2.840.113556.1.4.1941 is hardcoded and should remain unchanged in the filter.
Click Save after entering the above details.

- Follow Section 1, Step 2 through Step 5.
OU Users
Section 6. List All Users of an OU
Step 1:
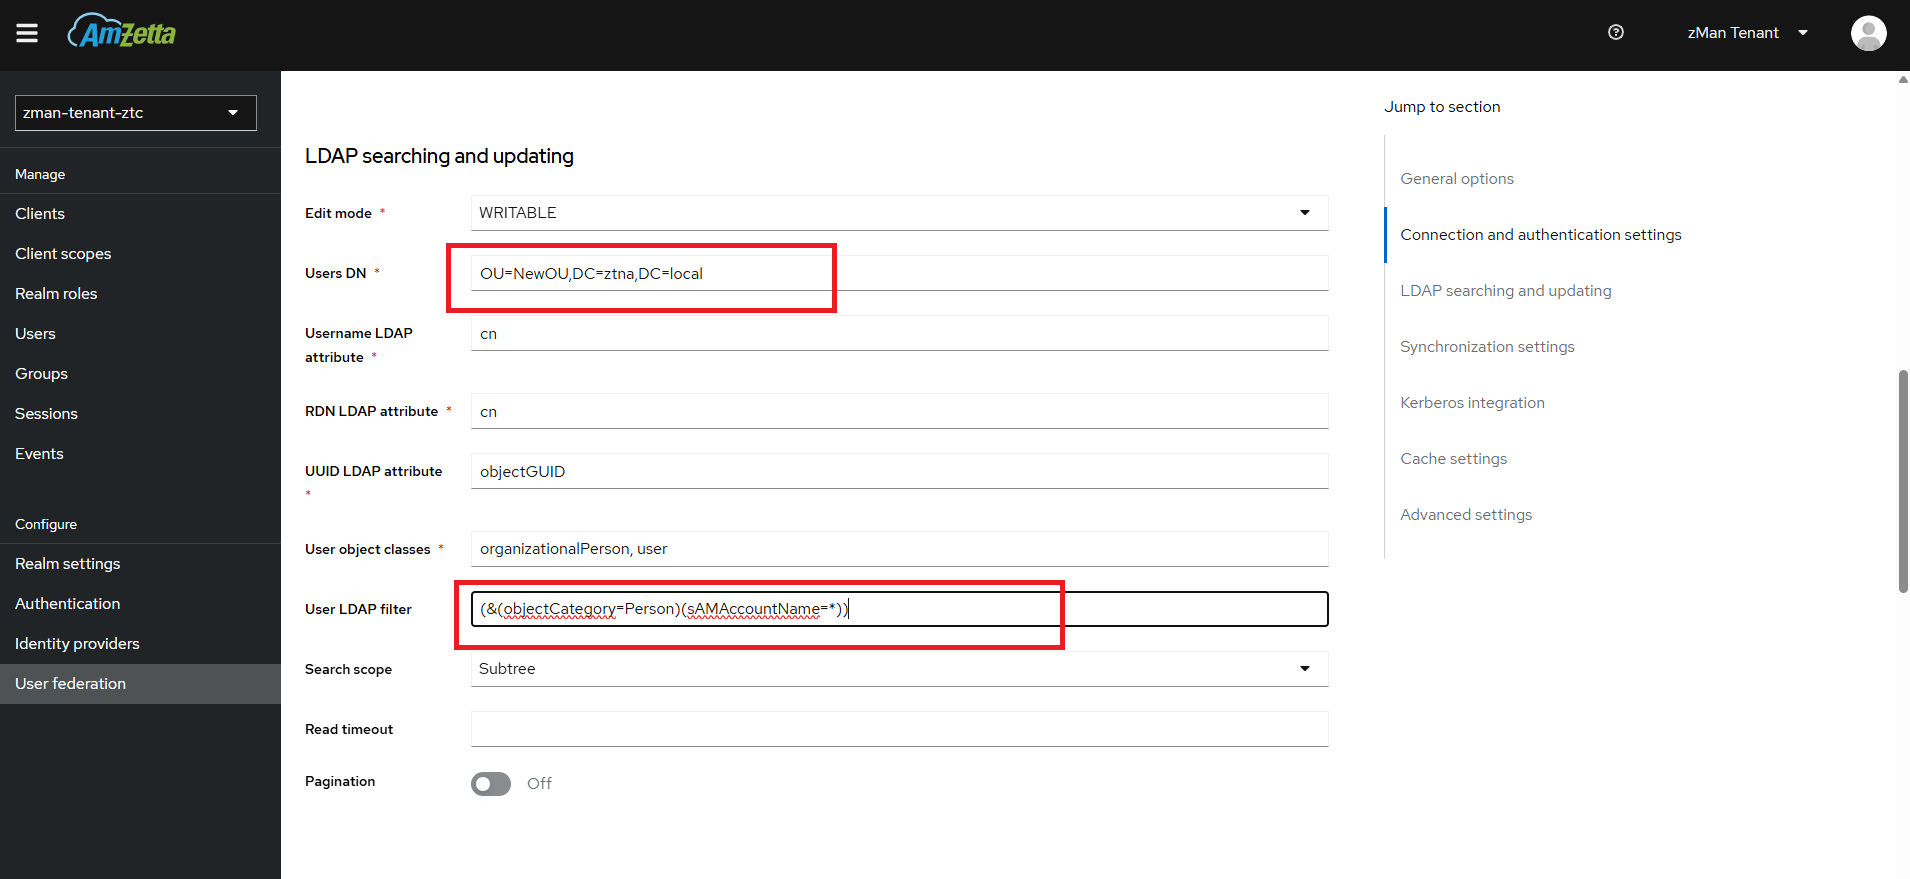
- Set the following parameters under the LDAP Searching and Updating section to retrieve OU users.
Edit Mode: WRITABLE
Users DN: OU=NewOU,DC=ztna,DC=local

Username LDAP Attribute: cn
RDN LDAP Attribute: cn
UUID LDAP Attribute: objectGUID
User Object Classes: organizationalPerson, user
User LDAP Filter: (&(objectCategory=Person)(sAMAccountName=*))
Search Scope: Subtree
The above example configuration fetches all users from an OU, such as NewOU.
Click Save after entering the above details.
- Follow Section 1, Step 2 through Step 5.
Section 7. Identify Group Users of an OU, Top-Level Users Only
Step 1:
- Set the following parameters under the LDAP Searching and Updating section to retrieve top-level group users from an OU.
Edit Mode: WRITABLE
Users DN: OU=NewOU,DC=ztna,DC=local

Username LDAP Attribute: cn
RDN LDAP Attribute: cn
UUID LDAP Attribute: objectGUID
User Object Classes: organizationalPerson, user
User LDAP Filter: (&(objectCategory=Person)(objectClass=user)(memberOf=CN=ztest,OU=NewOU,DC=ztna,DC=local))
Search Scope: Subtree
The above example configuration fetches users from one group, ztest, at the top level only, within the OU NewOU.
Click Save after entering the above details.

- Follow Section 1, Step 2 through Step 5.
Section 8. Identify Group Users Recursively of an OU
Step 1:
- Set the following parameters under the LDAP Searching and Updating section to retrieve group users recursively from an OU.
Edit Mode: WRITABLE
Users DN: OU=NewOU,DC=ztna,DC=local

Username LDAP Attribute: cn
RDN LDAP Attribute: cn
UUID LDAP Attribute: objectGUID
User Object Classes: organizationalPerson, user
User LDAP Filter: (&(objectCategory=Person)(objectClass=user)(memberOf:1.2.840.113556.1.4.1941:=CN=ztest,OU=NewOU,DC=ztna,DC=local))
Search Scope: Subtree
The above example configuration fetches users from one group, ztest, within the OU NewOU recursively, including users from subgroups. The string memberOf:1.2.840.113556.1.4.1941 is hardcoded and should remain unchanged in the filter.
Click Save after entering the above details.

- Follow Section 1, Step 2 through Step 5.
Default Configuration Settings
Leave the following settings unchanged using their default values:
Synchronization Settings
Kerberos Integration
Cache Settings
Advanced Settings
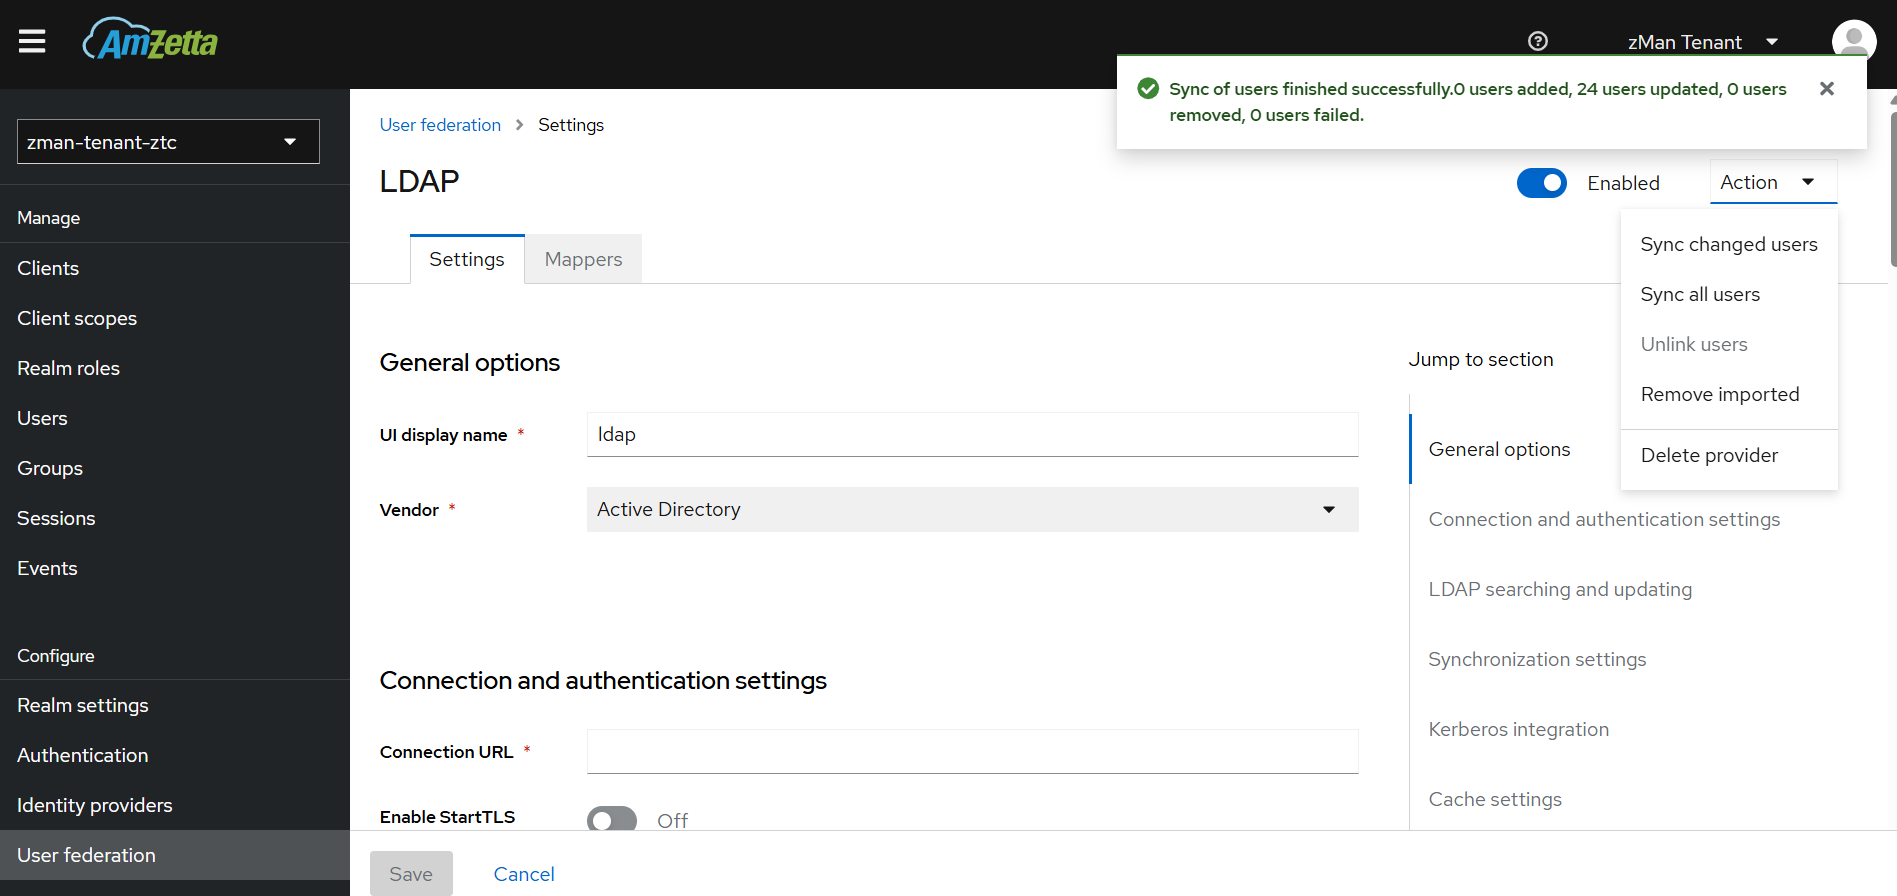
Synchronize LDAP Users
- Open the configured LDAP provider.
- Navigate to the Actions menu in the top-right corner.
- Click Sync All Users.
This process imports all users from Active Directory into zID.
Verify Imported Users
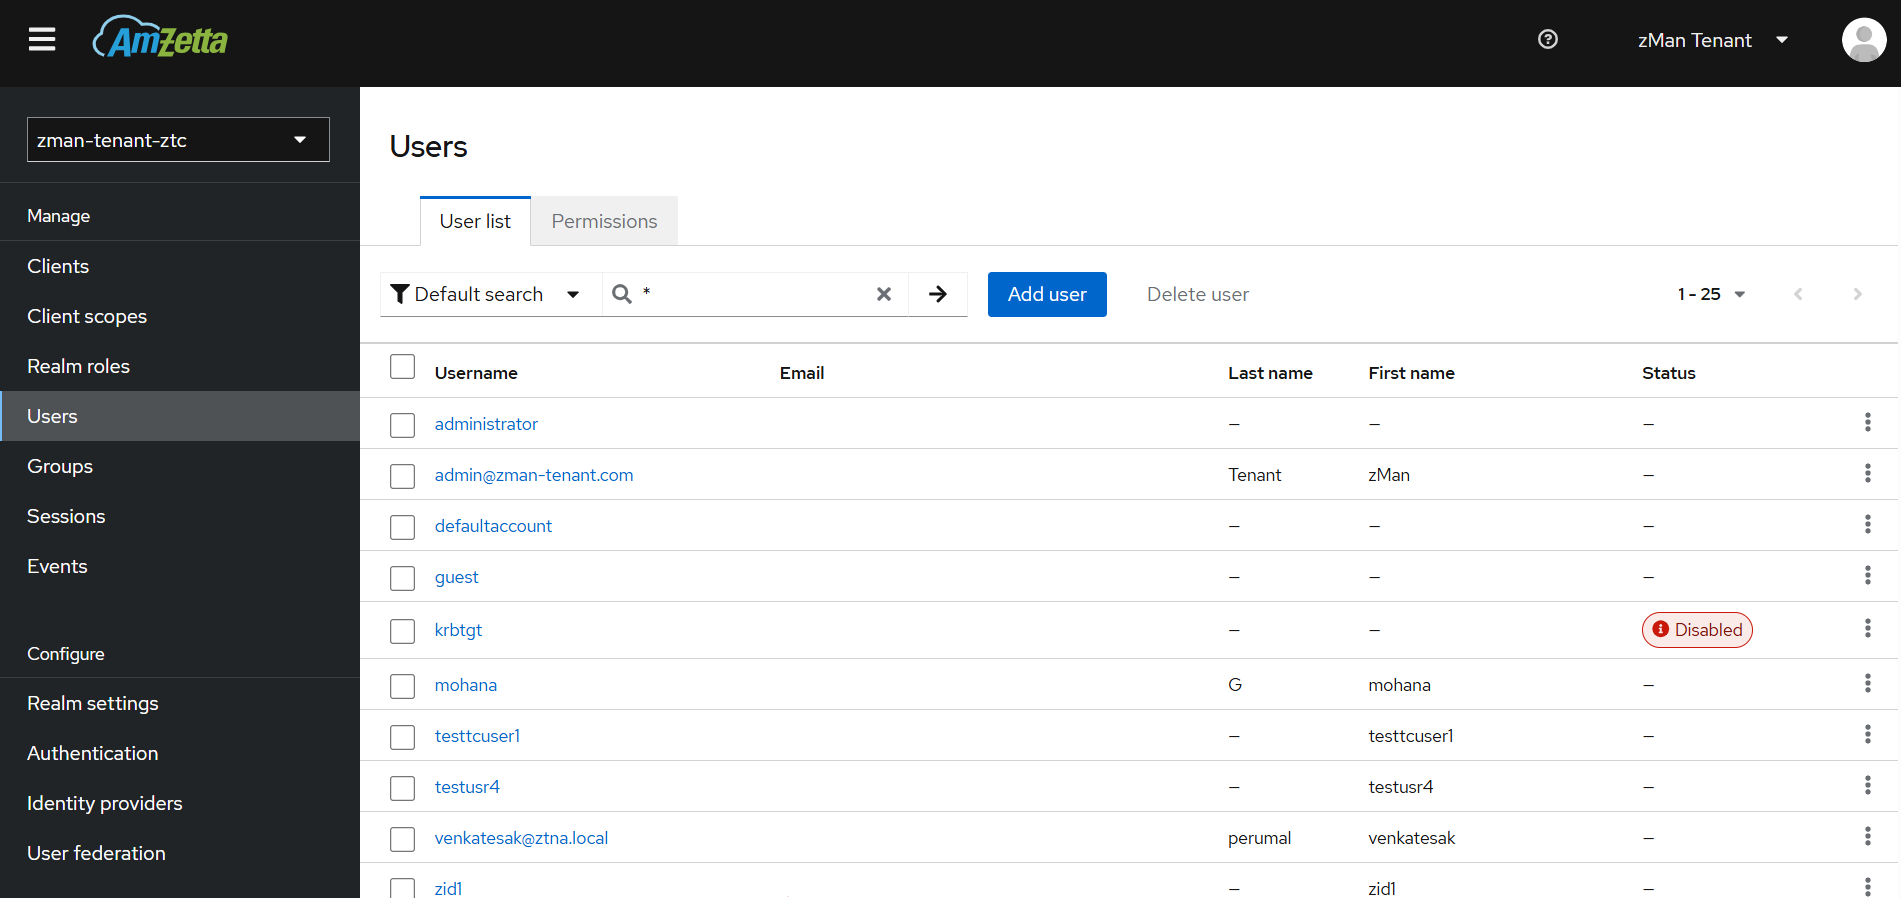
From the left pane, select Users.
In the search field, enter *.
Press Enter or click the arrow icon.
All Active Directory users should now be visible.
All configurations on the zMan Director side have now been completed. The next step is to validate user authentication from the SnapOS endpoint. Follow the steps below to perform the verification.
Configure zTC for zID Authentication
On the zTC endpoint:
a) Navigate to:
Start Menu → Applications → Logon Configuratorb) Complete the following steps in the dialog:
- Uncheck Enable Autologin.
- Enter the zMan Server IP.
- Enter the Tenant Name using the -ztc suffix.
- Select Reboot Now and click Apply.
Note:
-
For SnapOS (zTC) login configuration, the tenant name must include the suffix -ztc.
- Example: zman-tenant-ztc
-
For zMan Director UI login, use the tenant name without the -ztc suffix.
- Example: zman-tenant
Please refer to the screenshots below.


Validate User Login
- After reboot, the login screen appears.
- Enter a valid username and password.
Upon successful authentication, the user is logged in to the session.

User Authentication for zMan Director UI Access
- The configuration steps described earlier apply specifically to SnapOS endpoint user login via zID.
- To enable Active Directory (AD) user login for the zMan Director UI, a separate configuration is required.
- Navigate to the zID Login option from the zMan Director UI settings icon at the top right, then repeat the same LDAP and Active Directory configuration steps from Step 2 onward within that section.
-
Ensure that:
- LDAP (Active Directory) integration is properly configured in the respective zID login section.
- Users are successfully synchronized from AD.
- Once configured, users can log in to the zMan Director UI using their domain credentials.

Set User Roles on zMan Director
zMan Director supports role-based access for synchronized Active Directory users.
- Log in to zMan Director with the required credentials.
- Navigate to User Management > Users from the left pane.
- The right pane lists all synchronized Active Directory users, including group and recursive subgroup users.
- Select the desired users and update their roles as needed.
Refer to the screenshot below.

- Log out from zMan Director and sign in with an AD user account.
