-
SnapOS
-
-
- Articles coming soon
-
-
-
- Citrix HDX + USB Headset (Call-Center Baseline)
- OS/Firmware Update & Rollback
- Power Management and Session State
- Wi-Fi Roaming & Link Change Mid-Session
- Kiosk / Assigned-Access Auto-Launch
- Barcode Scanner (HID) with Line-of-Business App
- Printing to Local USB & Network Printers
- USB Device Management – Block Storage
- Multi-Monitor & 4K Performance
- Microsoft AVD/RDP + Teams Optimized Video
- VMware Horizon + Smart Card / CAC Login
-
-
-
-
zWAN
-
-
-
-
- Firewall & Layer 7 Application Filtering
- VPN Site-to-Site Tunnel Setup & Connectivity (z40 to Cloud vGR)
- Intrusion Prevention System (IPS) / Intrusion Detection System (IDS) Testing
- DNS Filtering
- DDoS Protection & Logging
- MAC Address Filtering & Geo-fencing
- Application Control & Protocol Blocking
- Authentication & Access Control (zID)
-
- WAN Link Failover & Load Balancing (ACI Mode)
- Dynamic Path Selection & Application-Aware Routing
- SaaS & Internet Breakout Validation
- QoS for Microsoft Teams (Datacenter vGR + Branch z40)
- Tunnel Failover (z40 ↔ vGR) — WAN00 (wired) primary, WAN03 (4G) & WAN04 (5G) backups
- IP Routing & Static Route Steering (z40 Branch)
- VLAN & Layer-2 Bridging
-
-
-
-
-
-
- Articles coming soon
-
-
-
-
- Articles coming soon
-
- Articles coming soon
-
-
-
-
-
-
- Articles coming soon
-
- Articles coming soon
-
- Articles coming soon
-
- Articles coming soon
-
-
-
-
-
- Articles coming soon
-
- Articles coming soon
-
- Articles coming soon
-
- Articles coming soon
-
-
-
-
-
- Articles coming soon
-
- Articles coming soon
-
- Articles coming soon
-
- Articles coming soon
-
-
- Articles coming soon
-
- IPsec Tunnel not Establishing
- SSL-VPN Tunnel not Establishing
- Mobile Network Issues
- Management Tunnel does not Establish
- DNS not Resolving from Local Network Appliance
- DNS Resolution Issues in Tunnel Configuration
- DHCP Server not Leasing IP to LAN PC
- Debugging EC Events - Unknown Status Issue
- Trusted-MAC Geofencing Issues
- DNS Issues from DC LAN PC
- Troubleshooting LAN Connectivity to Internet via WAN, Remote Branch LAN, or Local Branch LAN
- NetBalancer gateways displaying Faulty/Inactive
- Packet Drop Issues
-
-
zAccess
-
StorTrends
Print
Installing and Managing Certificates on zTC
Installing and Managing Certificates on zTC
Summary
Use the Certificate Installer to add, view, and delete SSL/TLS certificates for secure VDI and web-based sessions.
Prerequisites
- SnapOS ≥1.3
- Certificate files in .cer, .der, .crt, .p12, .p7b, or .pem format
- USB drive or FTP server access (for remote install)
Procedure
- Start → Applications → Certificate Install

- Add from USB
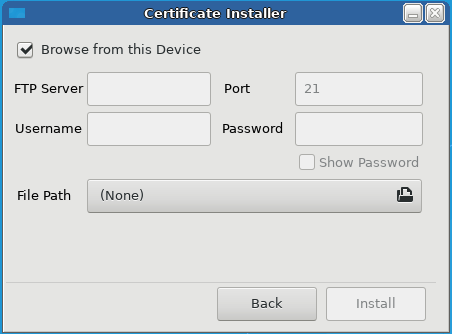
- Click “+” → Browse from this Device → select file → Install → Close
- Add from FTP
- Click “+” → choose FTP → enter server, path, creds → Install → Close
- Delete
- Select certificate → click trash icon → confirm
Example
To trust a private RDP host cert: copy
hostcert.pemto USB → insert → add via Certificate Installer
Advanced Configuration
- Automate via zMAN: push cert bundles and auto-install on registration.
Related Features
- Microsoft Remote Session article (for trusting RDP hosts)
- Citrix Remote Session article (for storefront certs)
Troubleshooting
- Install fails (“unsupported format”): convert
.p12to.pemwith OpenSSL:openssl pkcs12 -in cert.p12 -out cert.pem -nodes - Cert not listed after reboot: ensure it was installed under
/etc/ssl/certs/.
FAQs
- Can I install multiple certs at once?
- Yes—add them one by one; they’ll all appear in the list.
- How do I export a cert to remove it centrally?
- Delete in UI, or remove its file under
/etc/ssl/certs/via SSH.
Table of Contents