Preparing zGateway
Perform following task to configure zGateway
1. Set up Networking
2. Bootstrap the appliance
3. Create the gateway self-signed SSL certificate
4. Create first Security Officer (zGateway administrator)
5. Configure basic settings
6. Change to run mode
SETUP NETWORKING
The default IP Address assigned to the first network interface card of zGateway is a static IP address 172.17.9.100.
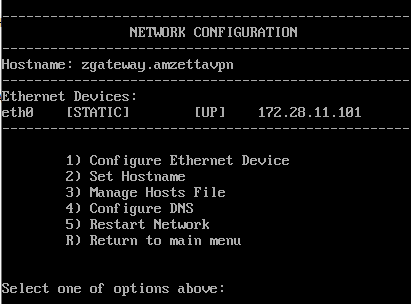
All networking settings can be done from zGateway web management console by visiting https://zgateway-IP-address in local browser of PC. If the zGateway OS does not have a valid IP address, and to setup other basic networking settings, login into zGateway OS Console as user “consoleadmin” with default password “adminconsole”.
Choose “Network Configuration” (Enter 1) and then Choose “Configure Ethernet Device” (Enter 1). Select 0 to choose eth0 interface. If you see a different interface name like eth1 or eth2, select the numeric digit to select the network interface. For e.g. enter 1 for eth1 and 2 for eth2. It is recommended to do all other network settings from zGateway Web based management console.
BOOTSTRAP THE ZGATEWAY APPLIANCE
Follow below steps to configure zGateway for use
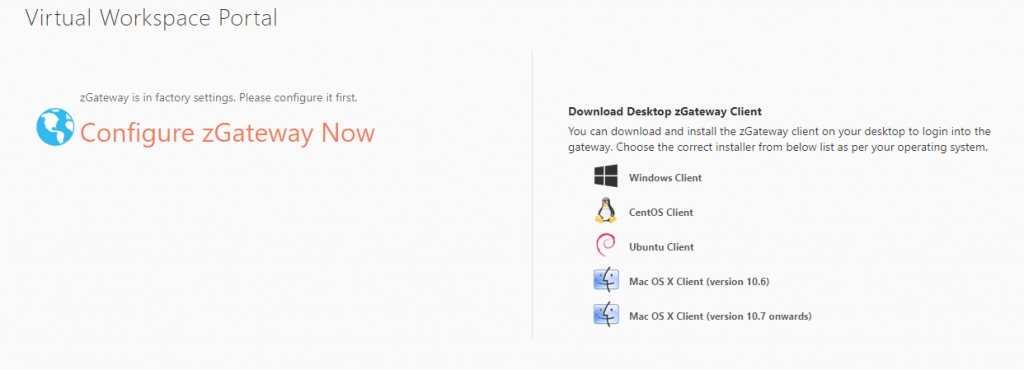
1. Launch the local web browser of your PC and go to URL https://zgateway_ip_address/
2. Click on the Configure zGateway Now
3. SYSTEM – CONFIGURATION
1. When installing on a local physical host or virtual machine, choose the option for the same to configure network settings.
2. When installing on public cloud like Amazon Web Services or Microsoft Azure, choose the respective option. When selecting this option, there is no option to set network settings. All network settings including hostname must be done through the management console provided by the cloud vendor.
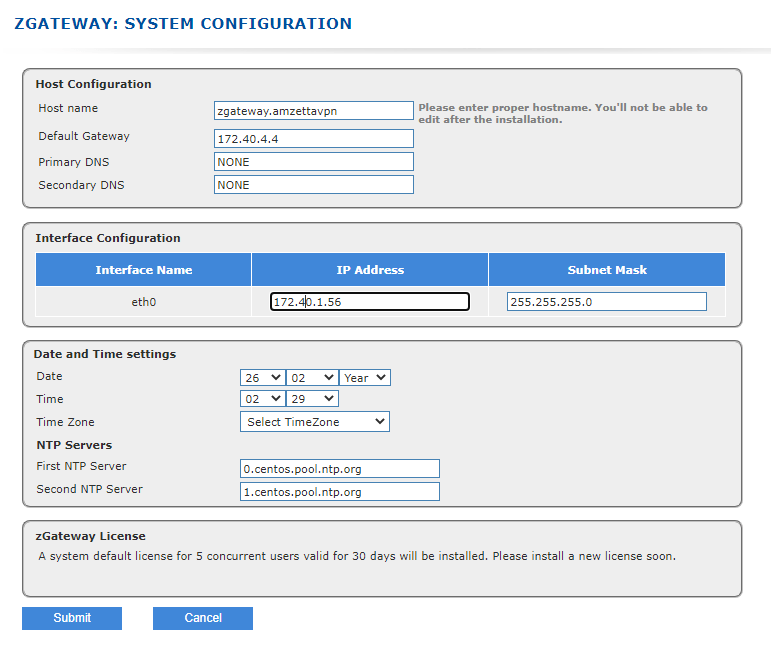
4. zGateway – SYSTEM CONFIGURATION
1. Use this screen to configure network settings
2. Make sure to configure the hostname on this screen. Hostname cannot be changed after zGateway is configured. This hostname need not be a public DNS name. The initial self-signed SSL certificate is created using this hostname, however the self-signed certificate can be replaced later.
3. Setup IP address, default gateway, DNS and date and time settings. All these settings can be configured later from zGateway web management console.
4. When installing on a public cloud, only date and time settings can be changed on this screen.
5. Select Submit to next screen.
5. SYSTEM CONFIGURATION : INSTALLATION TYPE:
Select if installing a standalone gateway or a zGateway cluster. In case you have a system backup file for zGateway, you can restore the backup from this screen.
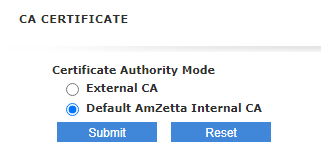
6. CA CERTIFICATE: Select to create a self-signed CA certificate
7. CREATE SSL CERTIFICATE: Create self-signed SSL certificate

8. On clicking submit, the first security officer (administrator) is created and a passphrase is generated. The passphrase is used to create the SSL client certificate. Security officer (administrator) must always login with SSL Client certificate to administer zGateway.
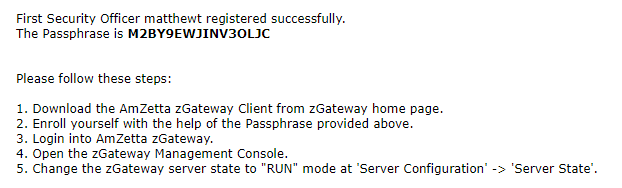
Copy the passphrase and use it to enroll the security officer SSL certificate.
ENROLL FIRST SECURITY OFFICER ACCOUNT
1. On a Microsoft Windows PC, download and install zGateway client from web page https://zgateway-ip-address
2. Launch the zGateway client, enter the zGateway IP Address and select “Login with digital certificate”. In Action file menu, select “Enroll Client SSL Certificate”

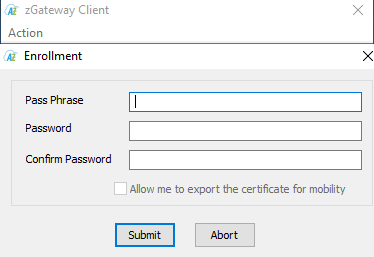
3. Enter the passphrase and set password for the security officer account.
4. The enrollment process creates a SSL Client certificate on the user PC. The SSL Client certificate is signed by the CA certificate of the zGateway and is installed in the certificate store of the browser. The certificate is non-exportable from the machine.
6. The zGateway administrator can be done only from this PC.
7. Note: The passphrase once used cannot be reused on any other machine. To manage zGateway from another PC, create another security officer from zGateway management console.
8. The option “Allow me to export the certificate for mobility” is a special mode to generate exportable certificate. This option can be enabled by a special setting, before using the passphrase to generate the certificate.
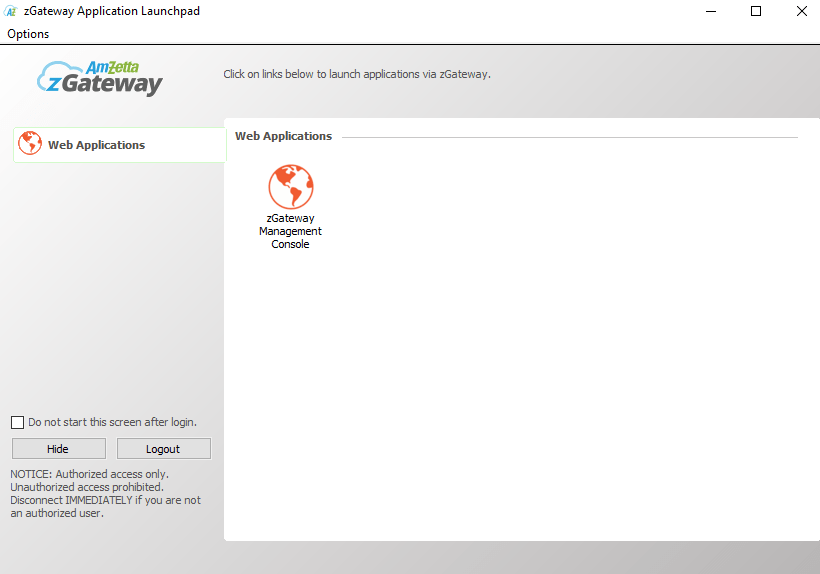
SIGN-IN INTO ZGATEWAY SERVER
Use the zGateway client to login into zGateway. Select option “Login with a digital certificate” and select the newly install security officer certificate.

Once authenticated, the zGateway management console will open up.
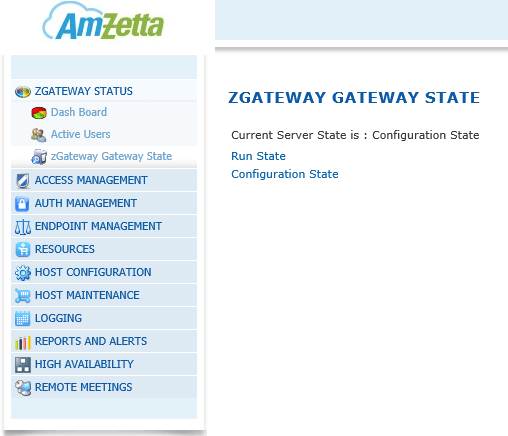
CHANGE TO RUN STATE
In order to access zGateway as a non-admin user a Security officer or Administrator needs to move the server into RUN state. This is performed in the Management Console under VPN Status > VPN Server State. Simply click Run State to change the status.