Edit Endpoint Device Settings
Device Settings enables administrators to apply specific Device Settings to existing devices individually. Device Settings is the third layer of device configurations and has the highest priority and thus can be used to overwrite Default Settings or Group Settings, if need to be.
To open Device Settings dialog, select a registered device and then click on button Device Settings. Only one device can be edited at a time; selecting multiple devices will make the setting disabled in the Action toolbar.

Device Settings dialog provides following options to the Administrator:
-
- Configurations
- Device Name
- Group Name
- Volume
- USB Redirection Driver
- Desktop Mode
- Default Language
- Connection Profile
- Software Version (Information Only)
- Login
- Auto Login Dropdown
- Inherit
- Enable
- Disable
- Ask Credentials at first logon
- Set Credentials
- Windows Login
- Auto Login Dropdown
- Display Settings
- Configure resolution and refresh rate on connected monitors on device
- Multimonitor configurations
- Change Primary Monitor
- Change Multimonitor Mode
- UI Controls
- Display or Hide UI Controls on zPortal Client Login Screen E.g. Show/ hide Shutdown, Settings, Info, AmZetta Logo, Network Settings button
- Password Protect UI Controls and specify the password e.g. password protect Shutdown, Settings, Mode change button
- Upgrade Settings
- Inherit
- Enable
- Disable
- Advance Settings
- Session Shell
- Session Control
- Configurations

Configuration
Following settings are available in Configurations section of Device Settings:
Device Name
Renaming the devices can help a lot in zPortal Management and thus the same option is provided in Device Settings dialog.
To change name of the device
-
- Select the device and click on Device Settings button
- In Device Settings dialog, go to Configurations section
- Type appropriate name for the device
- Click on Save button to save Device Settings
- Device name will be changed and will start reflecting all relevant sections where the selected device is configured e.g. Endpoints tab, Sessions tab, Desktops VMs tab etc.
Group Name
Displays the name of the group to which this device belongs. The group cannot be changed from Device Settings dialog.
Volume
A device can be configured to use specific volume settings.
By default, Volume is configured as Inherit in Device Settings which means all devices will use volume settings from Group Settings.
Volume configurations in Device Settings could be used for overwriting the Group or Default Settings configuration.
To change the volume setting of a specific device
-
- Select the device and click on Device Settings button
- In Device Settings dialog, go to Configurations section
- Select appropriate Volume settings
- Inherit: Use the volume settings as configured in Group Settings
- User’s Settings: Let the device use its settings and do not force settings from zPortal Controller
- Set Manually: Specify Volume manually for the device. Set the volume slider to desired level
- Click on Save button to save Device Settings
- Device volume will be changed as per configured settings in next successful heartbeat
|
Note:
|
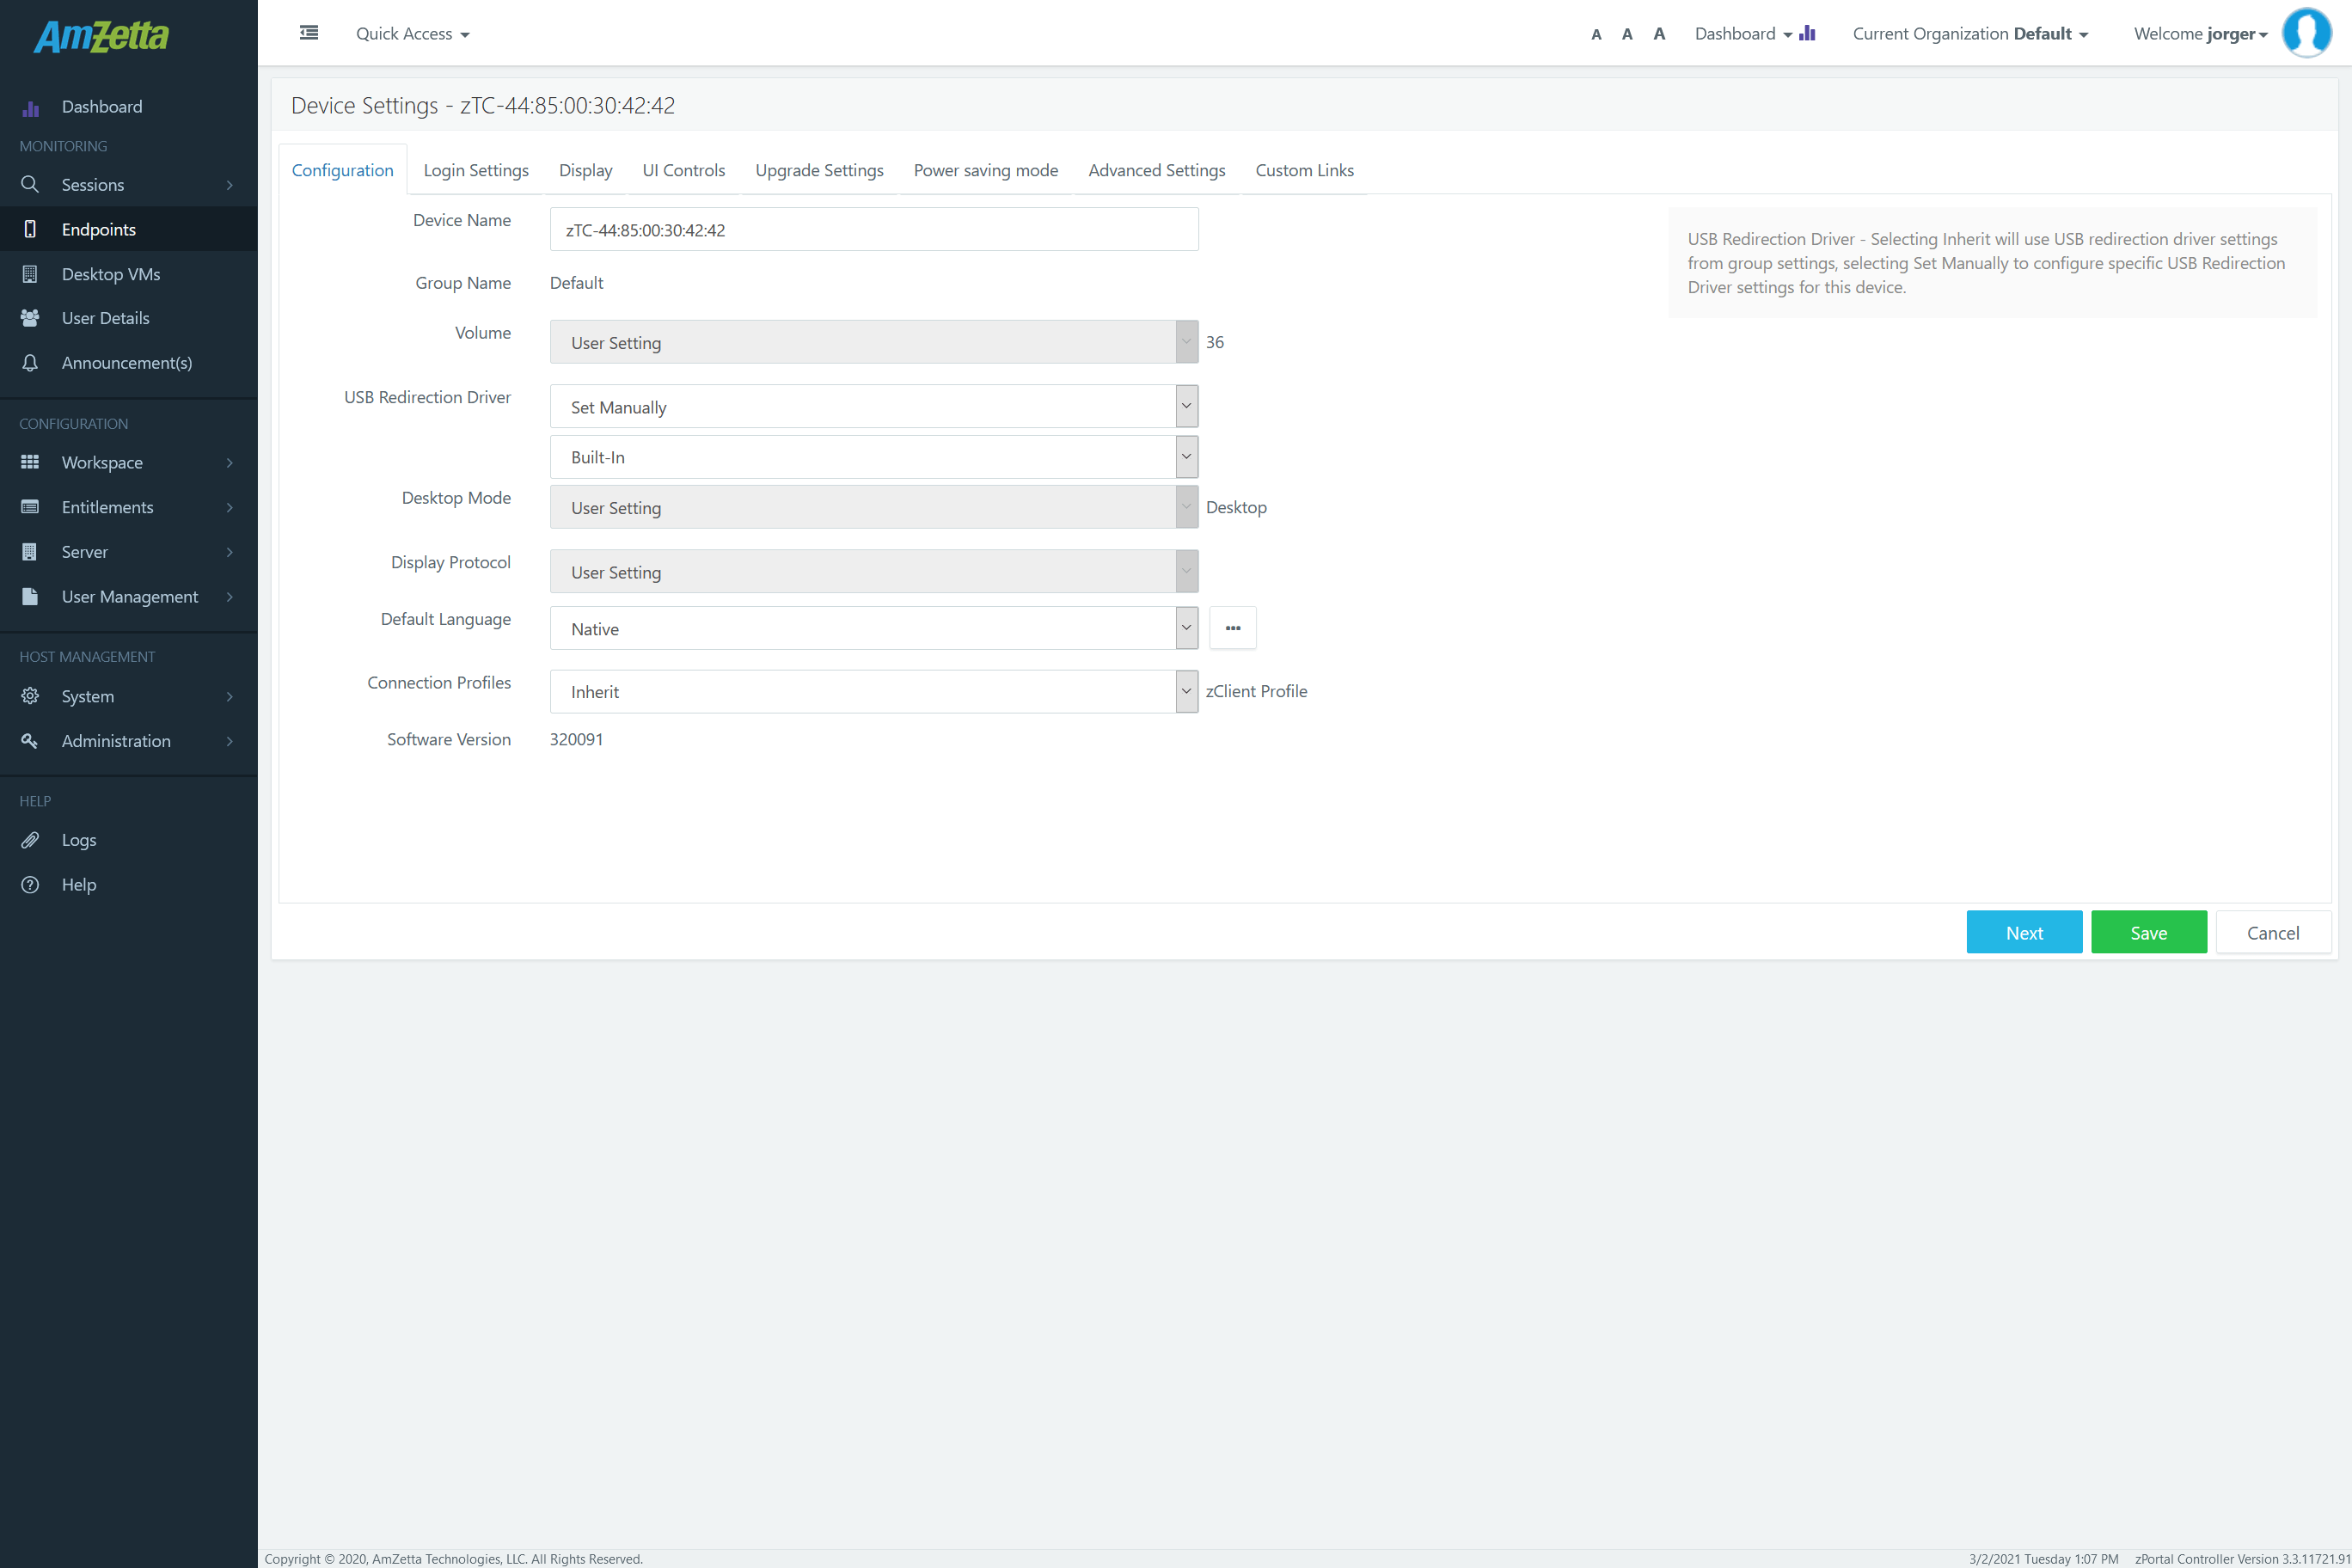
USB Redirection Driver
USB Redirection Driver option in Device Settings dialog provides opportunity to administrator to enable specific USB Redirection Driver configuration for the specific device.
USB Redirection Driver configuration is set to Inherit to use the USB Redirection Driver configurations from Group Settings, but Device Settings provides the option to overwrite USB Redirection Driver settings.
To change the USB Redirection Driver setting of a specific device:
-
- Select the device and click on Device Settings button
- In Device Settings dialog, go to Configurations section
- In USB Redirection Driver dropdown list
- Select Inherit to use USB Redirection Drivers configurations from Group Settings
- Select ‘Set Manually’ and specify the USB Redirection driver to be used by the device
- Built-In (Recommended for dedicated VDI deployments)
- Enhanced (Recommended for shared VDI deployments)
- Click on Save button to save Device Settings
- If any change in USB Redirection Driver (currently used by device) is detected, device reboot will be required and a Confirm Action dialog will be prompted
- Click on Save button to confirm the action
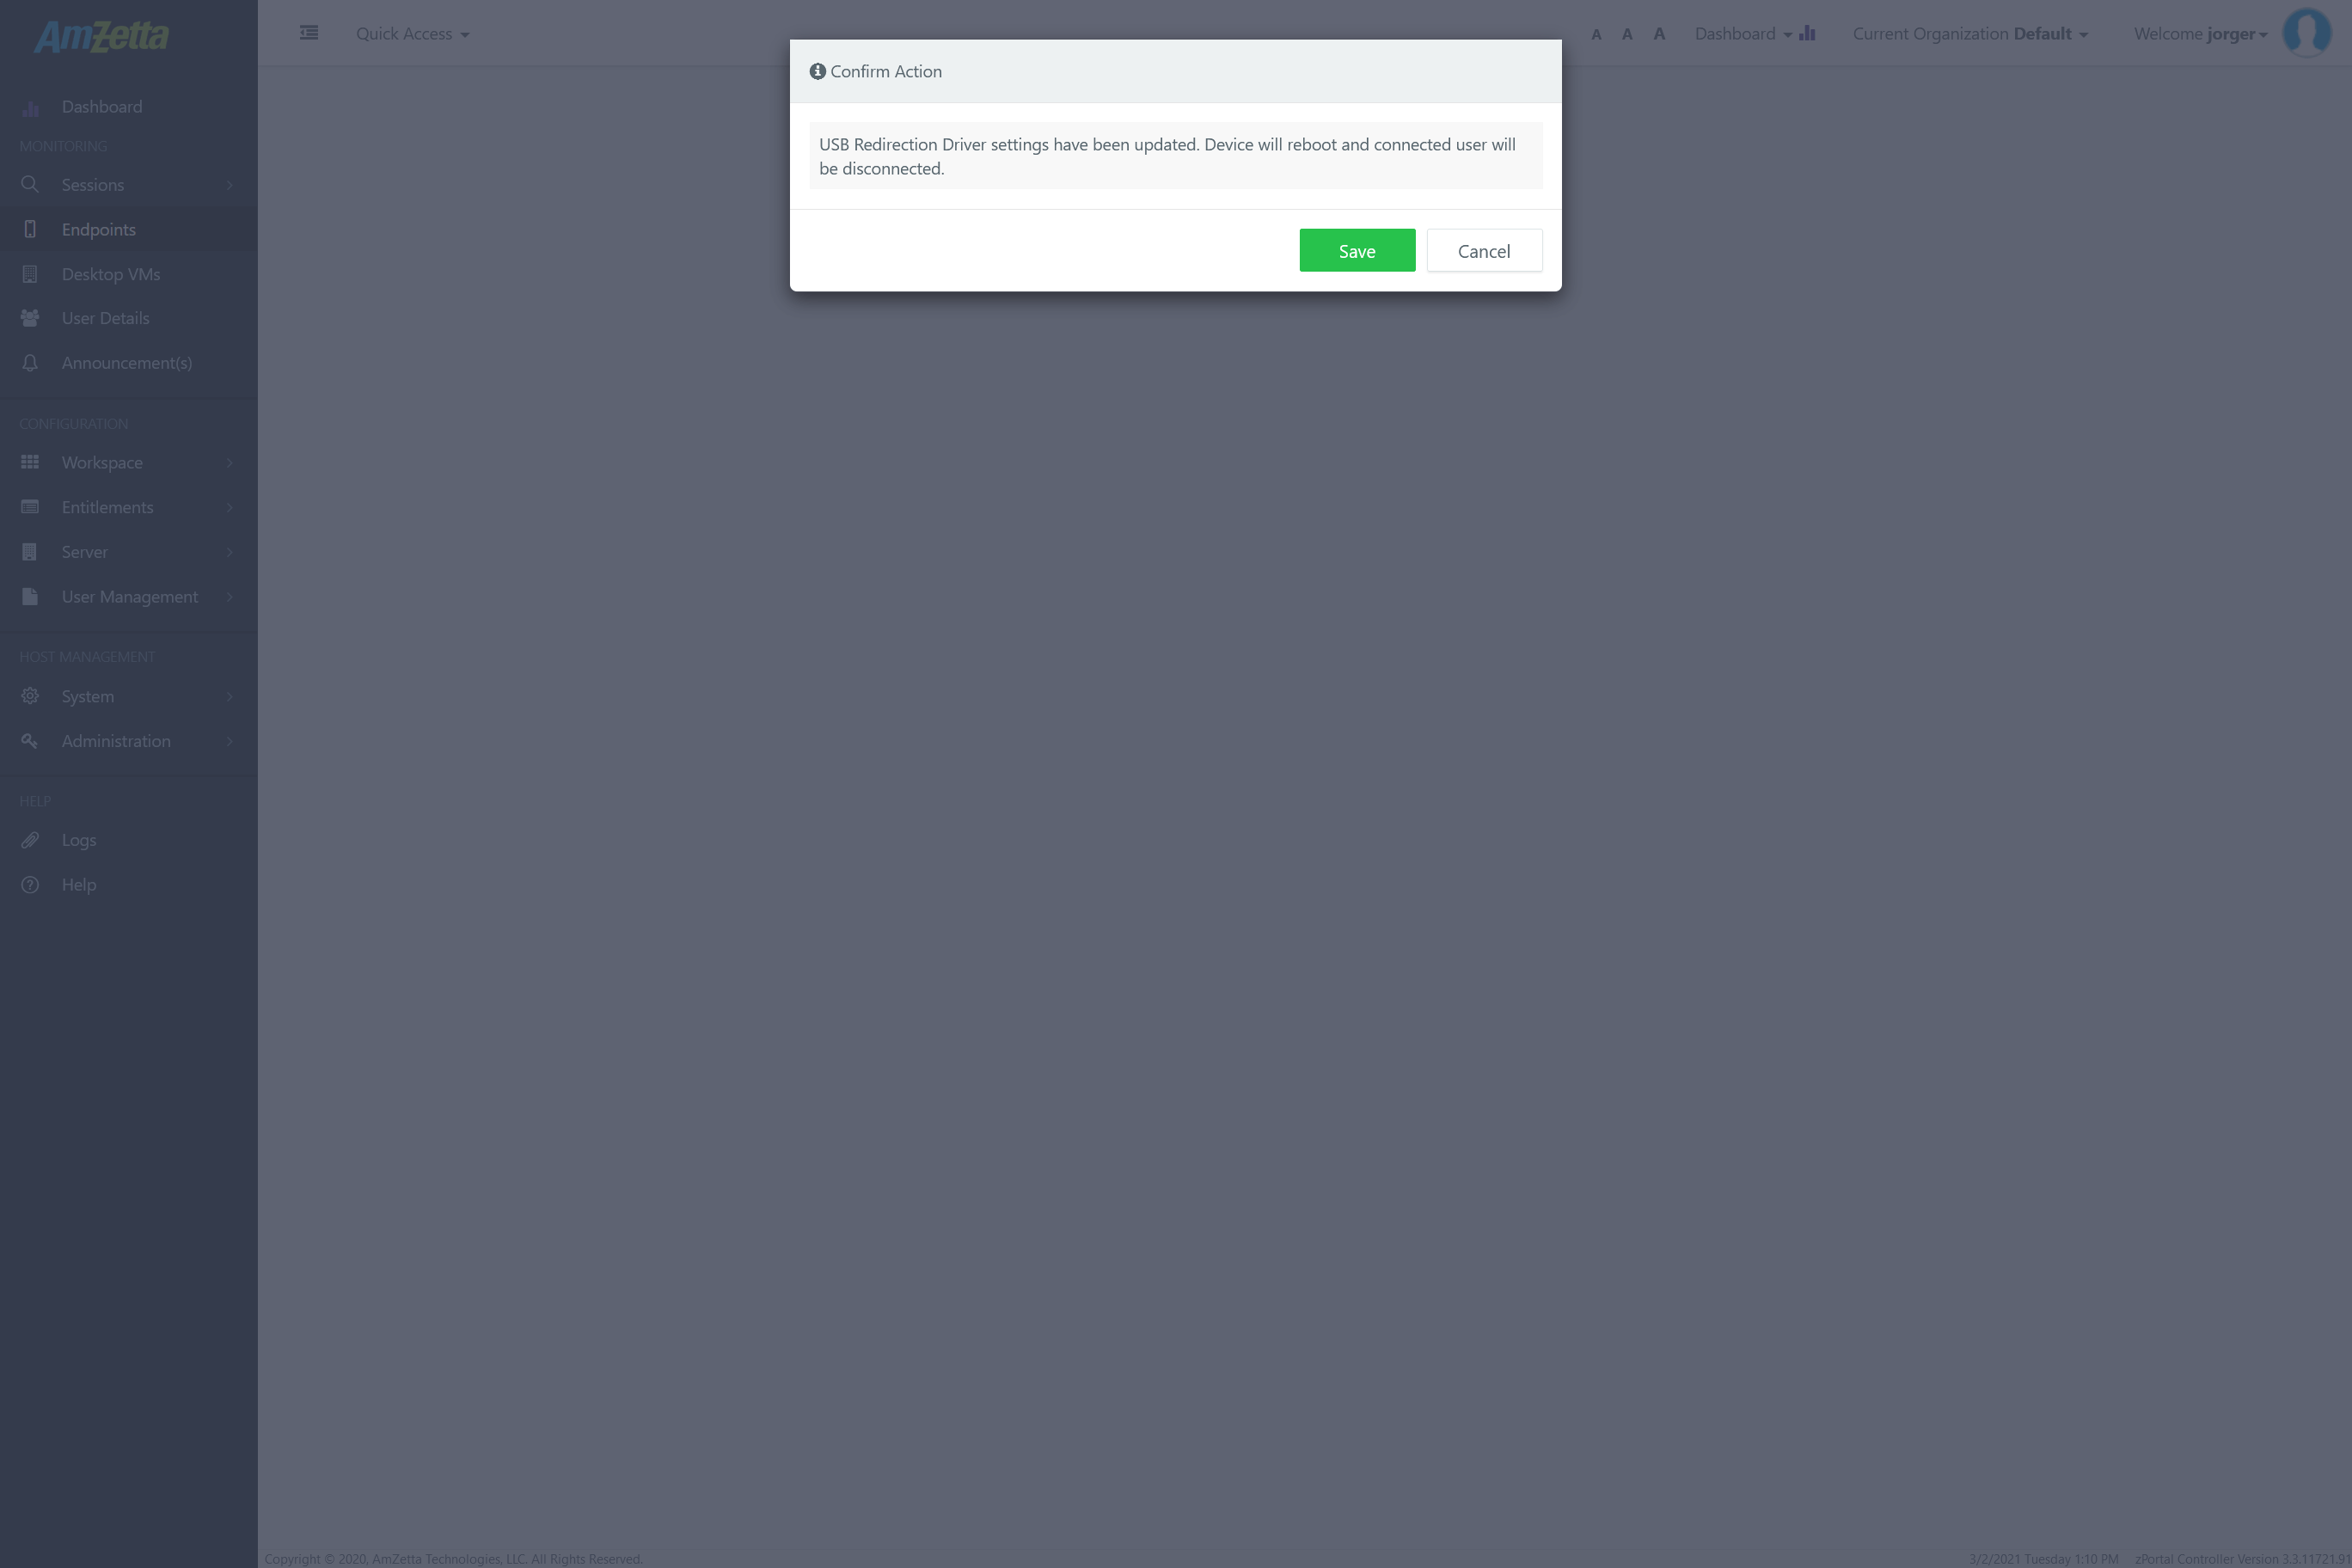
- Device will be rebooted and will start using new USB Redirection Driver configurations after restart
|
Note:
|
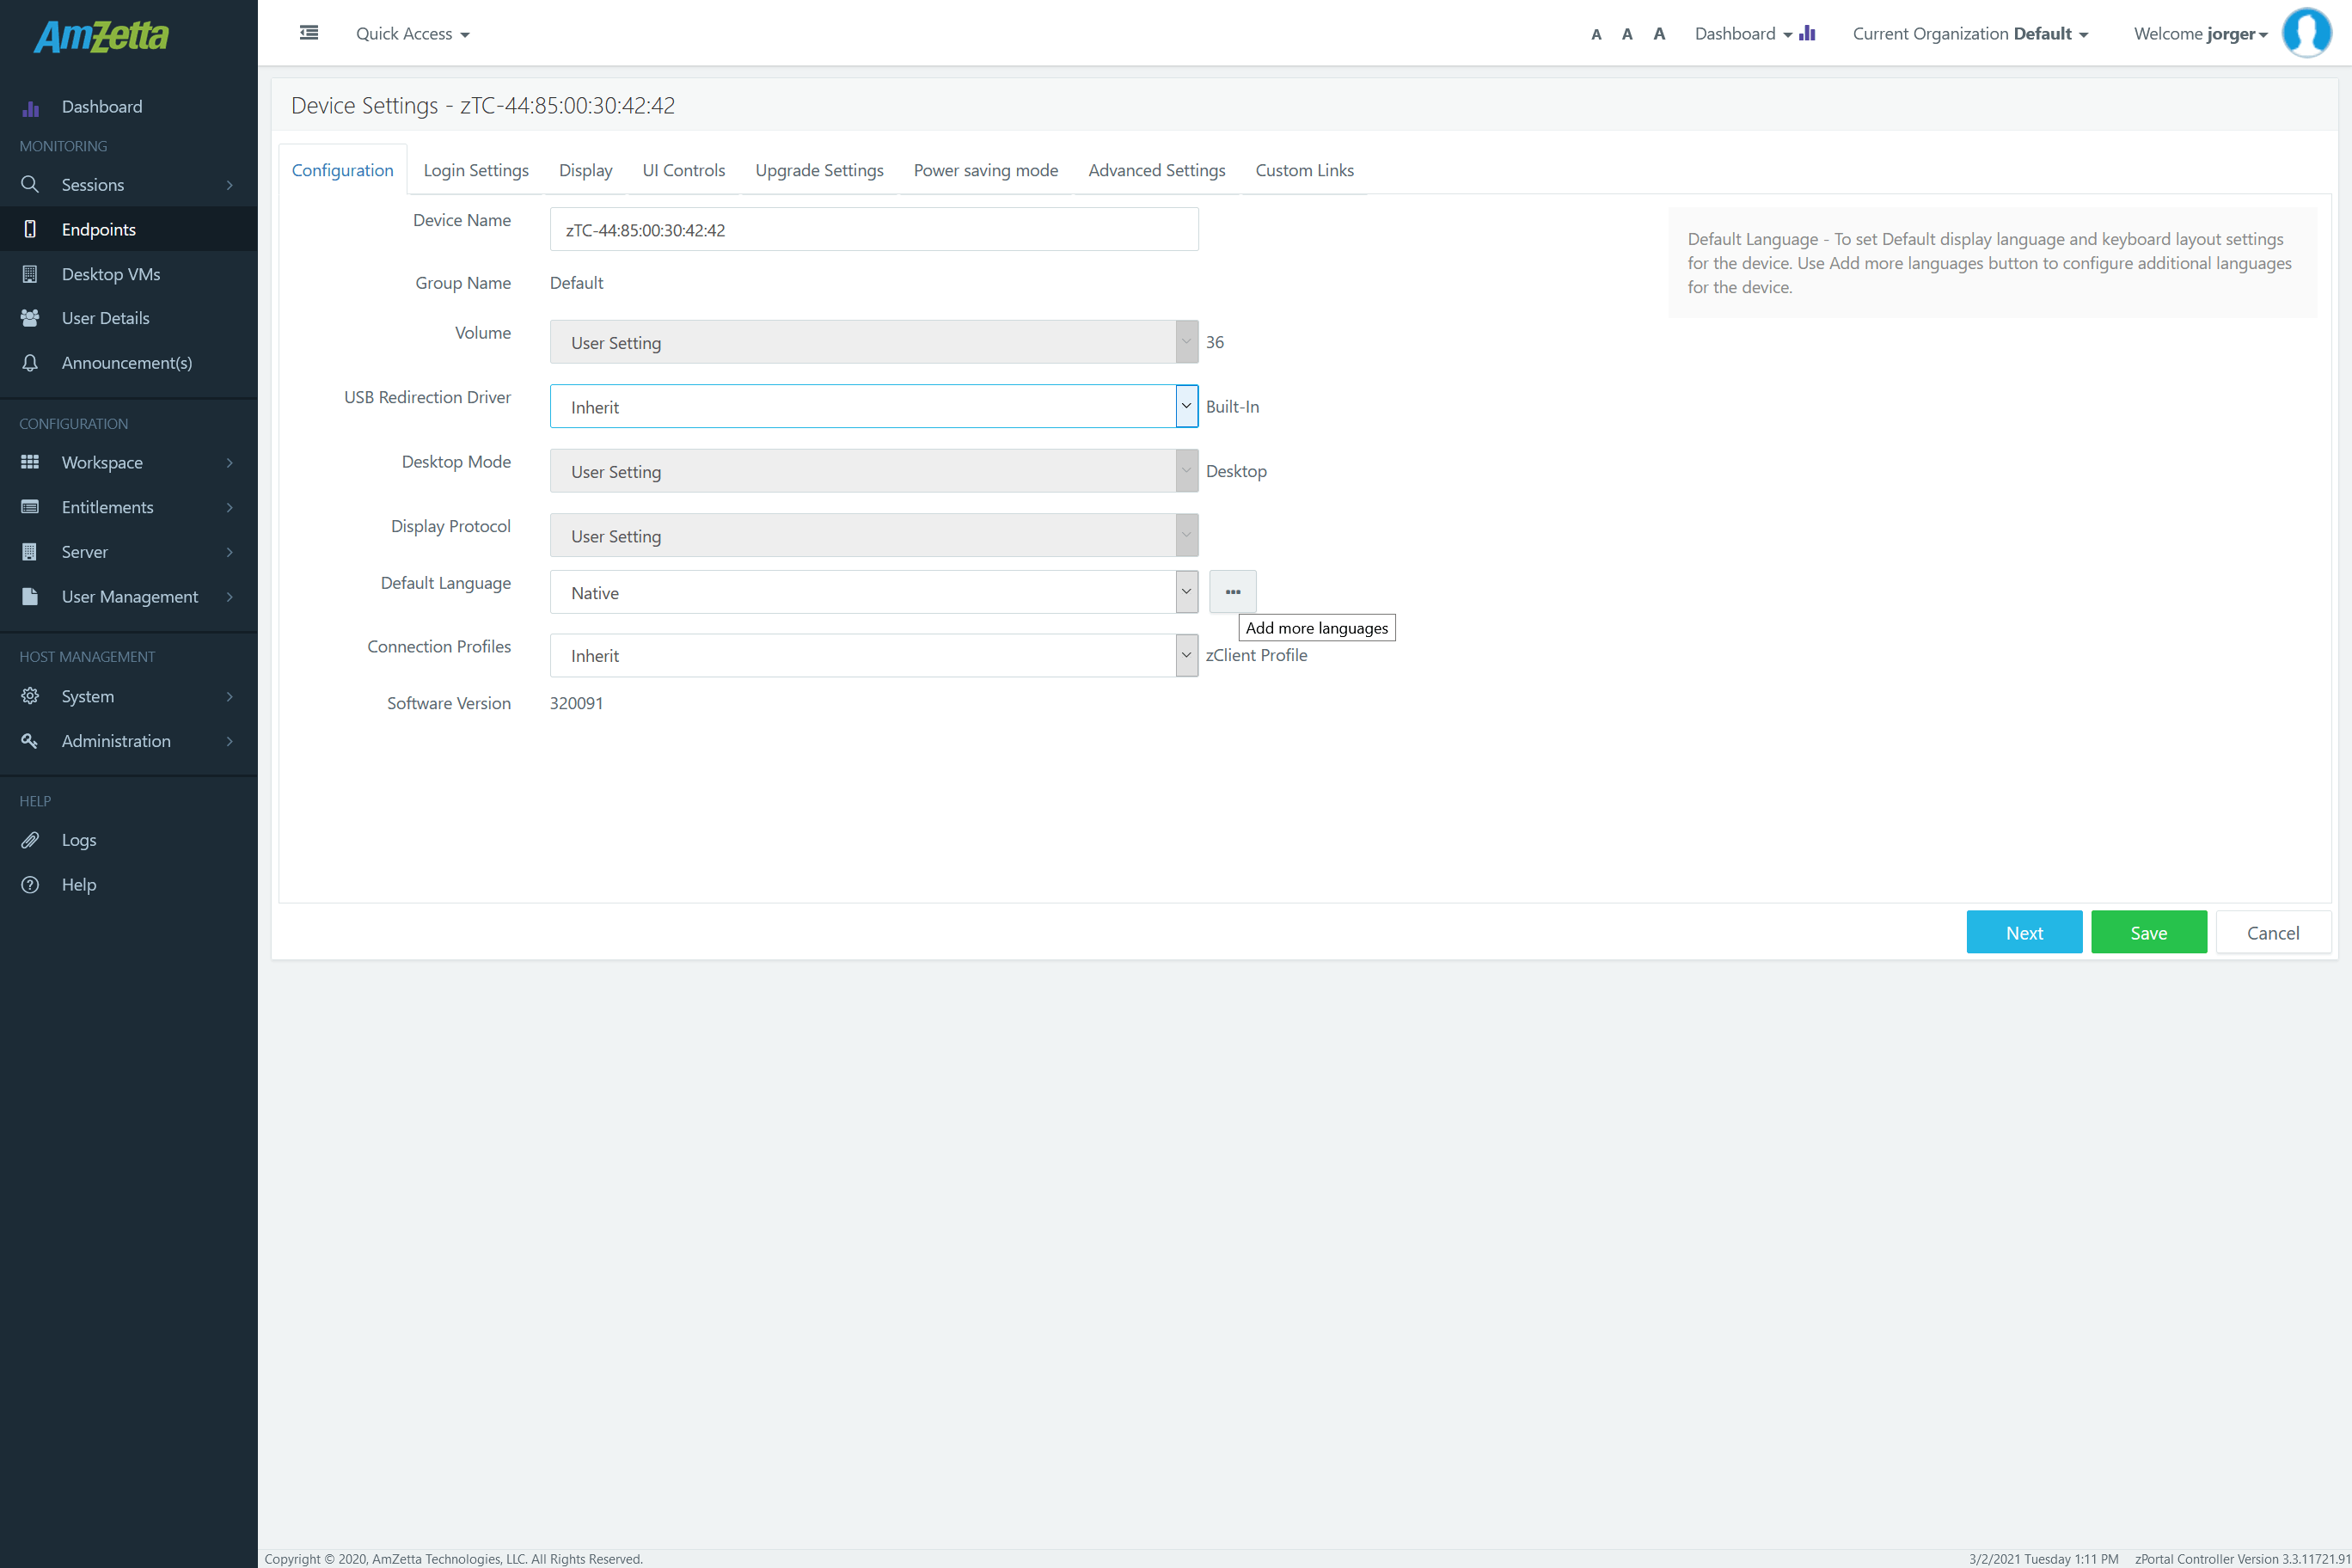
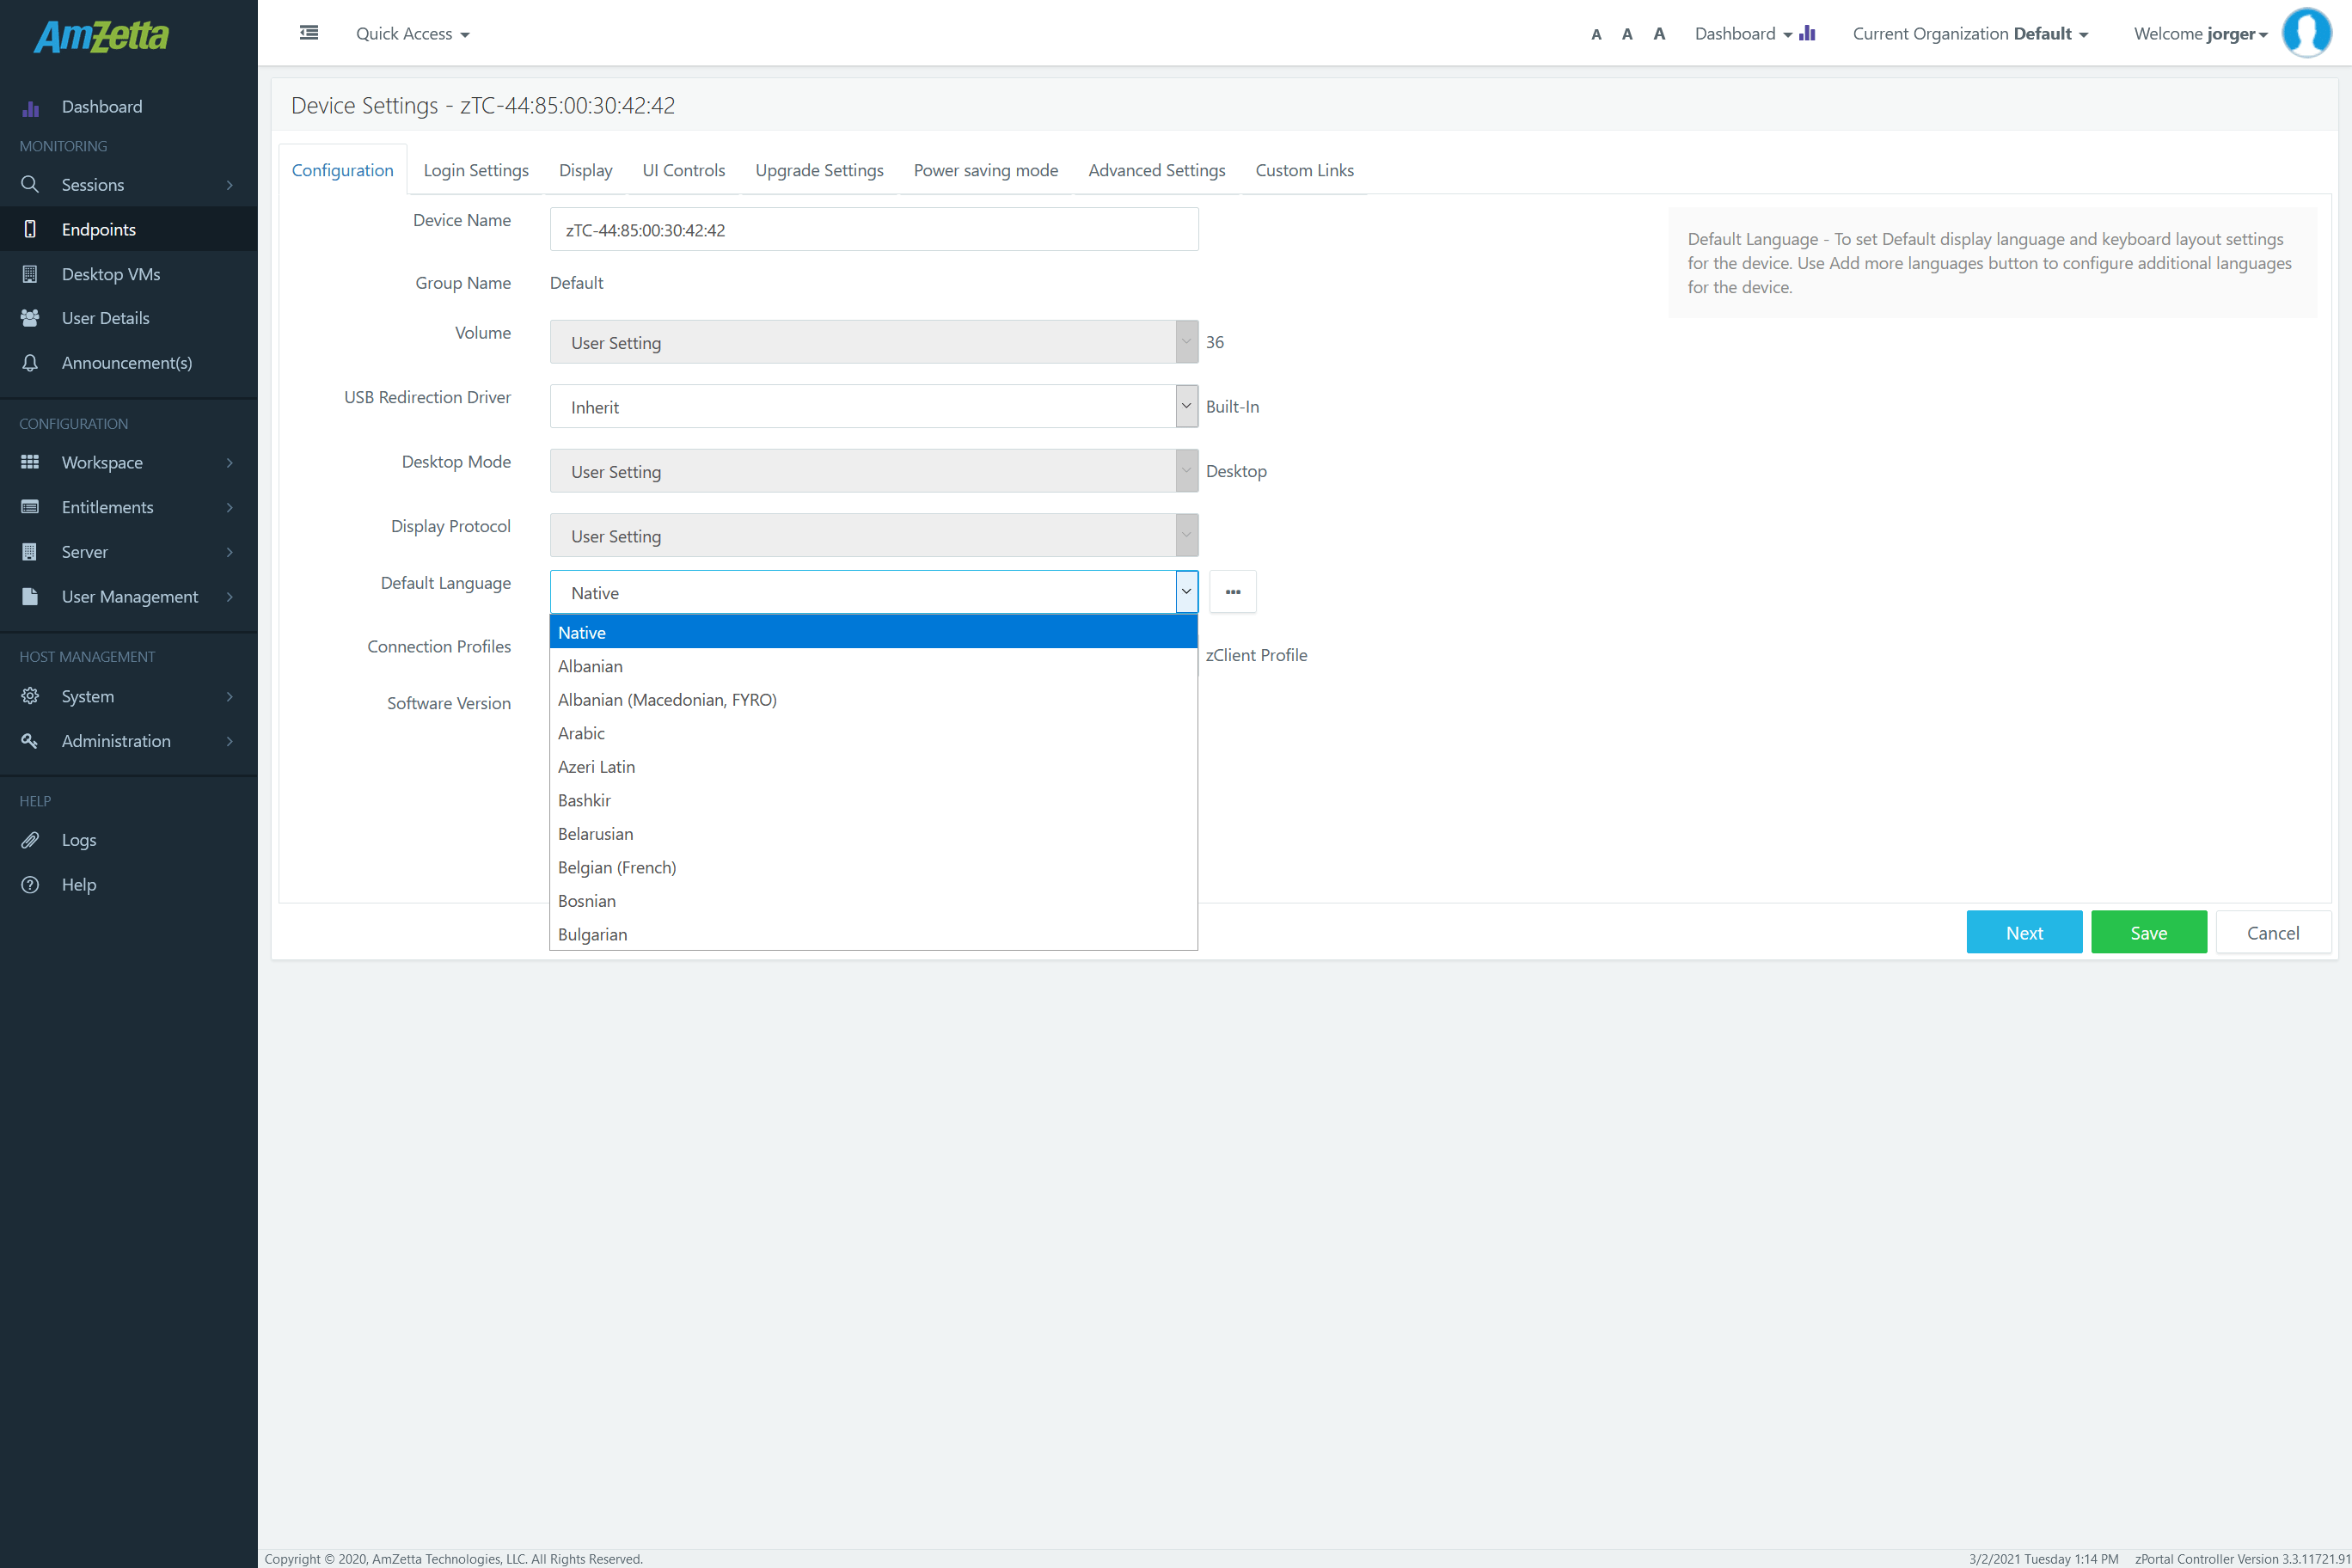
Default Language
Default language option can be used to set the default language for the device and to provide language choices to the user on the zPortal Client login screen.
The default value is always native using the native (EN-US) language of the device until another language is specified on zPortal Controller.
In Default Language option administrator will be able to configure the following language configurations:
-
- Add More Languages
- Remove Added Languages
- Select Default Language
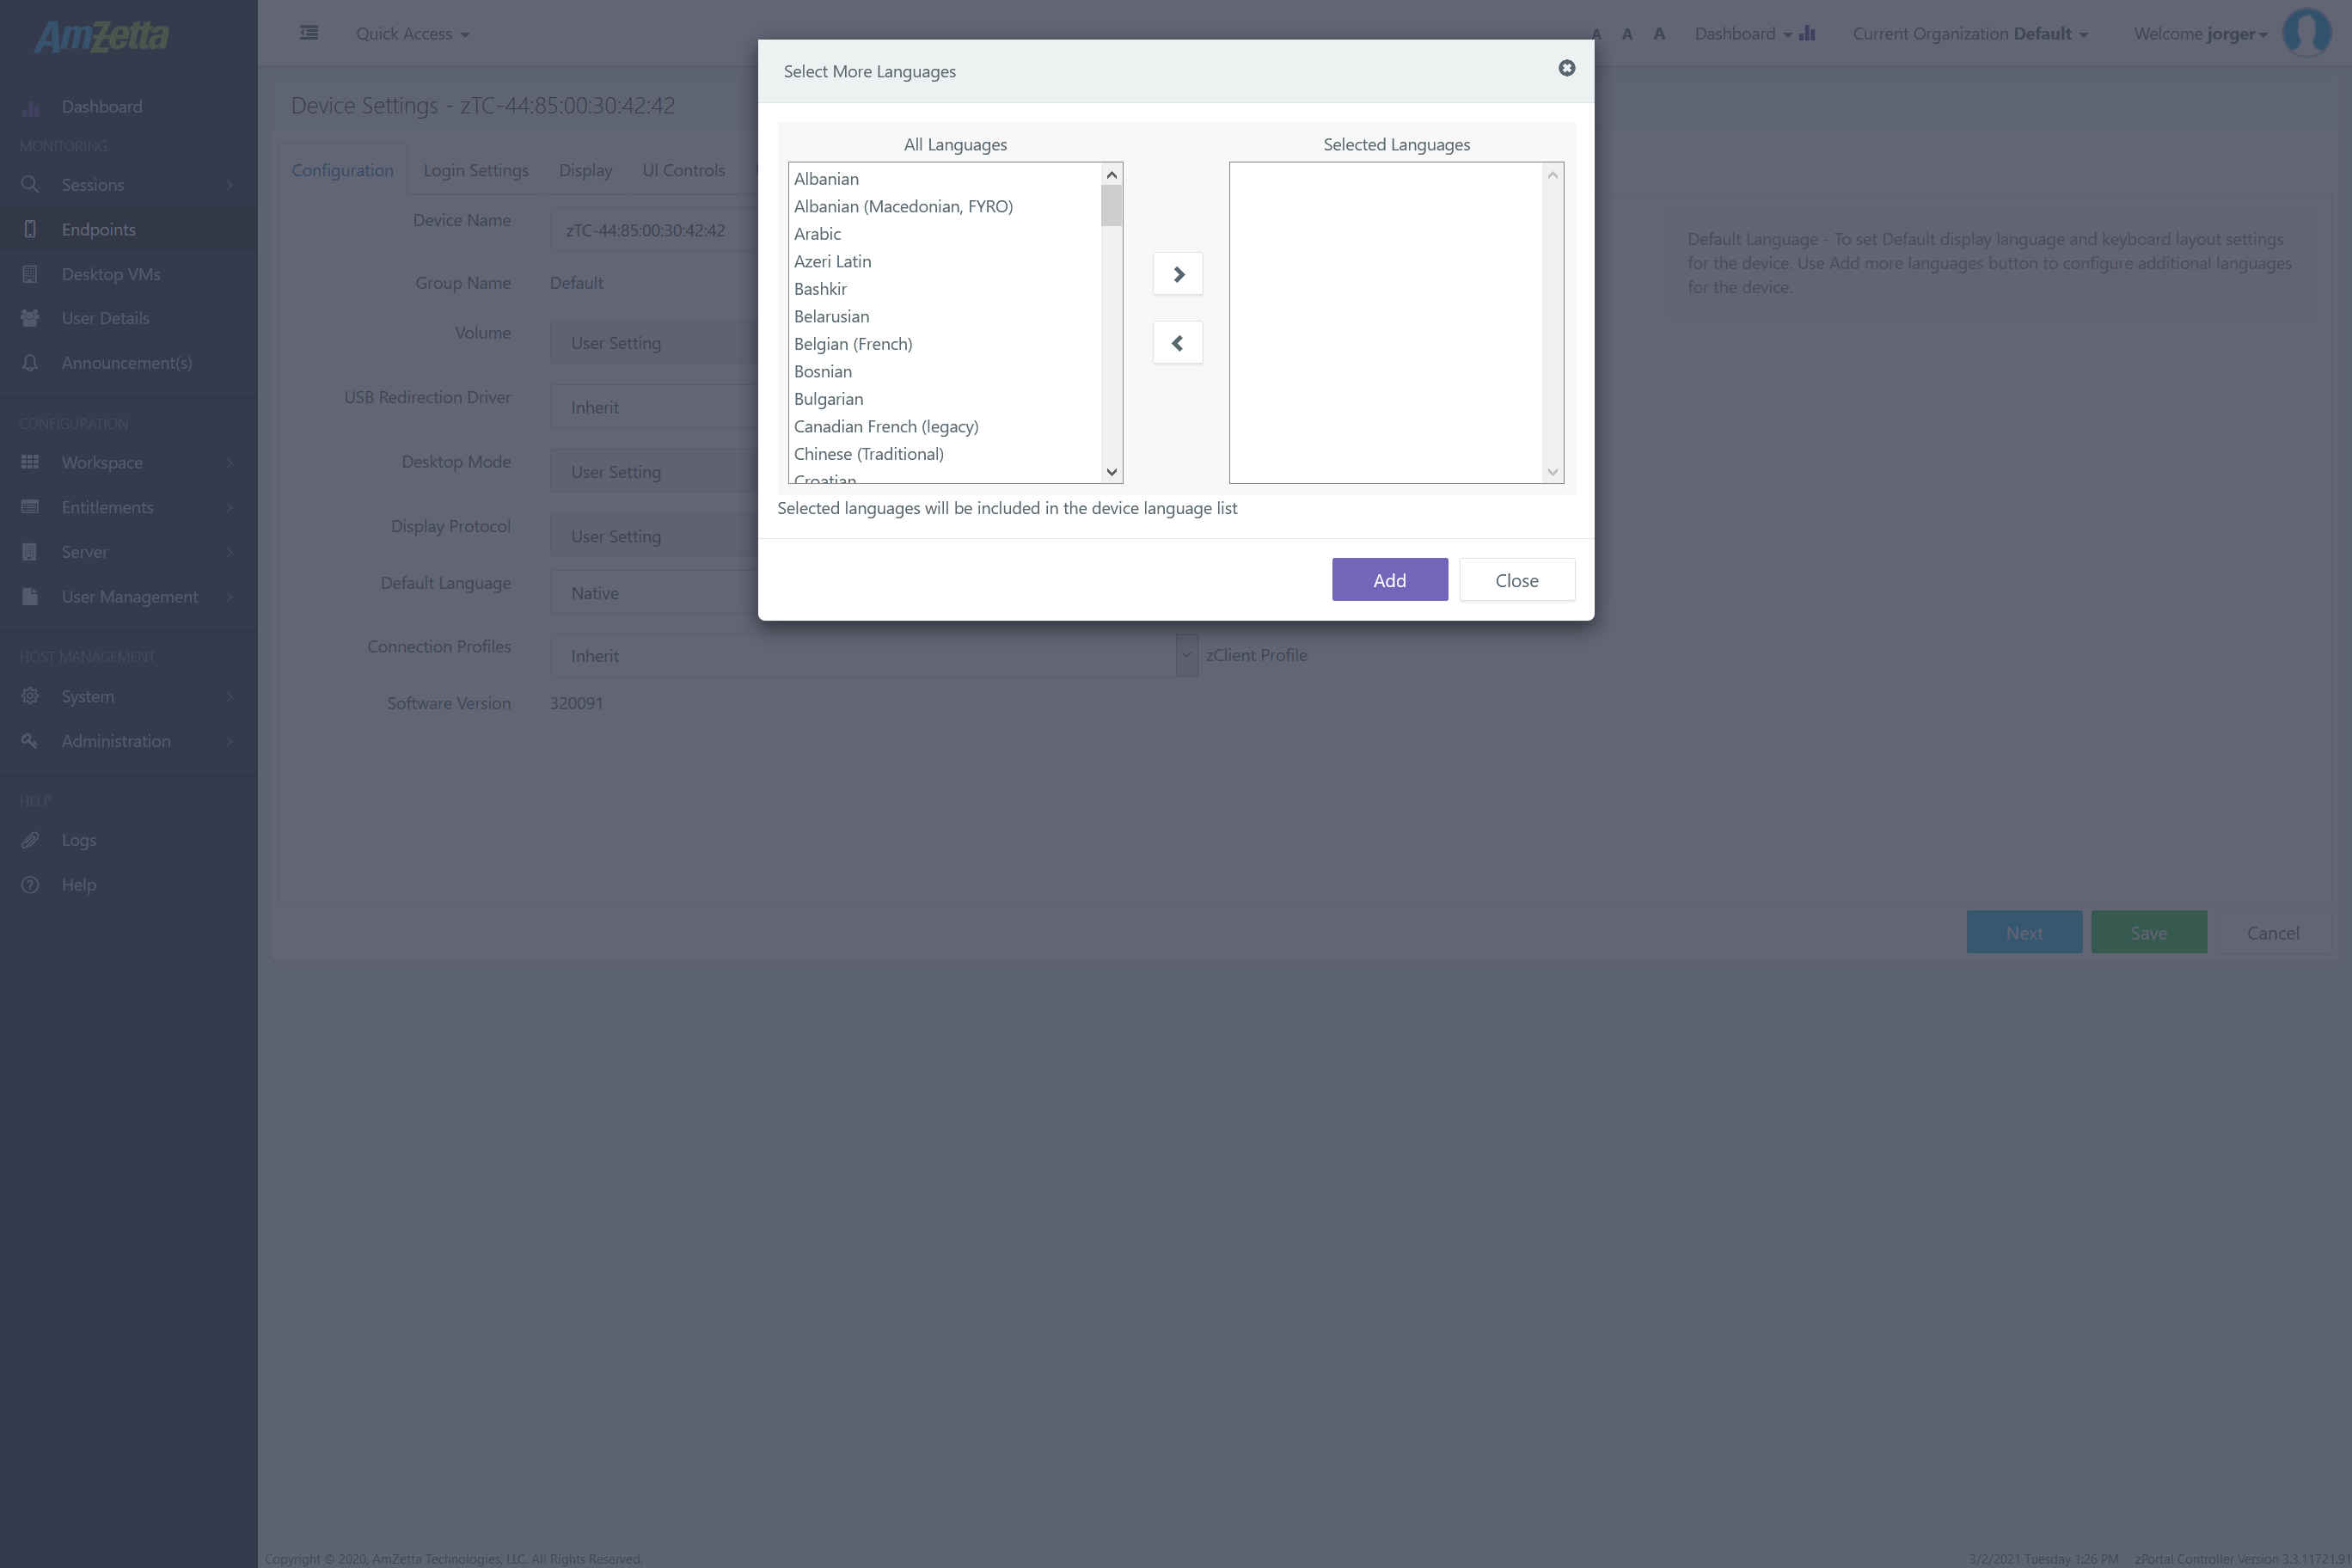
Add More Languages
Adding multiple languages for the device provides end user options to select language of their choice. To add multiple languages for the device, in Device Settings dialog -> Configuration screen:
- Click on Add More Languages button.
- On Select More Languages dialog, select multiple languages using ctrl + mouse click or shift + mouse click operations.
- Click on Right arrow button
- Click on Add button
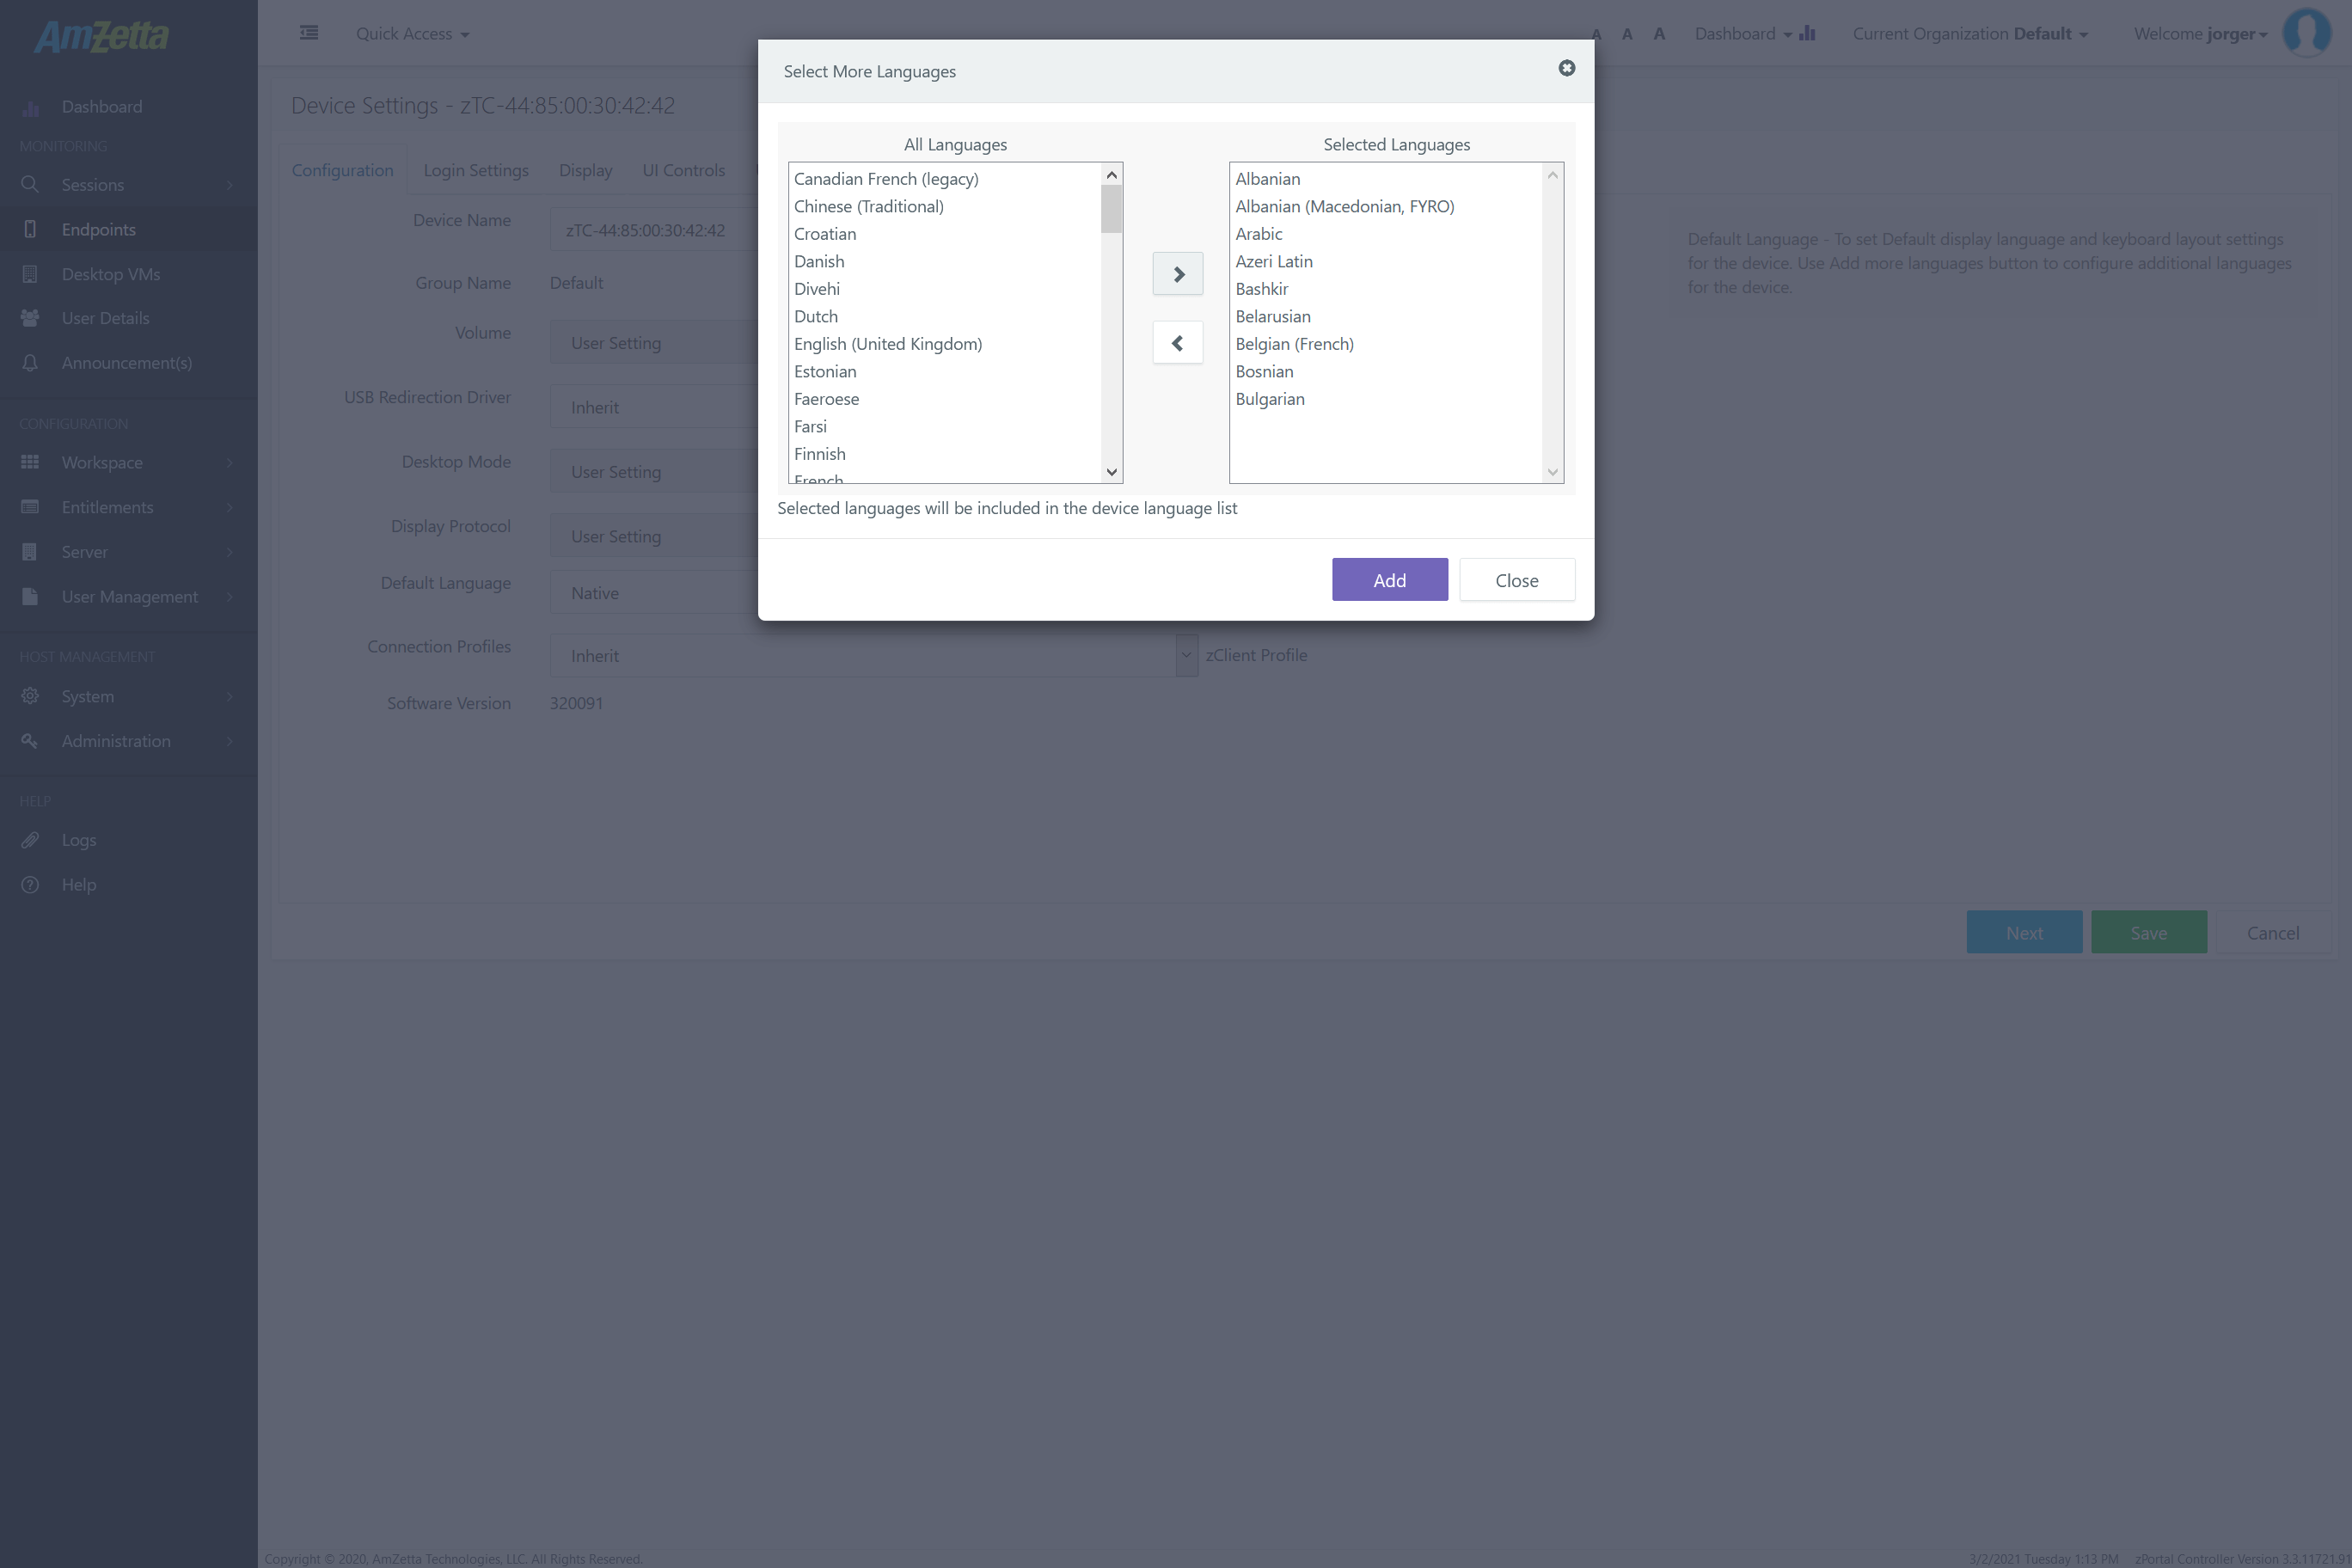
- All the selected languages will then appear on the Selected Languages drop down list
- Click on Save button to save the Device Settings
- Default Language changes in Device Settings require device reboot and thus Confirm Action dialog will be displayed with checkbox Reboot the device now. Connected user will be disconnected.
- Enabling this option will reboot the device immediately and language changes will be applied
- Keeping this option as unchecked will not reboot the device and changes will be applied on next device reboot
- Rebooting the device will enable the Keyboard control on login screen with all above language changes available.
Remove Languages
Administrators can also remove additional languages by selecting the languages from language list on right side.
- Click on Left arrow button.
- Click on Add button.
- Default Language changes in Device Settings require device reboot and thus Confirm Action dialog will be displayed with checkbox Reboot the device now. Connected user will be disconnected.
- Enabling this option will reboot the device immediately and language changes will be applied
- Keeping this option will not reboot the device and changes will be applied on next device reboot
- All the selected languages will be removed from Default Language drop down list.
- Rebooting the device will enable the Keyboard control on login screen with all above language changes available.
|
Note: Administrator will not be able to remove the Default Language using above steps. |
Selecting Default Language for Device
Administrator can specify a default language for any specific device, but user will always have option to change the keyboard layout based on the provided options.
- Selecting any language from Default Language drop down will make that language default language for the device.
- Default Language changes in Device Settings require device reboot and thus Confirm Action dialog will be displayed with checkbox Reboot the device now. Connected user will be disconnected
- Enabling this option will reboot the device immediately and language changes will be applied
- Keeping this option will not reboot the device and changes will be applied on next device reboot
- In case of no other language is selected by the user during login, the default language specified in Device Settings should be used.
Connection Profile
Device Settings -> Configurations -> Connection Profile dropdown option can be used to specify connection profile for the selected device.
Connection profiles are used to configure user experience options in the Desktop sessions and can be created from zPortal Controller Management Console -> Setup -> Connection Profile section.
To configure a new connection profile
- Select the device and click on Device Settings button
- In Device Settings dialog, go to Configurations section
- In Connection Profile dropdown list, select the option Set Manually (Default configuration is Inherit -> Which means devices will use the connection profile as defined in Device group)
- Select the desired connection profile from Connection Profile dropdown list
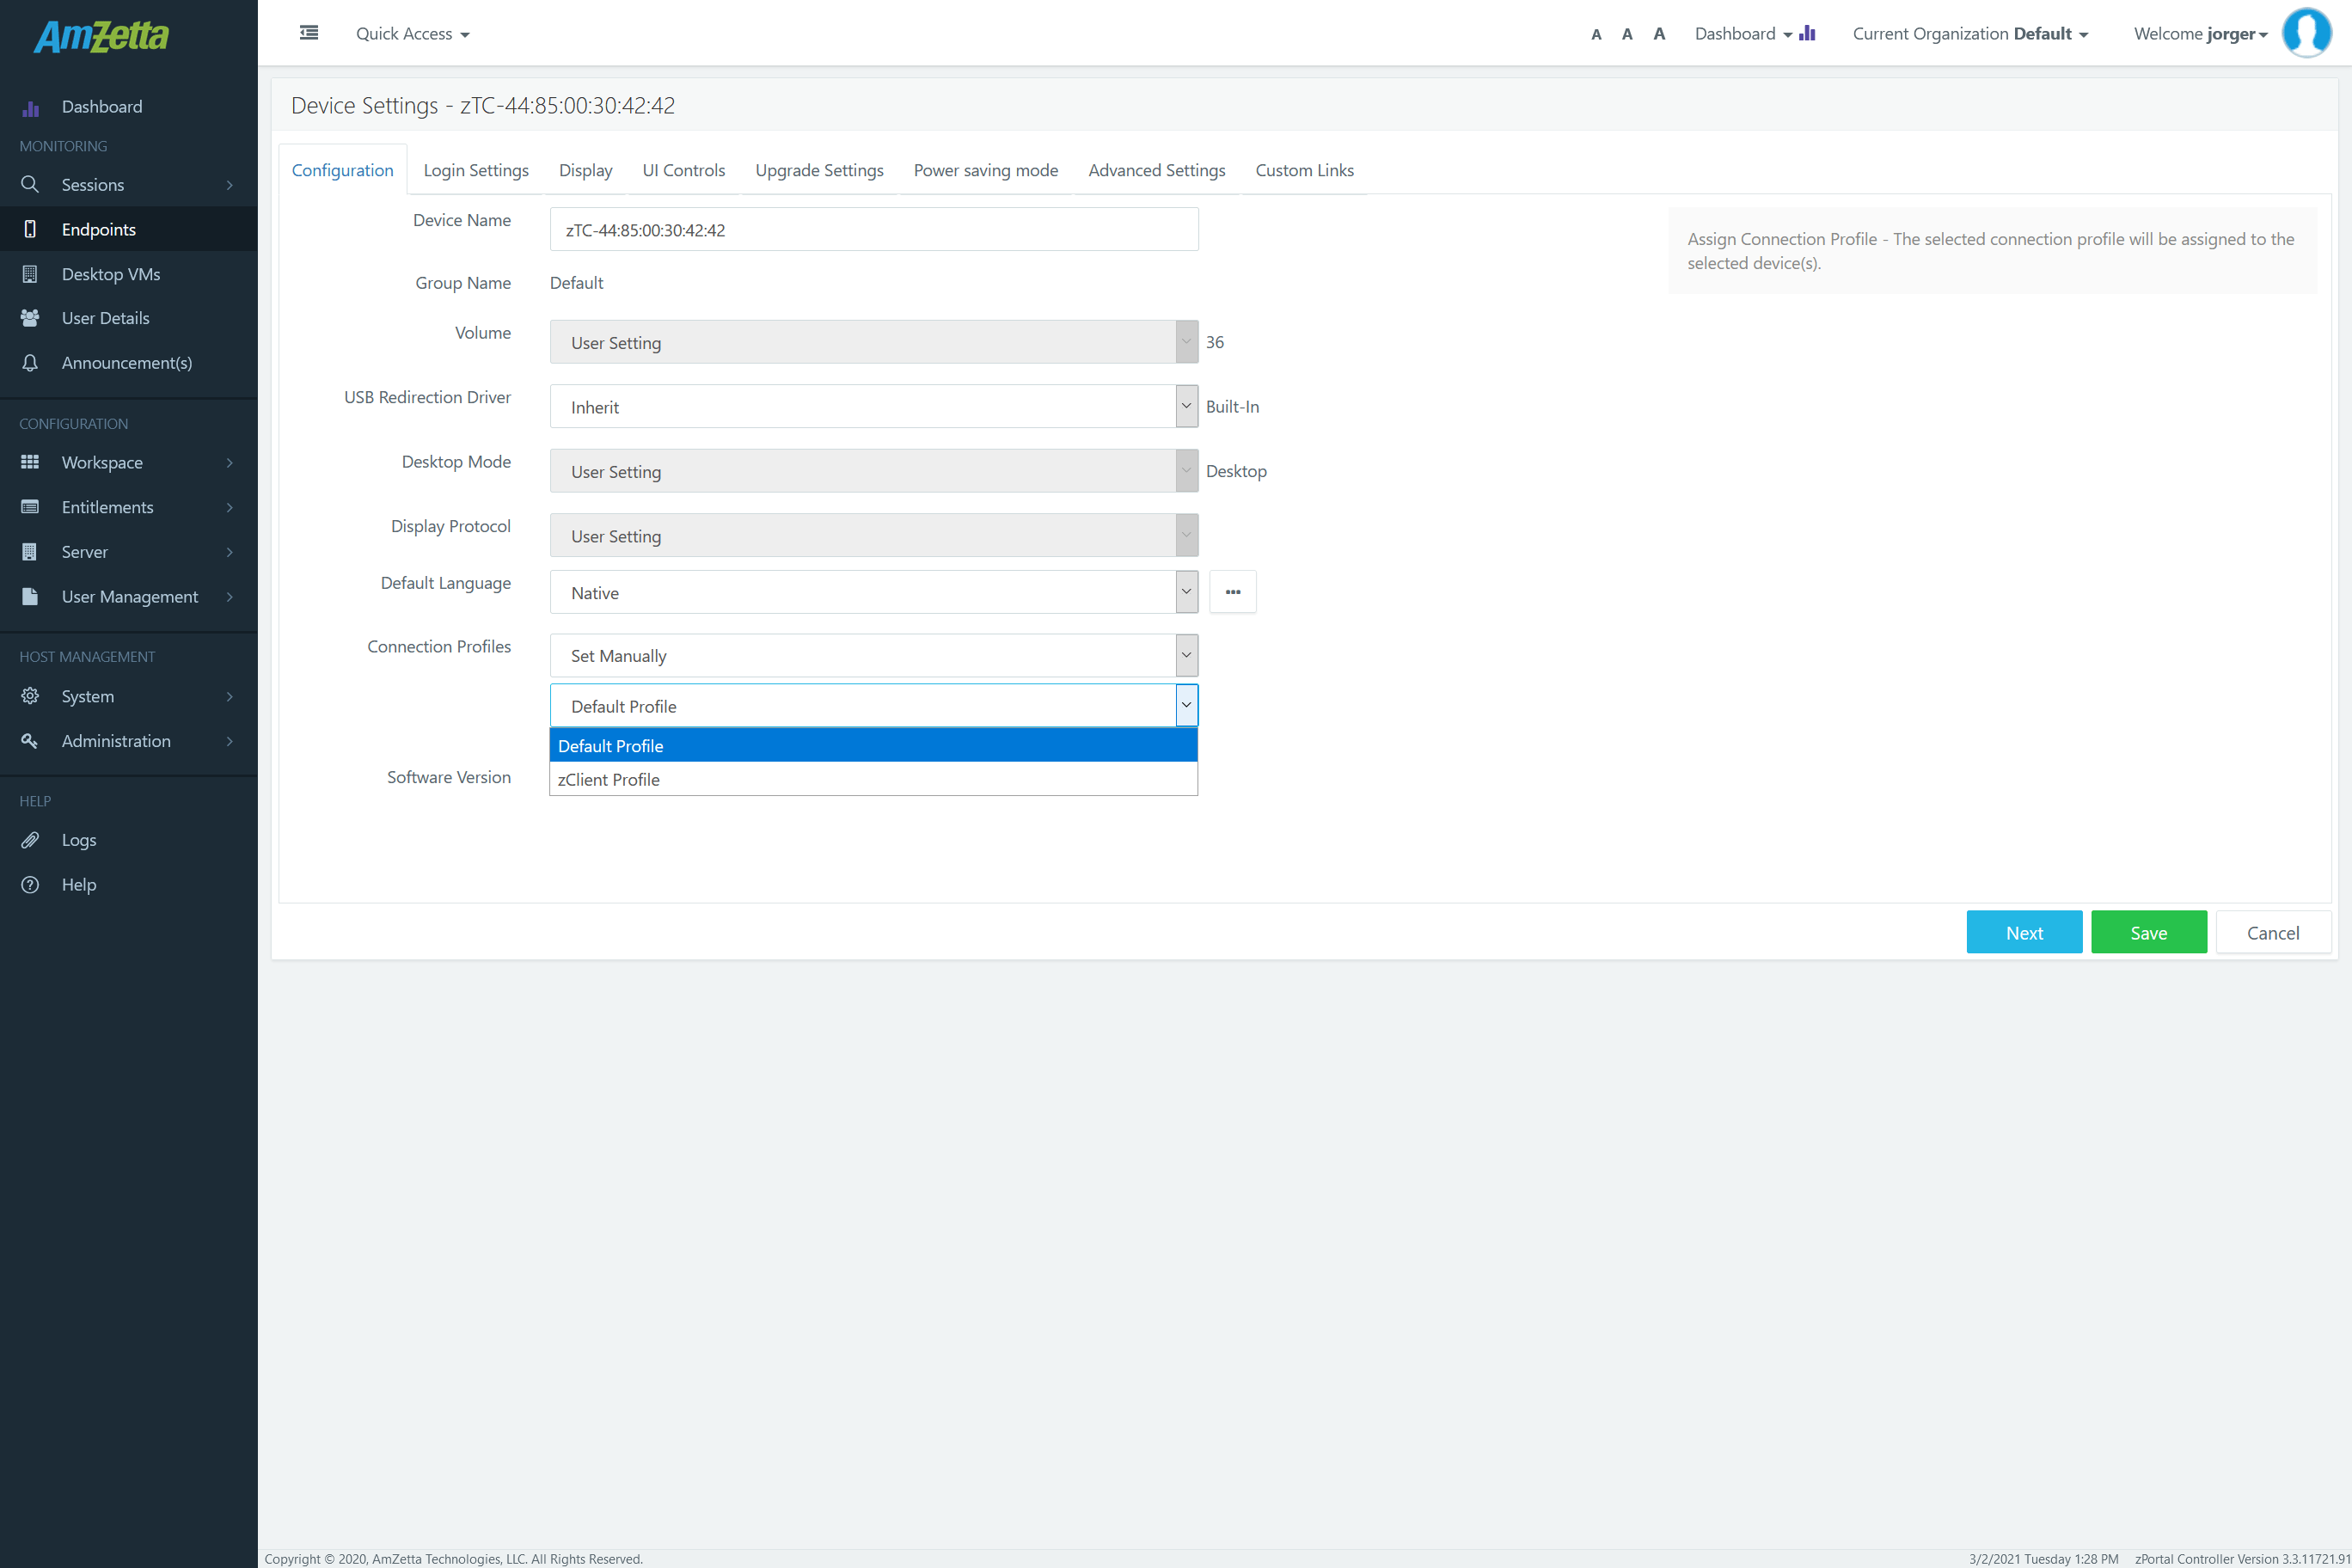
- Click on Save button to save Device Settings
- New Connection profile will be configured on the device and will be used in the very next session
|
Note: The connection profile changes do not get applied on the currently running sessions. |
Software Version
This field will be used to display the current client version of the device. In case of any difference between the current version and available software version on zPortal Controller, an alert icon (exclamation sign with red/ orange color) will appear, representing out of sync client version.
The alert can be used to change the device settings to enable/ disable the Auto Update Client settings.
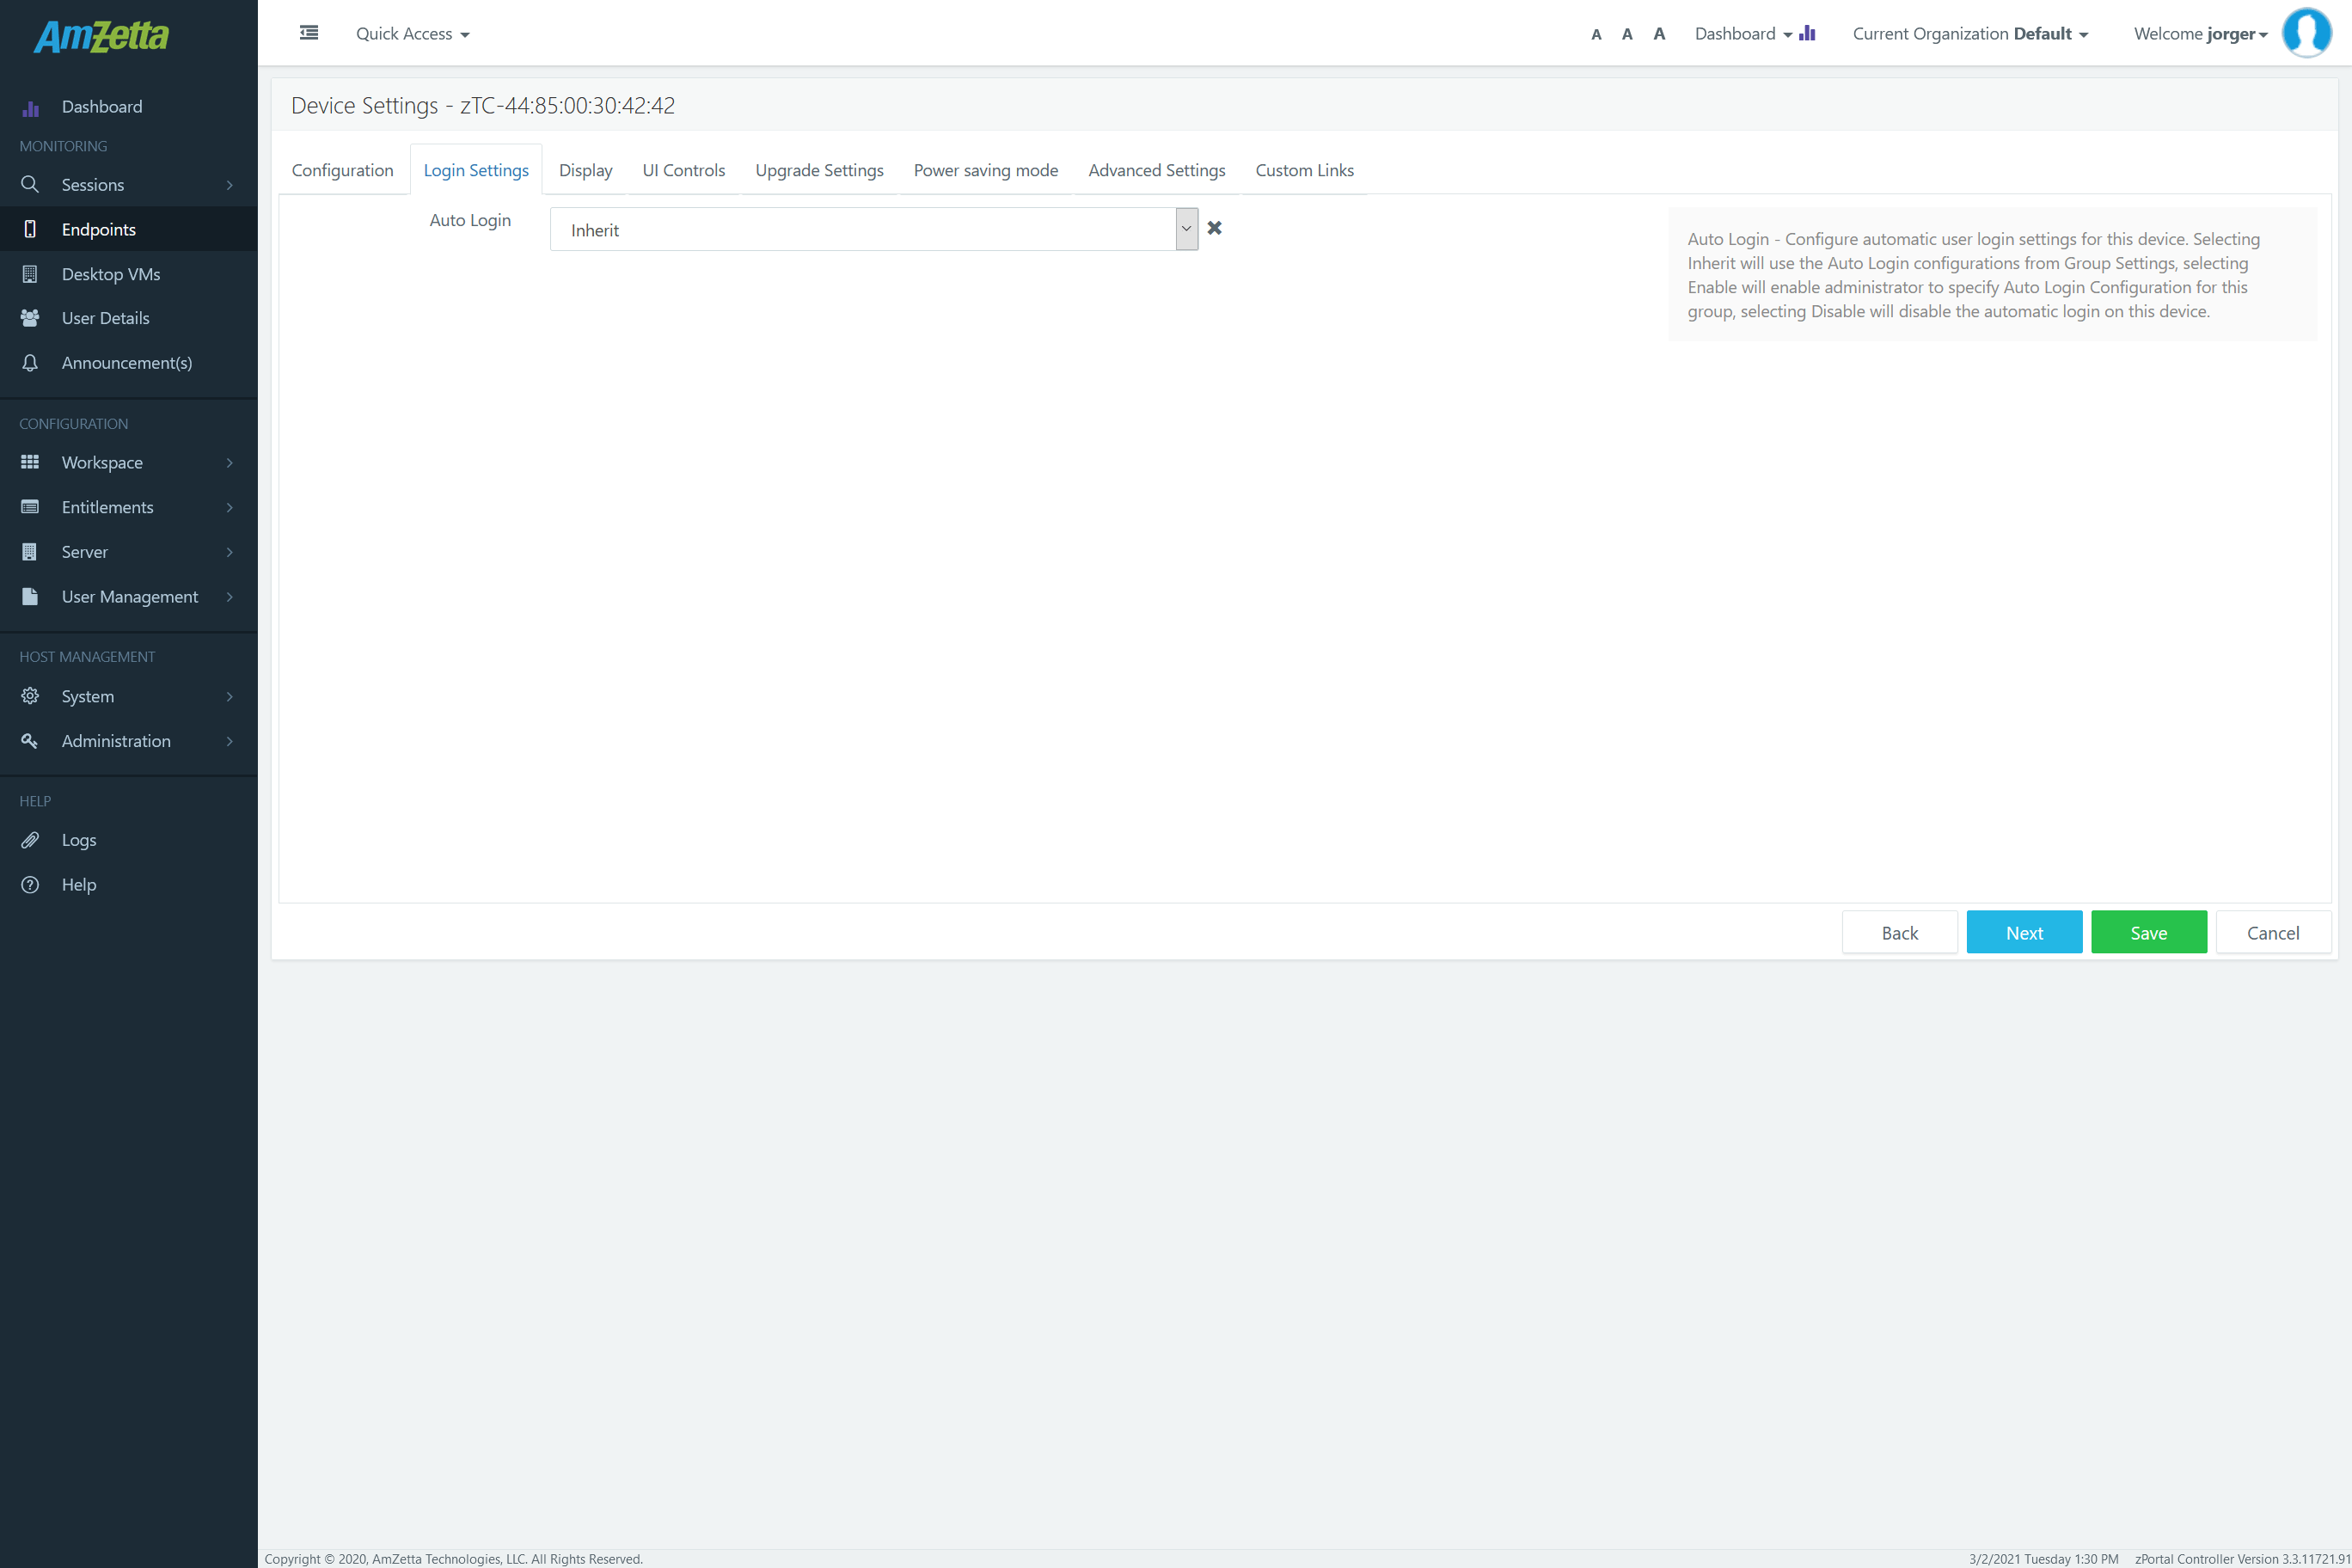
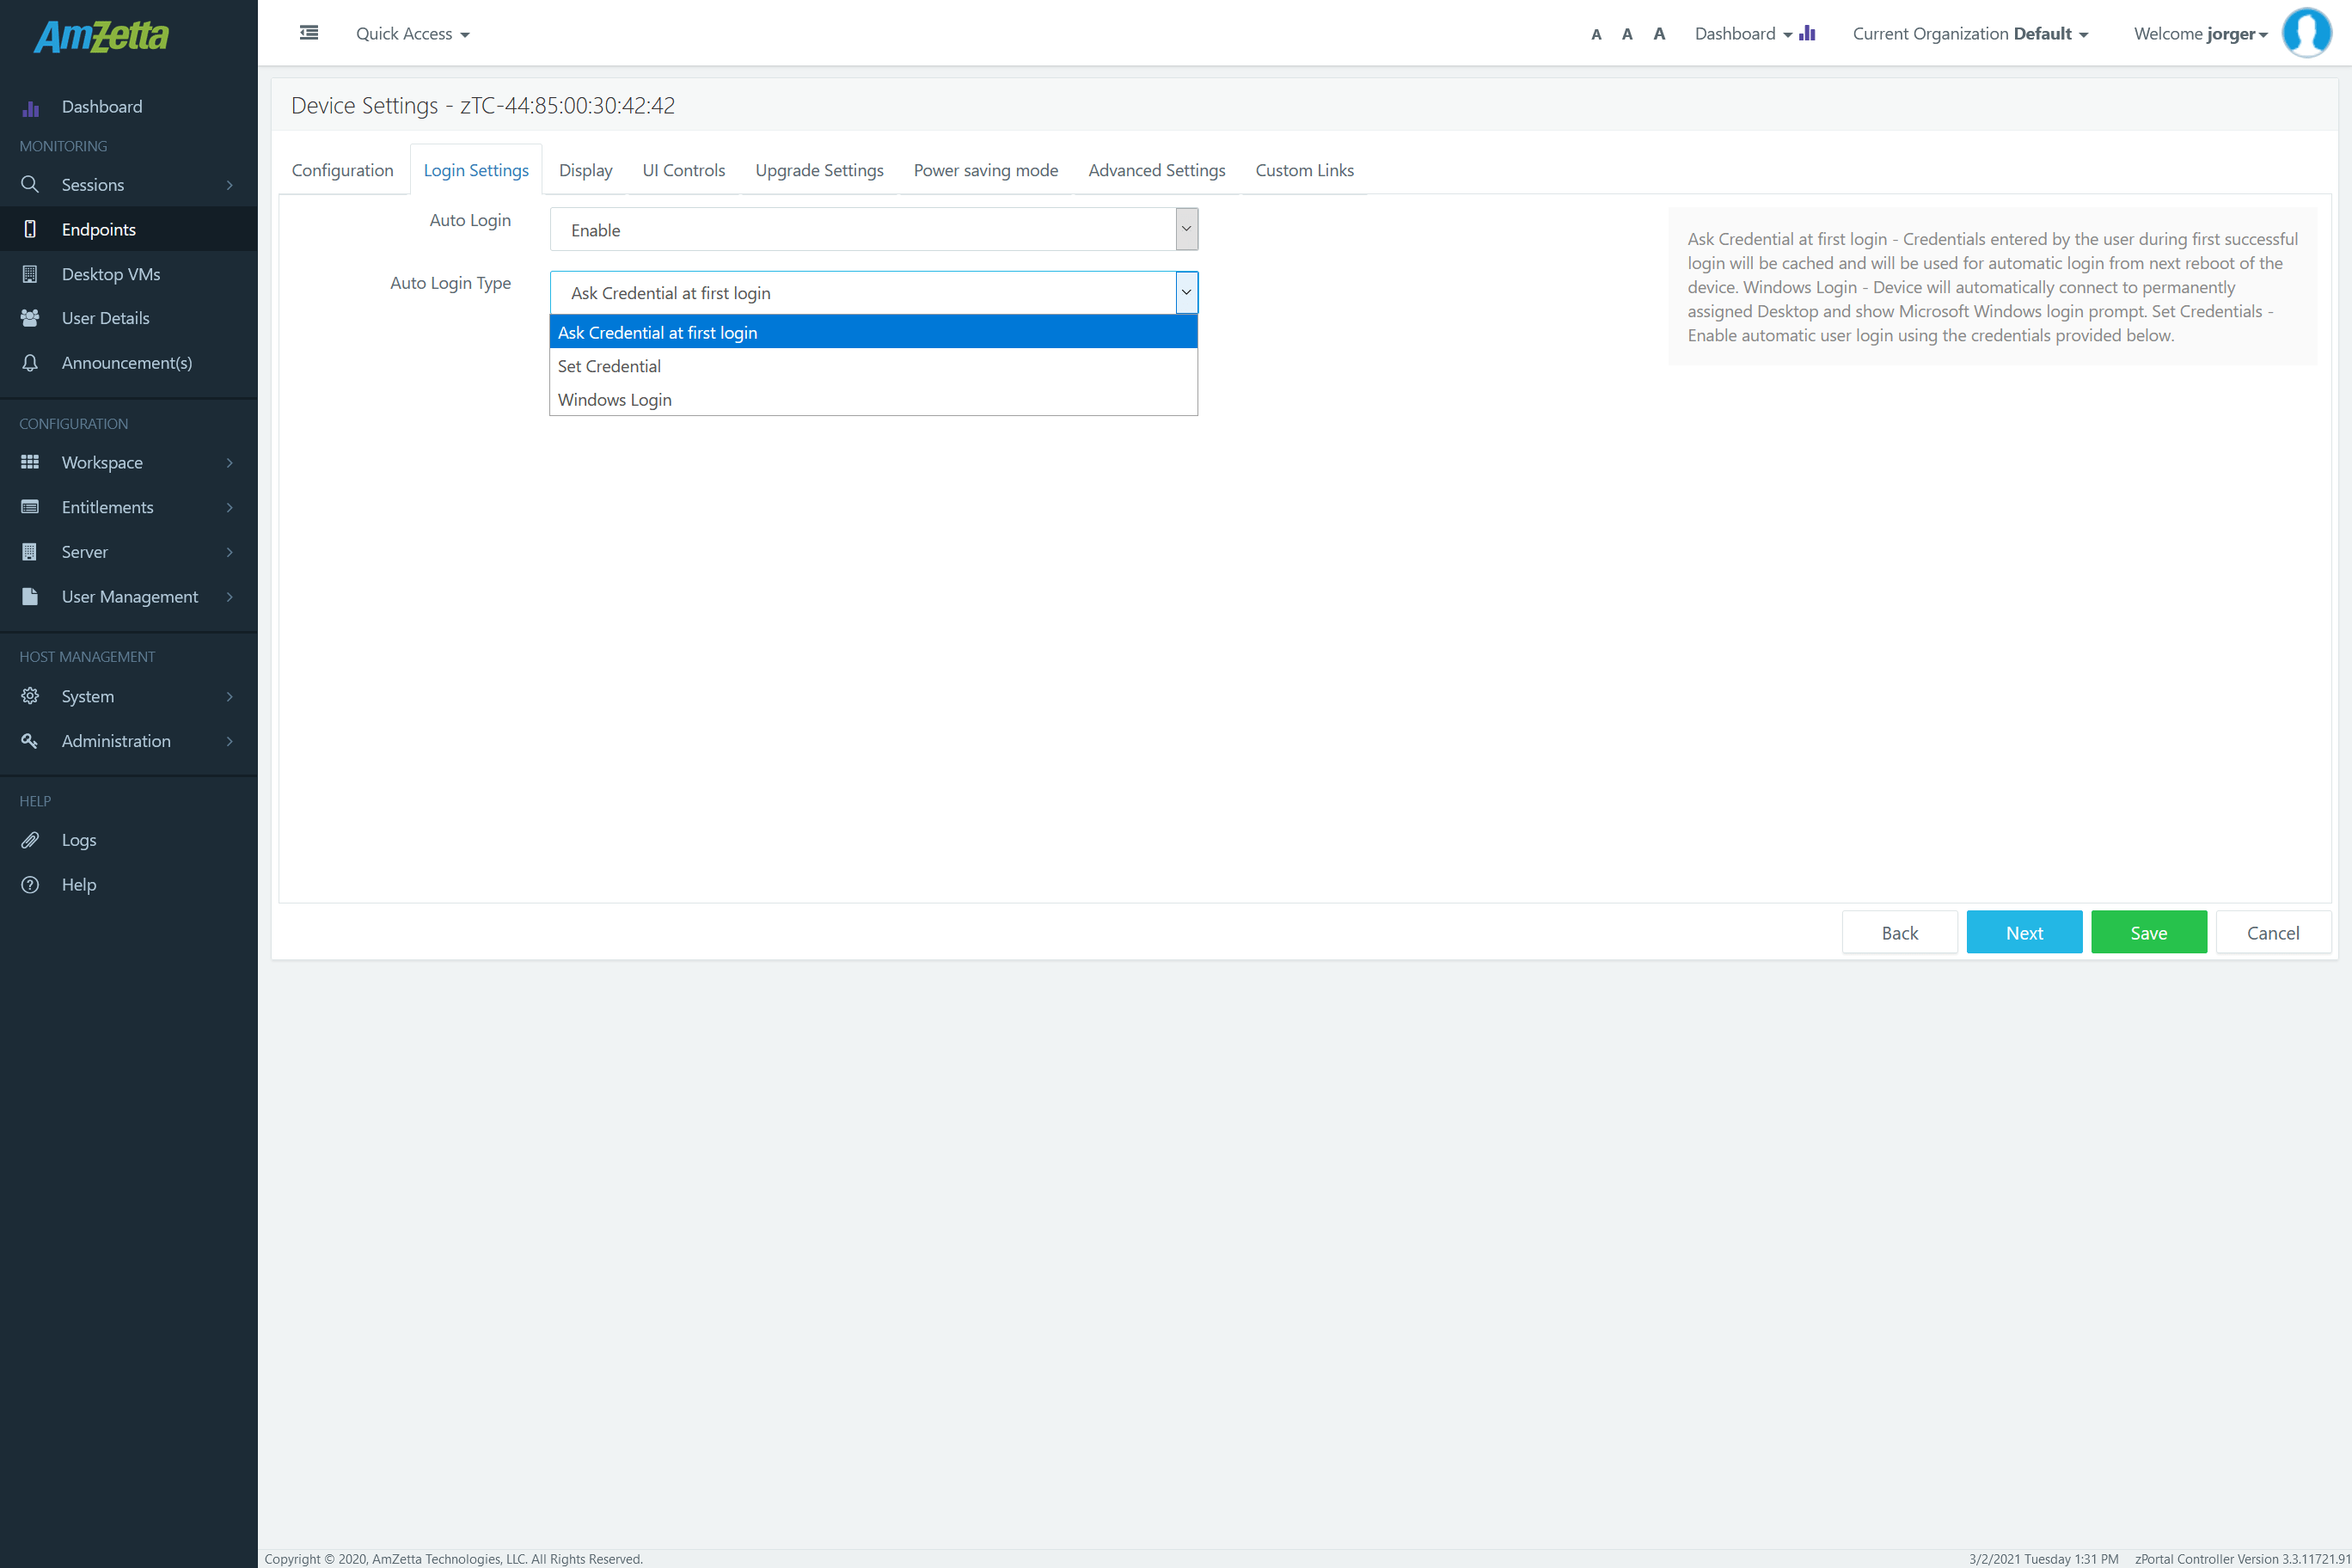
Login Setting
Auto Login settings in Device Settings can be used to configure specific auto login settings on the selected device. Following configurations are possible:
-
- Inherit: The default Auto Login configuration in Device Settings. Specifying the device to inherit the login setting from Group Settings and thus device will use Auto Login settings as configured in Group Settings e.g. if Auto Login in Default Settings is configured as Windows Login and if Device Settings – Auto Login is set as Inherit then it will get Auto Login configuration as Windows Login.
Image displayed next to Auto login checkbox reflects the status of Auto Login configurations in Default Settings
-
-
- A Cross sign [X] reflects that Auto Login is disabled in Group Settings
- A Tick sign [✓] reflects that Auto login is enabled in Group Settings.
-
-
- Enable: Selecting Auto Login as Enable in Device Settings will enable the automatic login on selected device irrespective of Default Settings configurations. Once Auto Login is set to Enable one of the following configurations needs to be selected:
-
-
- Set Credentials
- Devices will be automatically connected to configured Desktops using the credentials set by Administrator in Default Settings/ Device Settings
- Set Credentials
-
-
-
- Ask Credentials at first Logon
- On first login users will be displayed with default login screen and on successful logon, the provided credentials will be cached. Same credentials will be used for automatic connection to the configured Desktops from next device reboot.
- Ask Credentials at first Logon
-
-
-
- Windows Login
- Configured Desktops will be connected on the devices without any credentials and users will be needed to provide credentials in the remote session.
- Windows Login
-
|
Note: Windows login do not work with NLA (Network Level Authentication) enabled on devices. |
-
- Disable: Specifies that selected device will not use automatic login settings and thus manual login will be enabled on device.
Enable Auto Login Configuration from Device Settings
- Go to Endpoints page – Select a device – Click on Device Settings button to open Device Settings dialog
- Go to Login Settings section
- Select the Auto Login checkbox to enable the auto login setting
- Choose desired auto login configurations
- Ask Credentials at First Logon
- Windows Login
- Set Credentials
- Provide appropriate credentials
- Choose desired auto login configurations
- Click on Save button to save the Default Settings
- On Confirm Action Dialog
- Select checkbox ‘Reboot the device now. Connected user will be disconnected.’ to immediately reboot and configure auto login settings and click on Save button
- Keep checkbox ‘Reboot the device now. Connected user will be disconnected.’ unselected and click on Save button to save the settings on the device. Auto Login settings will then start functioning in next device reboot.
Display
Device Settings are the primary control layer for Display configurations on the device and it does not take configurations from the Default or Group settings.
How Does it Work?
Devices once connected with zPortal Controller share their monitor and available display settings as per provided details zPortal Controller enables appropriate display options for the selected device. E.g. if selected device is having only single monitor then zPortal Controller will provide options to configure resolution and refresh rate options for single monitor and if device is having monitors, zPortal Controller will provider options for both the monitors, selecting primary monitor etc.
Display Configuration
With Single Monitor
When connected device is having only single monitor connected then it allows administrator to configure following display settings:
-
- Resolution: Default value is Native and dropdown list will have options as shared by device
- Refresh Rate: Default value is Native and dropdown list will have options as shared by device
To change any off the above two settings, select appropriate values from the respective dropdown lists and click on Save button.
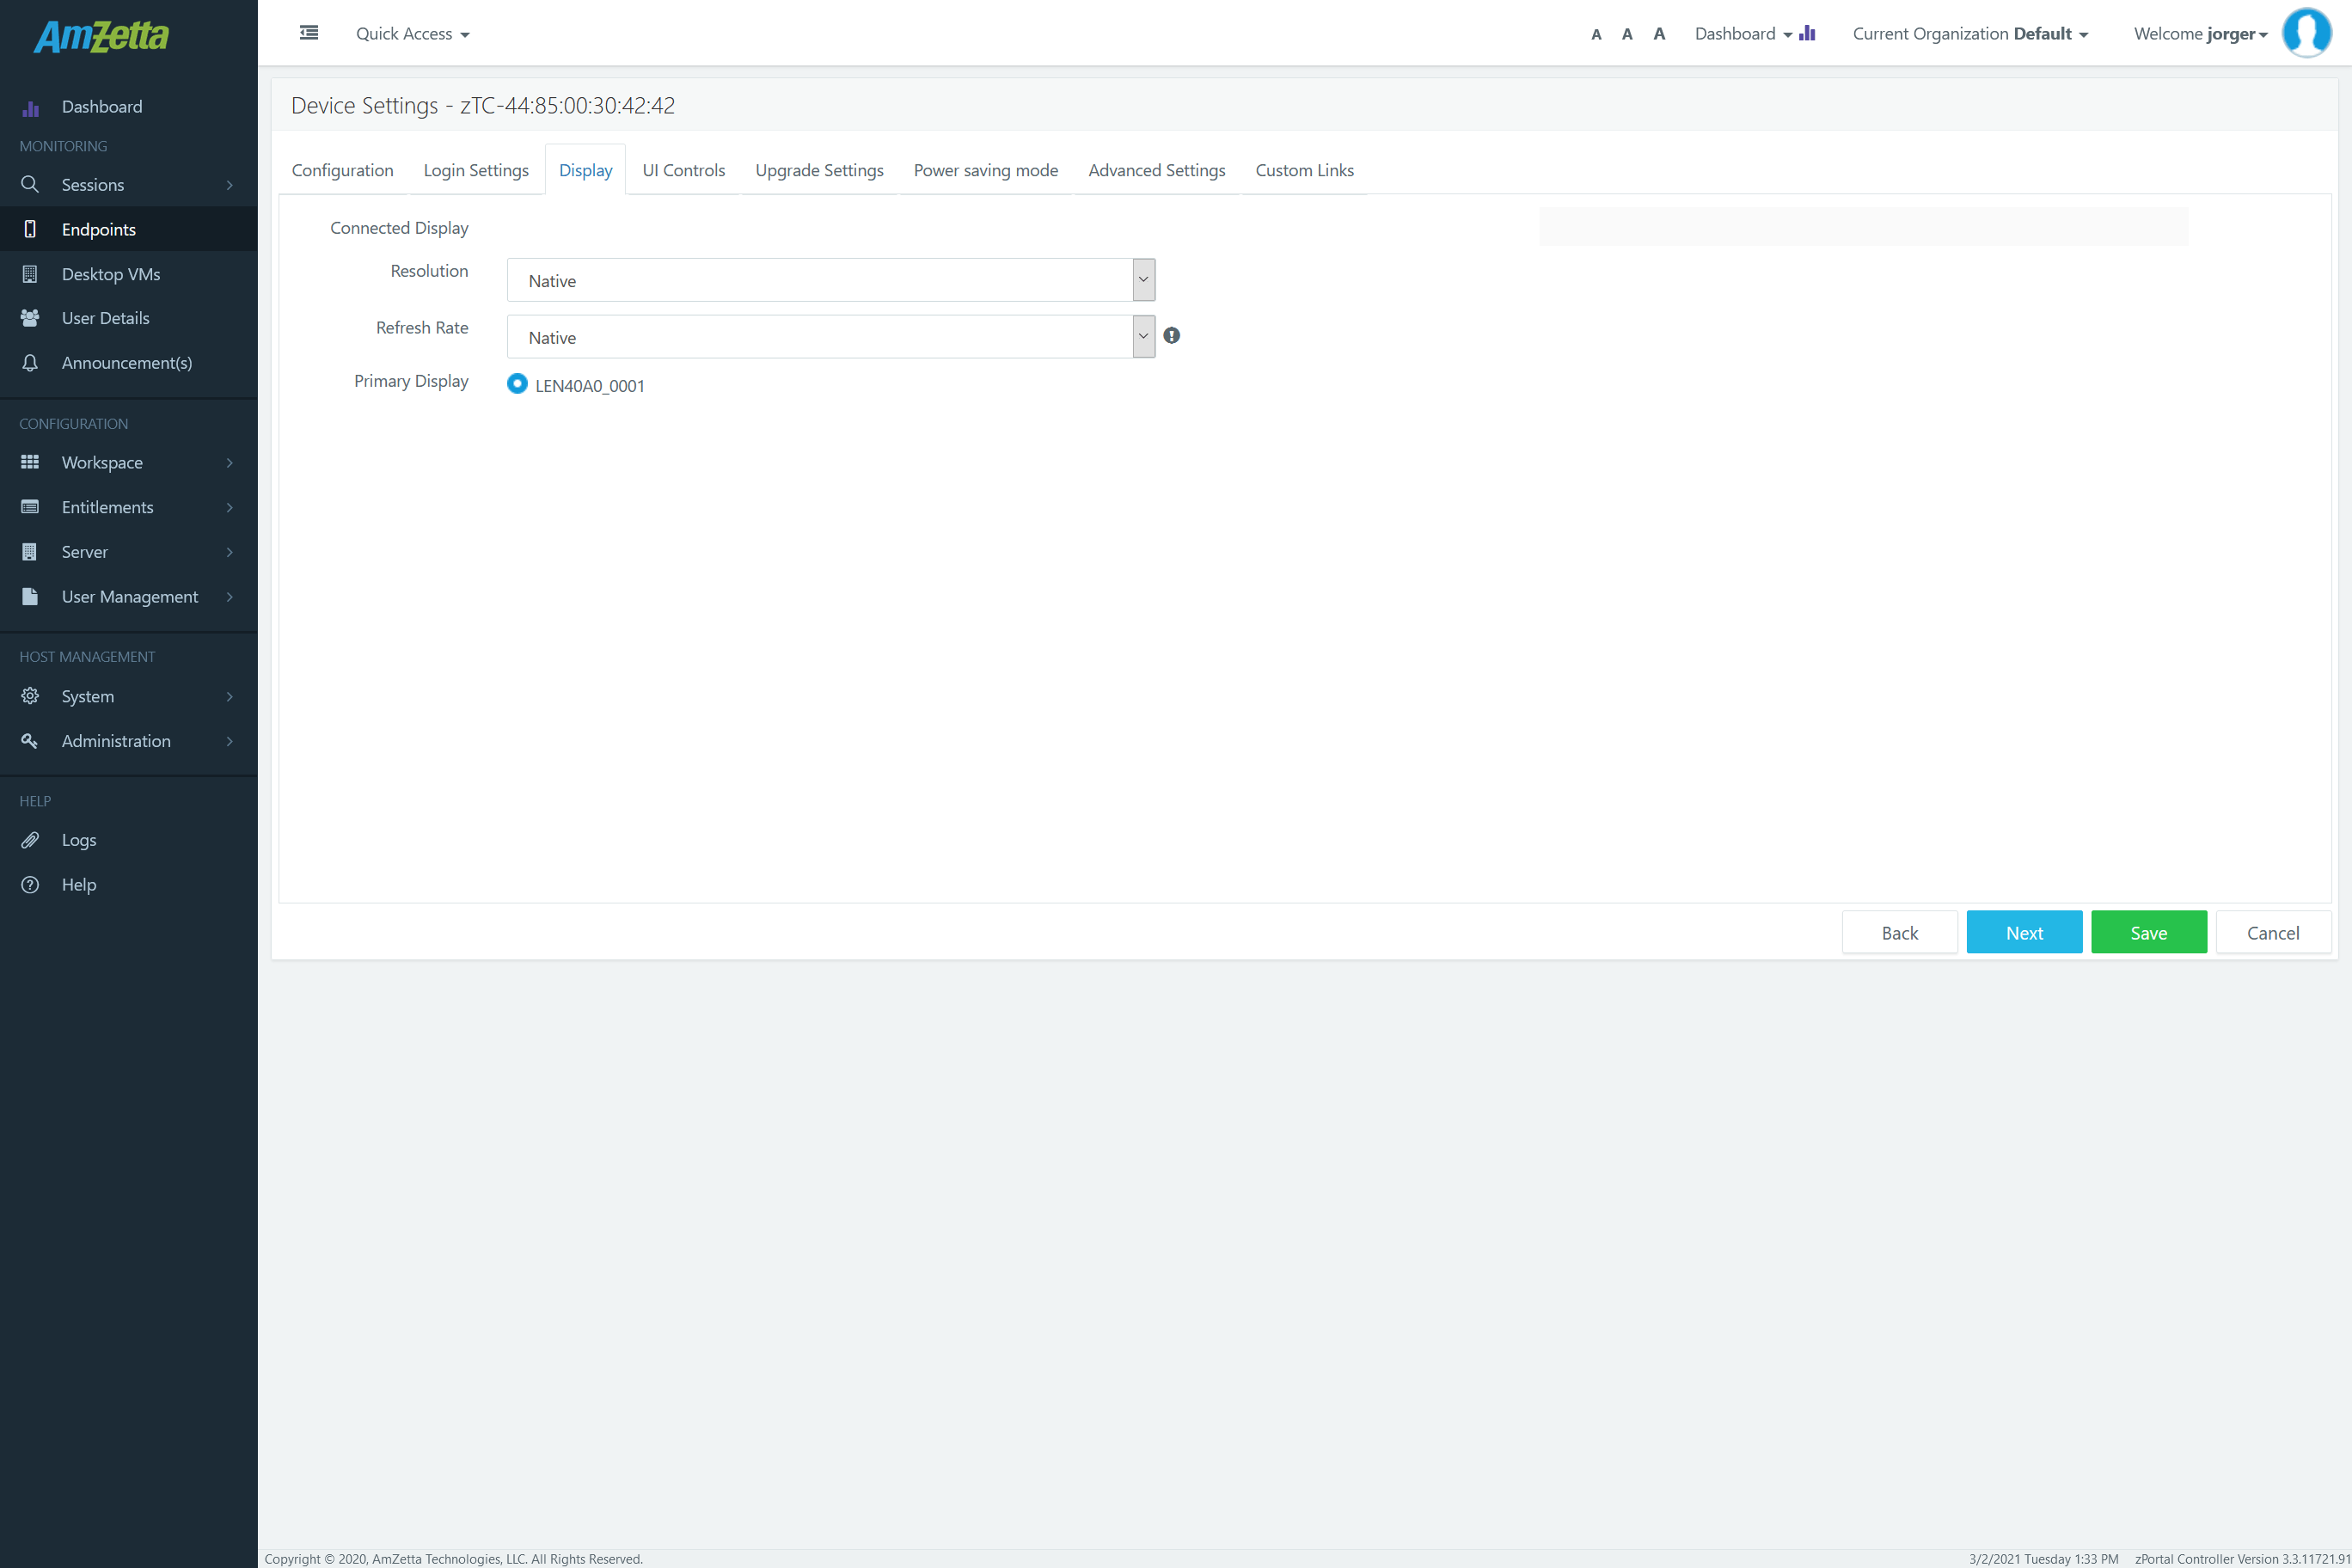
Device Settings will be saved and from next heartbeat device will start using new display settings.
With Multiple Monitors
If connected device is having multiple monitors plugged in, then following display settings are enabled in Device Settings – Display section:
-
- Display Mode Configurations: Following display modes are available:
- Native (Referred as default configuration for newly registered device)
- Single Display (Multiple Monitors connected but specifying to use only one display)
- Multiple Display (Known as True Multimonitor as well: This mode supports displaying different applications in different monitors)
- Duplicate Display (In this mode both monitors display same data)
- Extended Display (Known as Spanning as well: This mode extends the display on both monitors)
- Vertical Multiple Display (Vertical version of Multiple Display, different applications can be displayed in different monitors)
- Configure Primary Display: Configuring which one of the two monitors will function as the primary monitor
- Screen Resolution and Refresh Rate settings for connected displays
- Display Mode Configurations: Following display modes are available:
<zportal-edit-ds23.png>
Configuring Display Settings in Device Settings
- Select device – Click on Device Settings button to open Device Settings -> Go to Display tab
- Observe available options (if settings are as per single monitors or multiple)
- Configure appropriate display settings:
- Display Mode as per requirement
- Change resolution and refresh rate of connected monitors
- Specify primary monitor settings (if needed)
- Click on Save button to save the settings
<zportal-edit-ds24.png> - Logoff any running session and wait for settings to get applied (Default is 40 seconds)
- Re-logon using appropriate credentials
- New session should be displayed as per configured display settings.
|
Note:
|
UI Controls
UI Control section in Device Settings provide UI customization of zPortal Client Login screen for a specific device which means administrator will be able to enable or disable various controls on zPortal Client Login screen.
UI Controls in Device Settings is secondary layer which can be used to overwrite the Default Settings – UI Controls configurations.

Following settings are possible in Device Settings – UI Controls:
-
- Inherit: To inherit UI Controls configurations from Default Settings and thus effective UI will be customized as per Default Settings – UI Controls configurations.
- Set Manually: Specifying UI Control settings and thus over writing the Default Settings. Following settings will get enabled once UI Controls Source is selected as ‘Set Manually’
- Show/ Hide Controls
- Password Protect Controls
Show/Hide UI Controls
To show a UI Control,
- Select the checkbox displayed against desired UI Control in UI Controls section of Device Settings and to hide it uncheck the checkbox.
- Click on Save button to save the Device Settings
- Selected device will start showing or hiding respective UI Controls on zPortal Client login screen
UI Controls Which can be shown or hidden
-
- Information Button
- Shutdown Button
- Settings Button
- Network Settings tab in Settings window
- AmZetta Logo
- Remember Me
- Virtual Driver
- USB Driver
Password Protect UI Controls
To make any UI Control password protected,
- Go to UI Controls section in Device Settings dialog
- Select UI Controls Source dropdown as Set Manually
- Select the checkbox displayed against desired UI Control to make it password protected uncheck the checkbox to keep it unprotected
- Provide appropriate password if making any UI Control Password protected
- Click on Save button to save Device Settings
- The selected device will now start using Password Protection settings
- If UI Controls are made password protect, accessing those control will start prompting for password and will be accessible only on providing correct password
- UI Controls which are not made password protected will be accessible without any password
UI Controls Which can be Password Protected
-
- Shutdown Button
- Settings Button
- Mode Change (Desktop Mode Change from zPortal Client Login screen using secret key combination
- Virtual Keyboard
- USB Driver
|
Note: UI Controls settings in Default Settings are primary layer of UI Control configurations and can be overwritten from Device Settings of specific device. Please check Device Settings section for more details. |
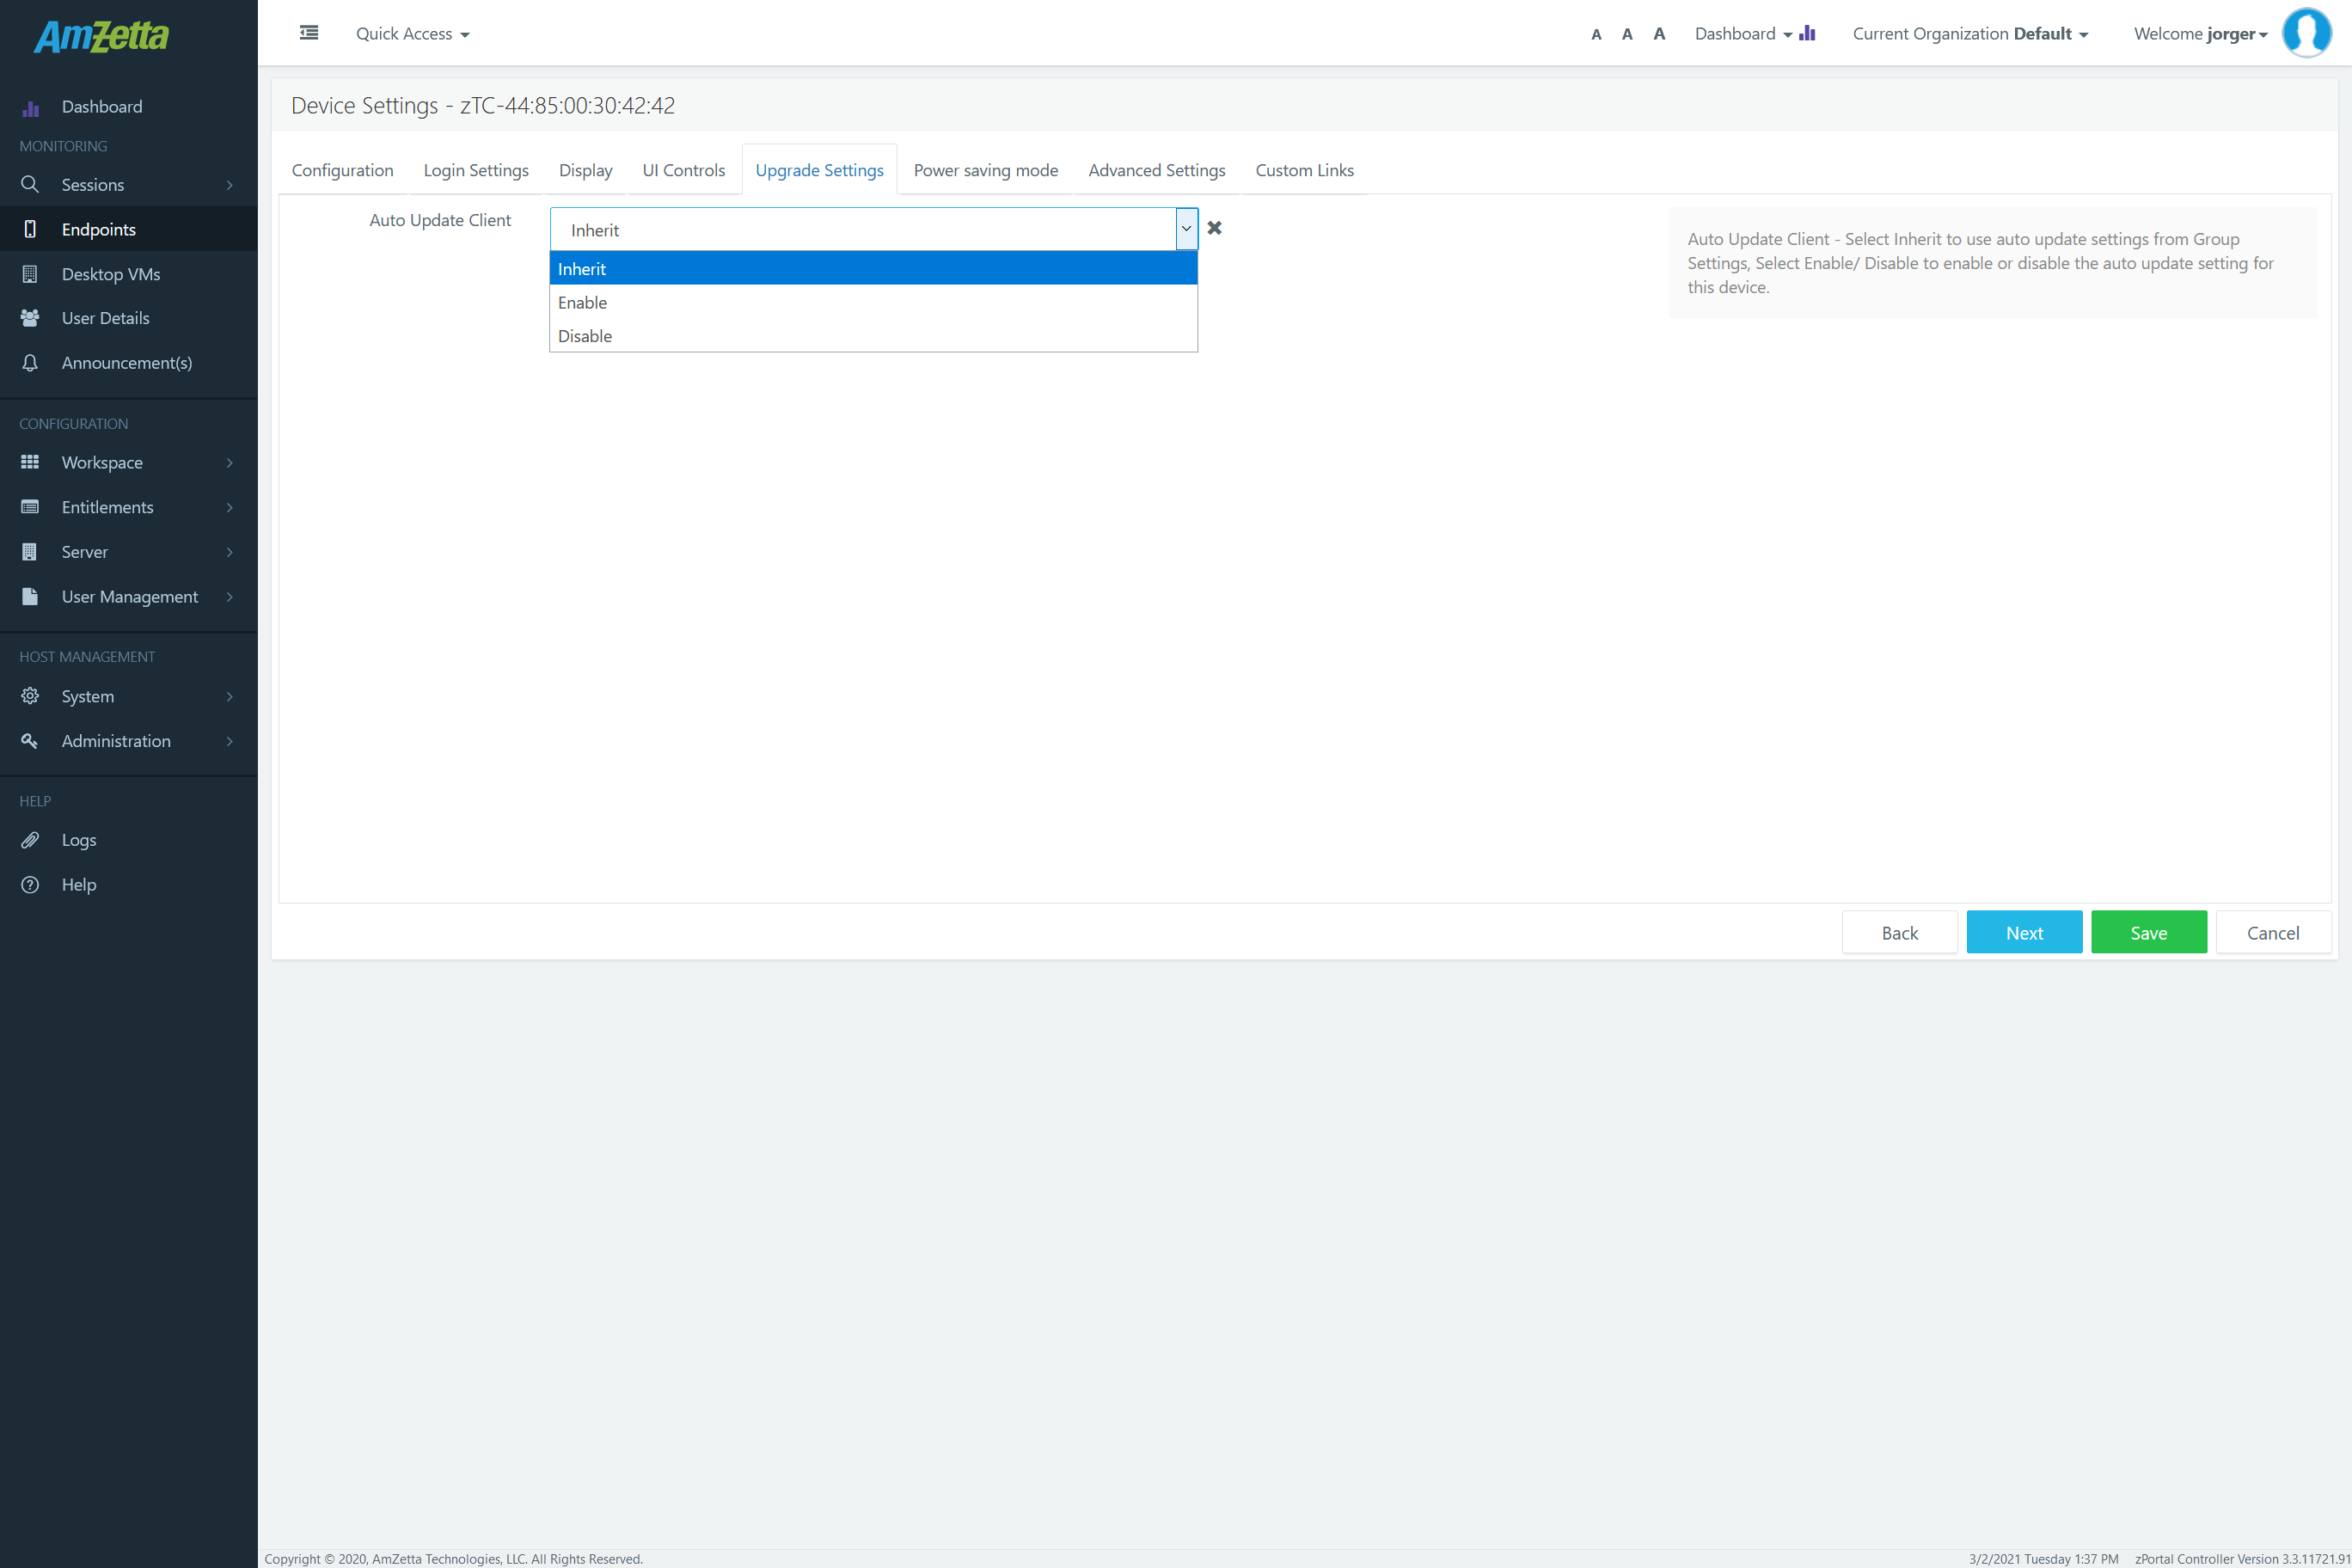
Upgrade Settings
Using Auto Update Client option in Upgrade Settings screen in Device Settings dialog, administrator can overwrite the auto update settings specified in the Default Settings.
Auto update client option in Device Settings is set as Inherit by default to use Auto Update Client settings from Group Settings.
Once Auto Update Client is enabled then devices will be downloading latest hotfixes from zPortal Controller and will get upgraded to latest version and vice versa if Auto update client is disabled the devices will not download the update patches from zPortal Controller.
To change Auto Update Client configurations for a specific device
- Select the device and click on Device Settings button
- In Device Settings dialog, go to Configurations section
- In Auto Update Client dropdown list select appropriate option. The following three viable options can be set for a device from Device Settings dialogs:
- Inherit: Set the device to be updated as per Group Settings.
- Enable: Update the specific device, irrespective of Group Settings.
- Disable: Do not update the specific device, irrespective of Group Settings.
- As per configured option, selected device will be set for upgrade
Important to know that current Auto Update Client configuration in Default Settings is displayed next to Auto Update Client dropdown in Device Settings to help appropriate settings.
-
- A cross sign [x] represents Auto Update Client is disabled in Default Settings.
- A tick sign [✓] represents Auto Update Client is enabled in Default Settings.
|
Note:
|
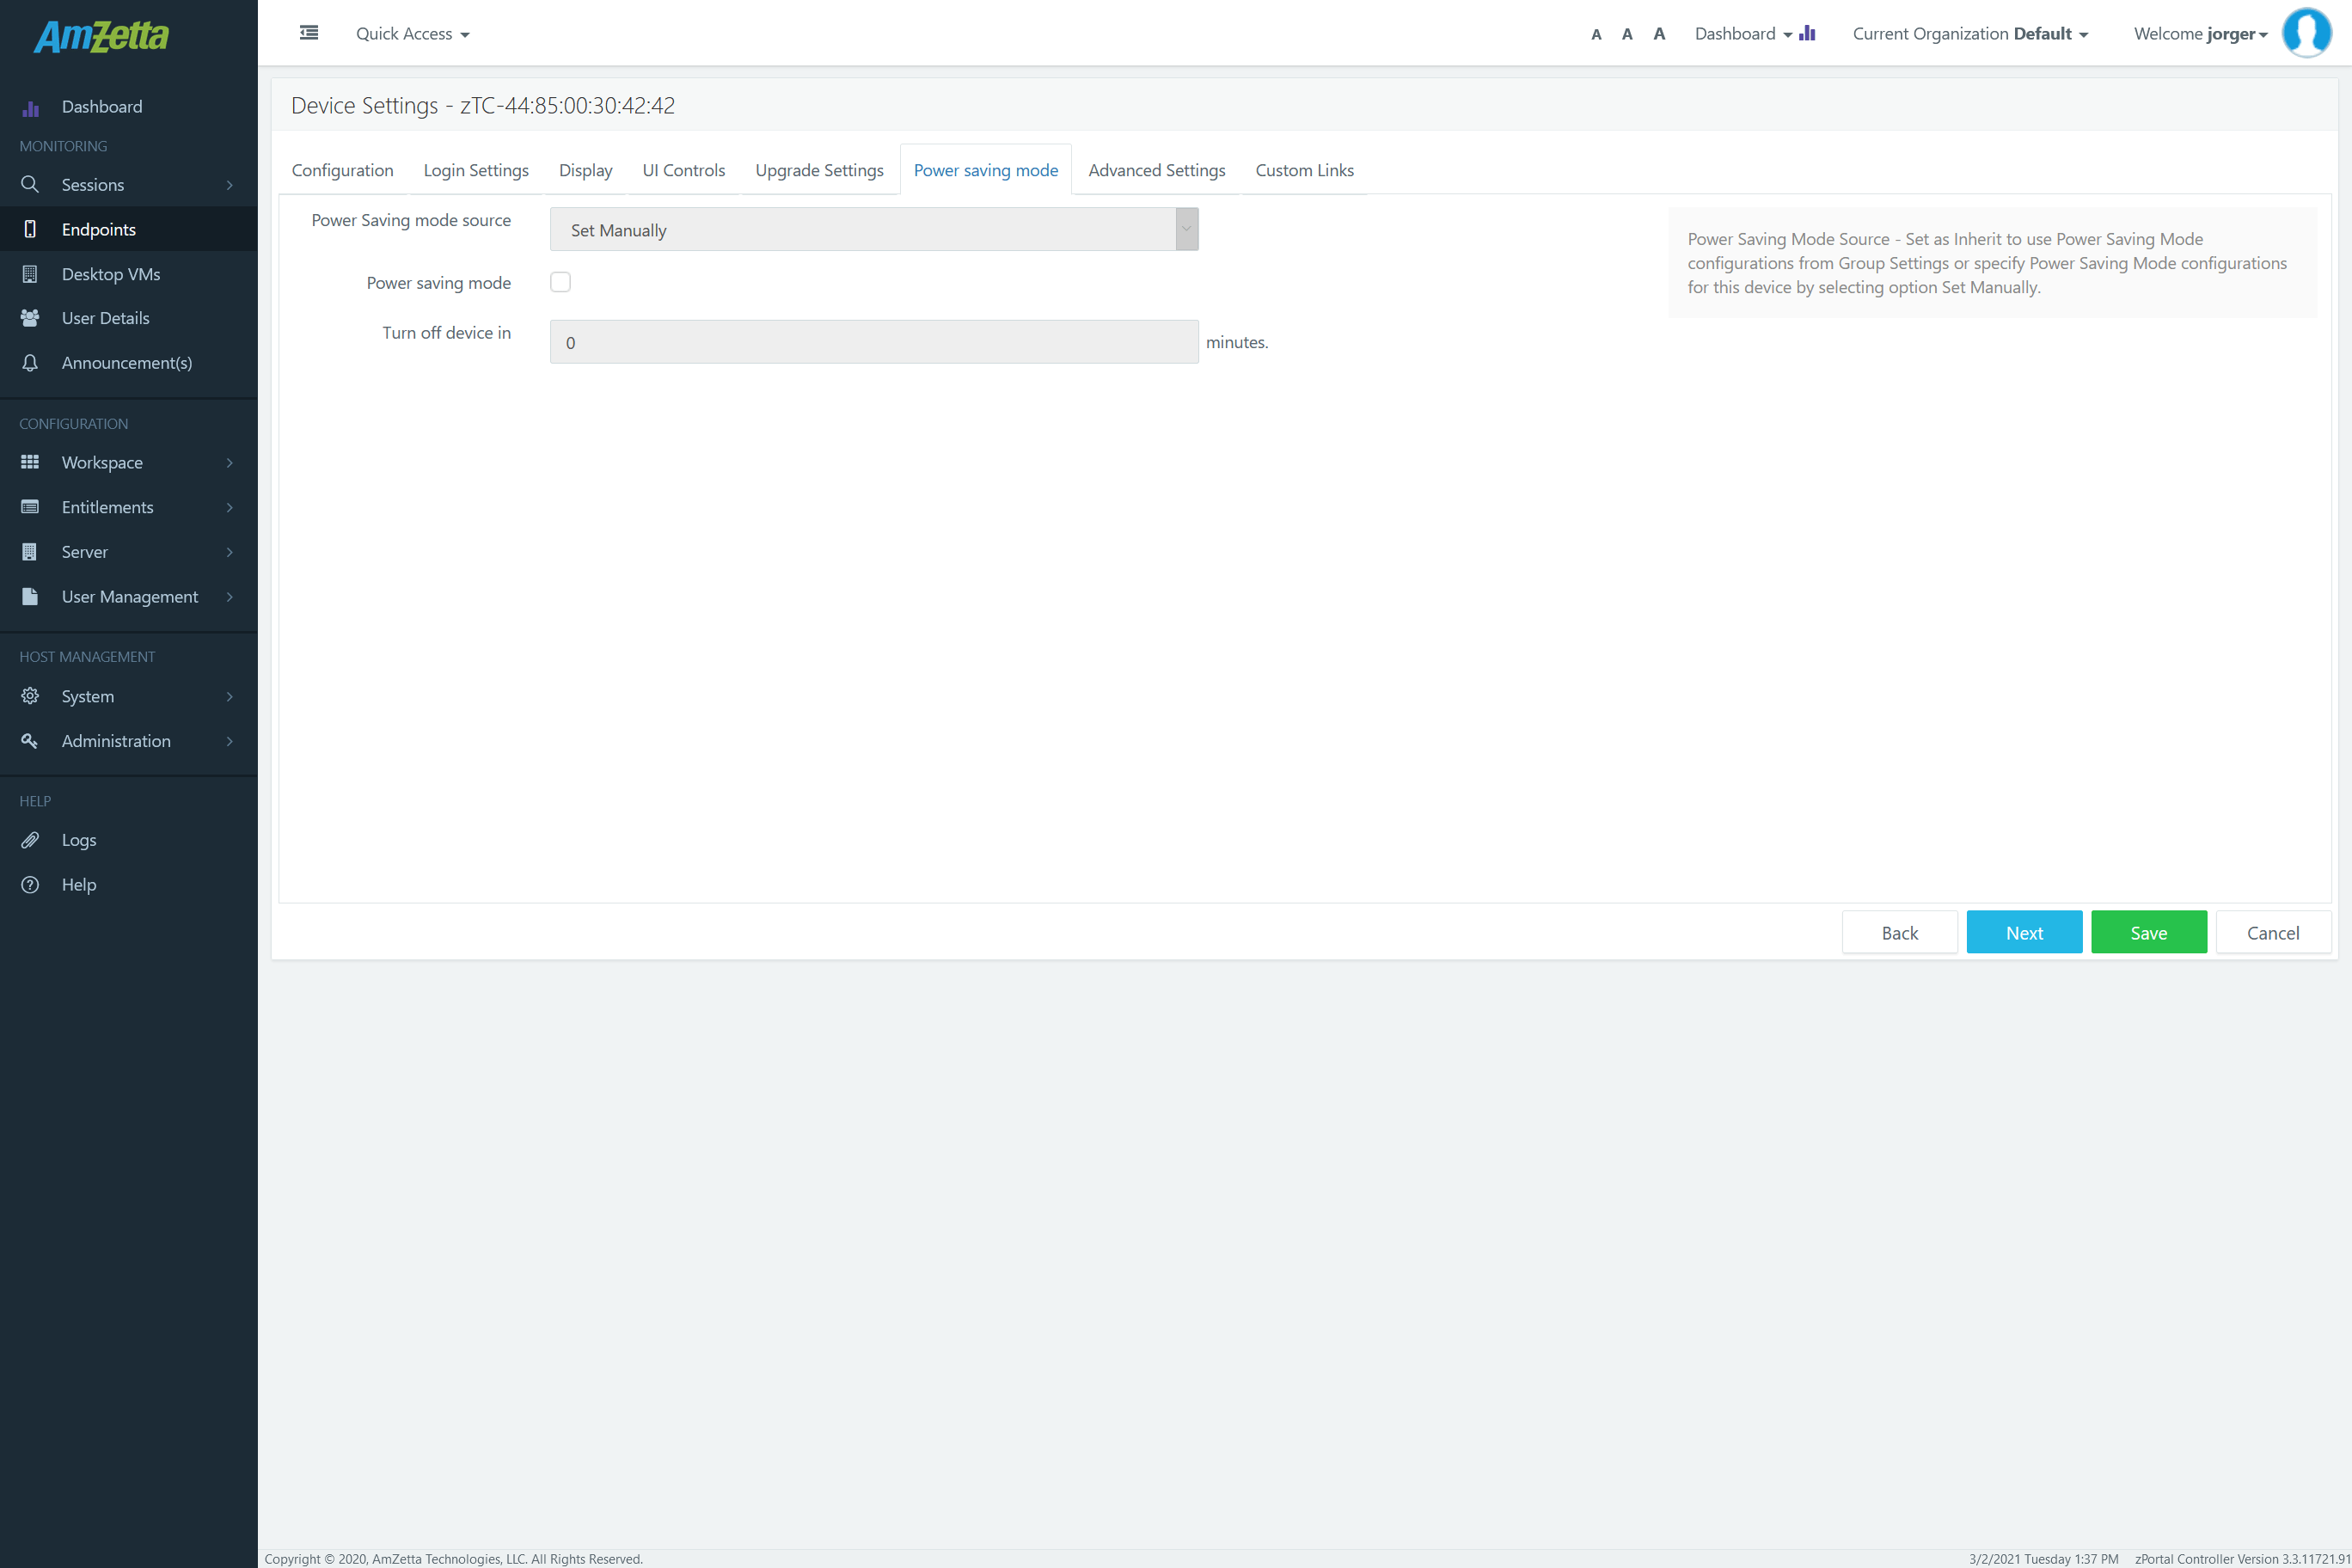
Power Saving Mode
Power Saving Mode section in Device Settings dialog provides administrator to set specific settings for a device and over-writing Power Saving Mode configurations pushed by Group Settings or Default Settings.
Following configurations are possible:
-
- Inherit: Use the settings being configured in the group this device belongs to
- Set Manually
- Enable (Select the checkbox Power Saving Mode) and specify Device Turn-off timeout
- Disable (Disable the Power Saving Mode) feature for the specific device
Advanced Settings
Advanced settings in Device Settings provide options to reconfigure Remote Session settings on devices. Administrator can configure following configurations in Advanced Settings of the device:
-
- Session Shell: It allows administrator to enable/disable the SSH on the devices and thus applied to SC03150T and Linux Clients only. Once enabled administrator will be able to SSH to specific device with root credentials and default password (Contact AmZetta Support for default password).
- Session Control: It allows administrator to enable/ disable VNC on the devices and thus applies to SC03150T and zPortal Client on zOS only, zPortal Client installed on Ubuntu OS i.e. Linux Client will require manual installation of VNC servers on system to make this option work.
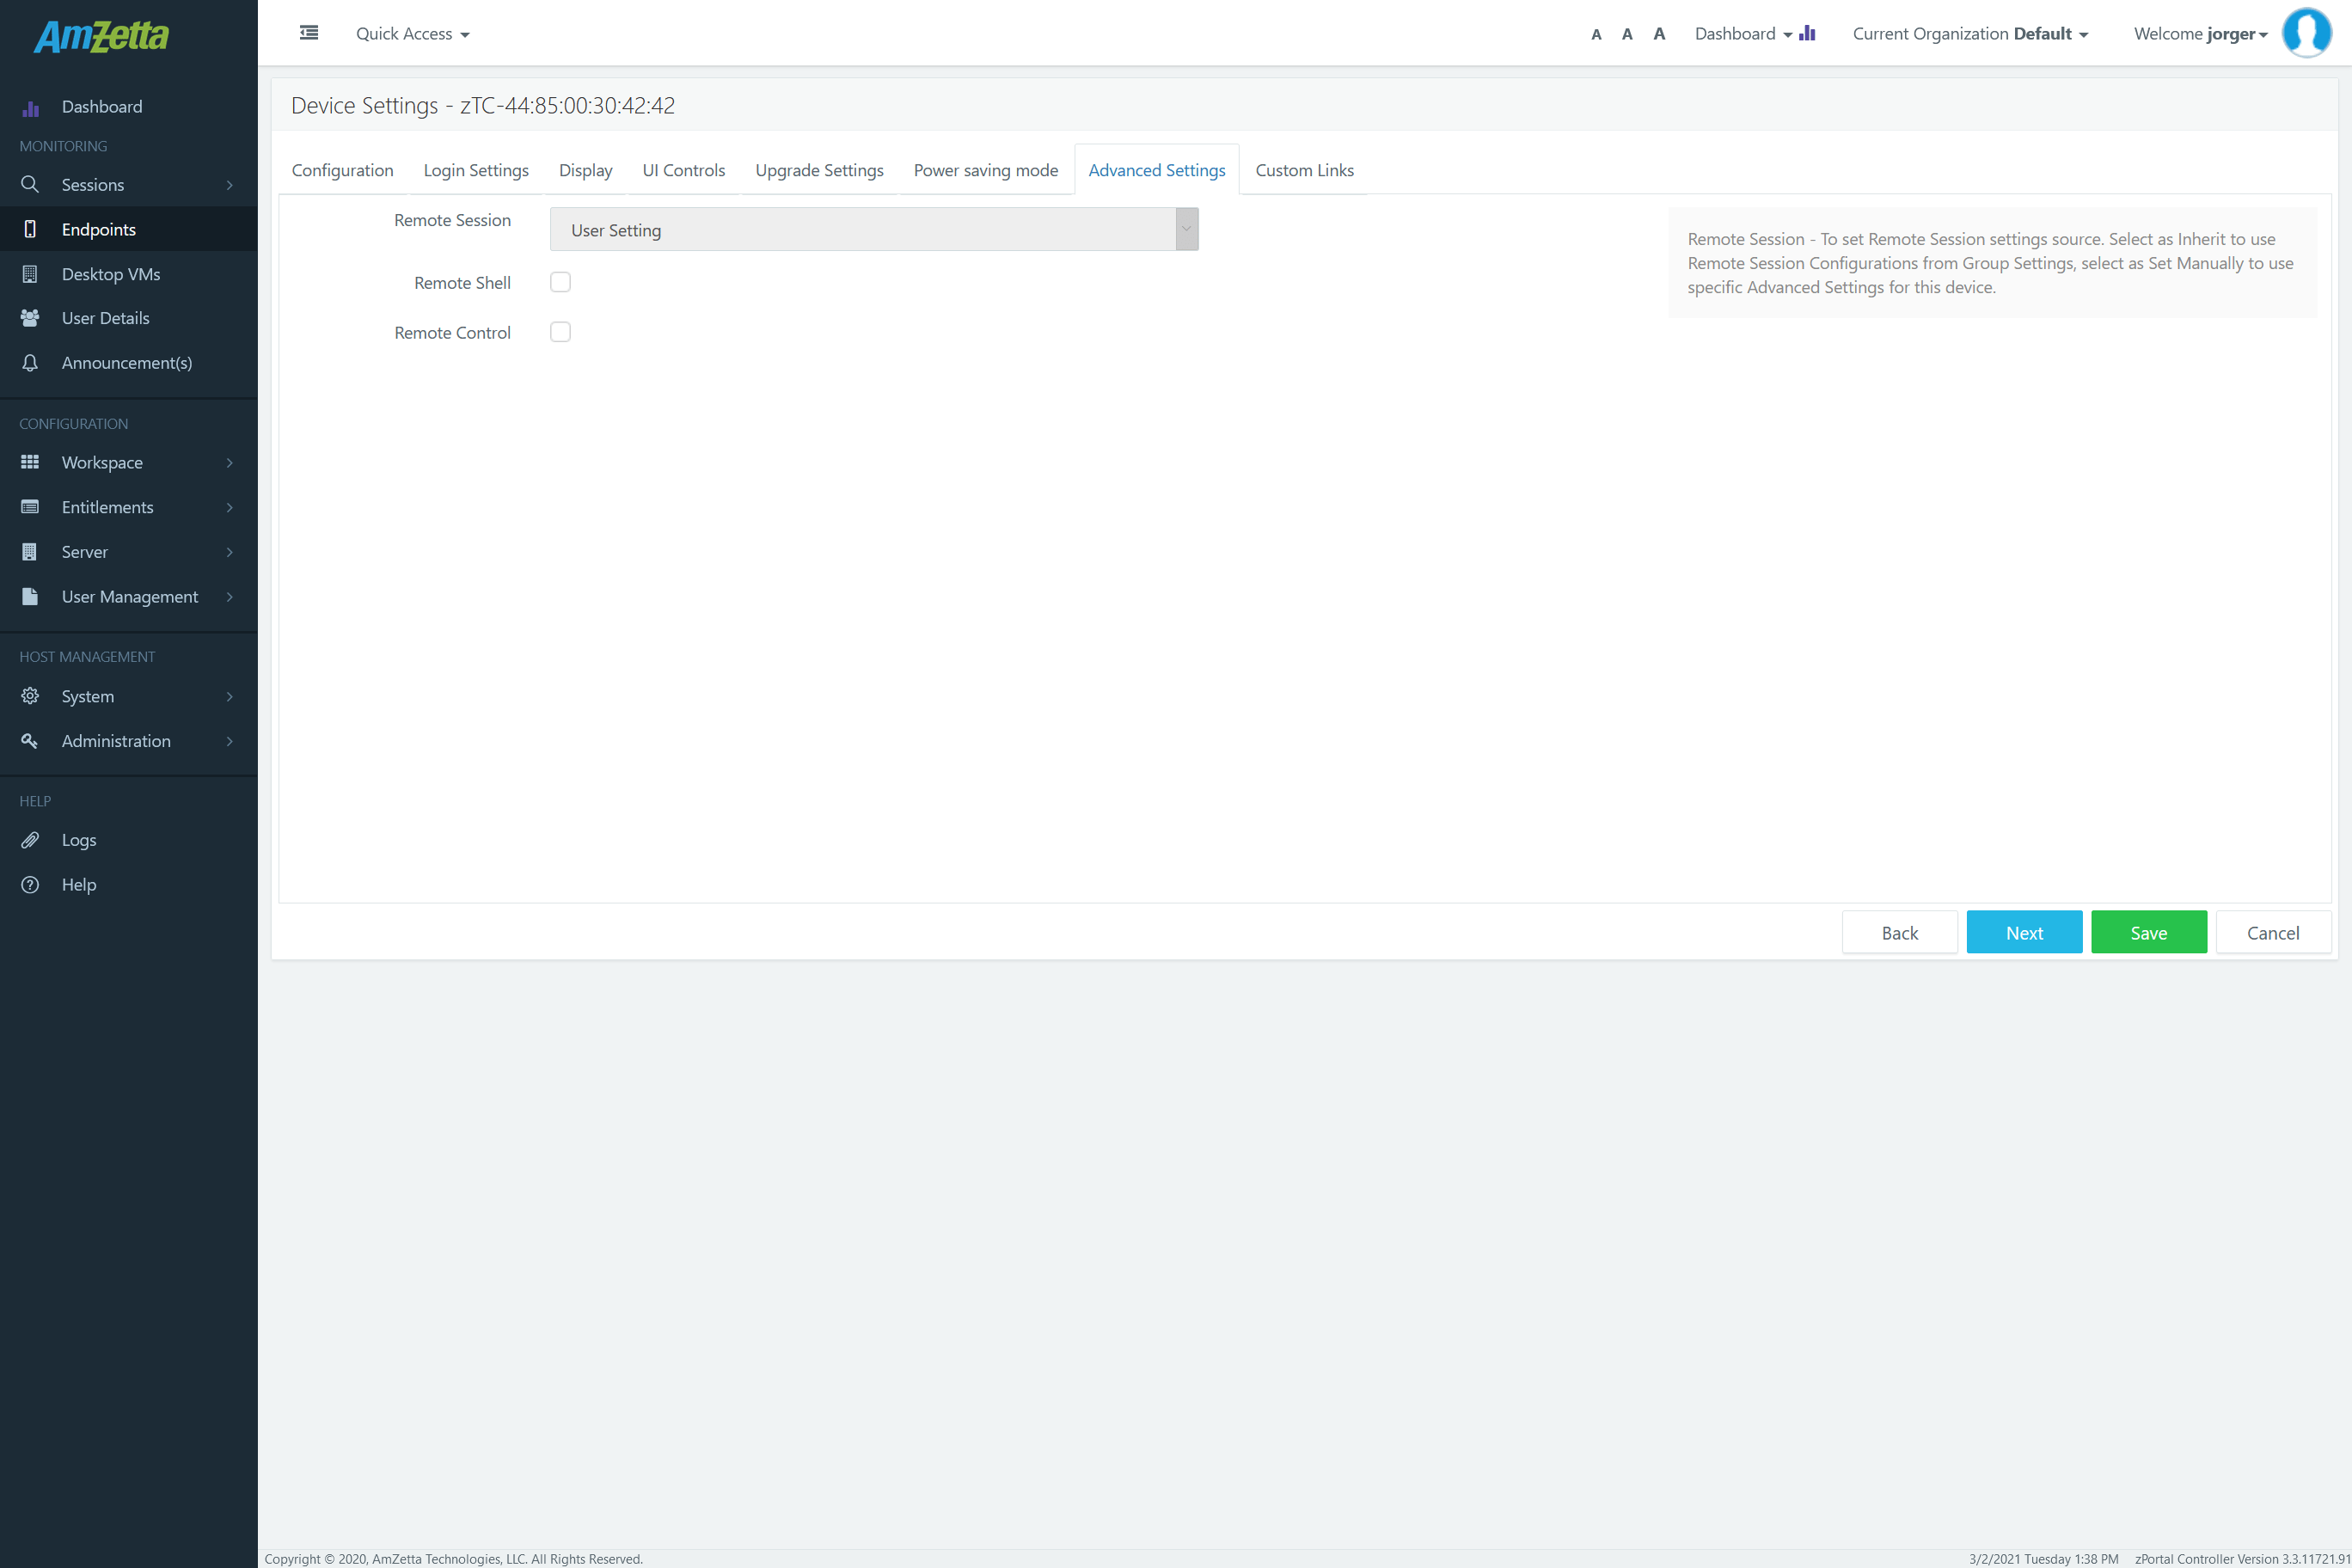
To enable or disable above two configurations, administrator must select appropriate option from Remote Session dropdown list:
- Remote Session: Dropdown list to select the source of the Remote Session settings on device. Select appropriate option from following possible configurations:
- User Setting: Means current user settings will remain configured. User can configure these settings from zPortal Client Login Screen – Settings – Diagnostic tab. If User Setting is selected, then it also displays the current configured settings with controls disabled.
- Inherit: Inherit remote session configurations from Default Settings. If Inherit is selected, then screen will display current Advanced Settings configurations in Default Settings with controls disabled.
- Set Manually: Manually specifying remote session settings. If configured as ‘Set Manually’ then administrator can configure Session Shell and Session Control settings as per need.
- Click on Save button to save device settings
- Remote session configurations will be enabled or disabled as per provided configurations.