zGateway Quick Configuration Guide
zGateway
With the installation of zPortal and/or zGateway completed, you can follow the simplified steps below to configure and deploy your digital workspace solution. For a more detailed description of each subsection of the UI, read the built-in tool tips or search engine on the AmZetta Knowledge base for more details.
- Select [zGateway Status > zGateway Gateway State] and change to Run State if not already.

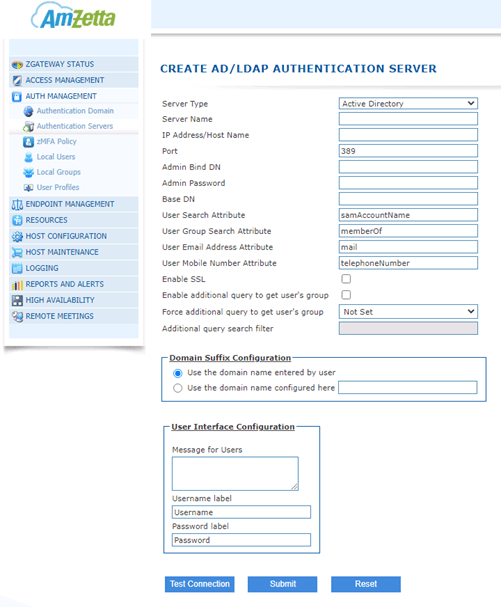
2. Select [Auth Management > Authentication Servers] to add your Active Directory Server.
a. Select “Add” a new authentication server.
b. Fill in each field with your Active Directory details. Binds will need to use the following format: CN=administrator,CN=users,DC=mycompany,DC=com.
c. Utilizing the built-in Telnet tool found under [Host Maintenance > Telnet].
d. If there is a connection issue, ensure the proper FW port forwarding rules are in place for the zGateway DMZ. PORT 389 should be open for LDAP or PORT 636 for LDAPS.
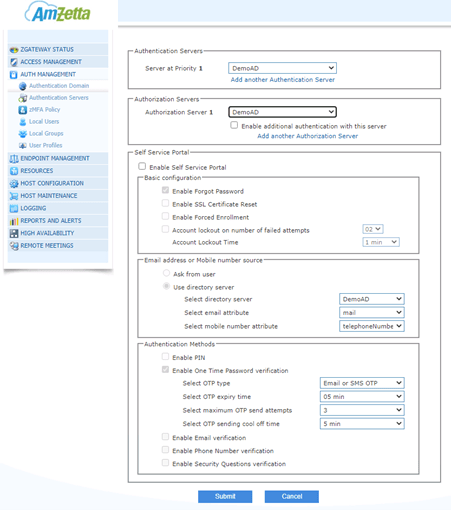
3. Select [Auth management > Authentication Domain] at check the box to Modify the default domain details and Self-Service options.
a. With the authentication server configured in step 2, here we will select the server to be used for authentication and allow for authorized virtual application and virtual desktops to query users for access.
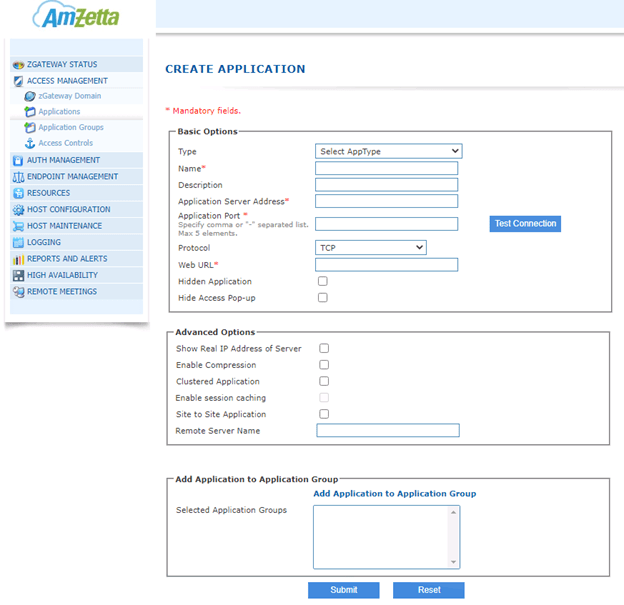
4. Select [Access Management > Applications] to add new applications for use.
a. The configured application type will offer a list of application categories, which will offer additional settings for configuration.
b. HTTP/S – Configure URL, server location, and user access to your preferred browser.
c. RDP – Configure the remote desktop and users or groups you would like to access securely through the zPortal client.
5. Select [Access Management > Application Groups] to organize applications into groups for easier administration and allows specific apps to be accessed by specific users.
a. Name your new group and press “Select Applications” to group applications together.

6. Select [Access Management > Access Controls] to apply control of an application group to a user or group.
a. Under Access Control Type, select “Application Access” to allow access to your configured applications by users or groups.
b. Select your preferred assignment type (users or groups). For specific users, you may use the search function and the “Add” button to place them in the list. The same can be done for the application group you would like available.

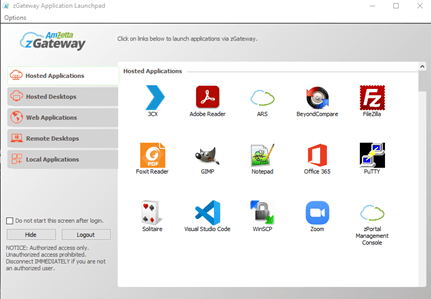
7. Download zGateway Client and to allow users and/or groups to access their assigned virtual desktops and/or virtual apps.
a. The zGateway Client can be found on the AmZetta website at https://amzetta.com/zclient/ .
b. Enter the zGateway service details along with a configured users credentials.

c. Once successful, the end user will be able to select the category of virtualized utilities and select one to run.