zPortal Controller Installation
Any time the installer is invoked in a system where no previous installation of AmZetta zPortal Controller exists, the installer will run in fresh installation mode and administrator will be able to only install the AmZetta zPortal Controller or Session Host Server. The following steps can be executed for installation of AmZetta zPortal Controller on a server.
Installation Steps
-
- Log-in to Windows Server as a user with administrative rights.
- Copy the AmZetta zPortal Controller installer to Windows Server having following prerequisites configured
- Appropriate .Net version 4.7.2 is already installed on the system
- SQL Server is installed and configured with static TCP port for zPortal Deployment
| Note: For detailed information on the required prerequisites, please refer to the System Requirements |
-
- Launch the Installation wizard by right click on the installer and select option Run as Administrator, wait for Setup Wizard to initiate

- Click on Next button on the welcome Screen to proceed with installation.

- On End-User License Agreement screen, check the box if you accept the terms and click on Next button to proceed

- The next screen allows configuration of the installation directory

- Installation on default installation folder:
- The default installation folder is: C:\Program Files (x86)\AmZetta
- Changing installation folder:
- Click on Browse button
- Select any appropriate folder and click on OK button
- Click on Next button to proceed to Component Selection screen
- Installation on default installation folder:
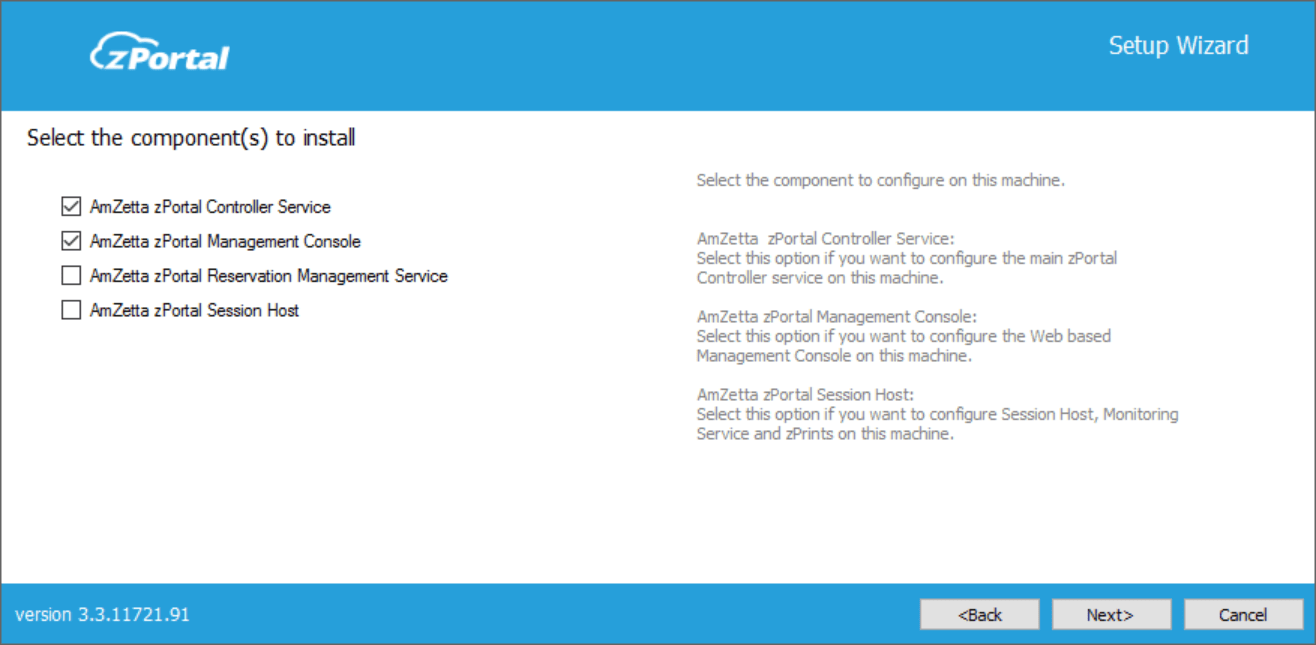
- Component Selection screen provides the option to select zPortal Components to be installed
- For zPortal Controller configuration, only following two roles should be selected
- AmZetta zPortal Controller Service
- AmZetta zPortal Management Console
- 3rd Option to install zPortal Session Hosts server should only be selected if the same server will be used to serve the shared hosted desktops or applications to the end users.
- For zPortal Controller configuration, only following two roles should be selected
- Launch the Installation wizard by right click on the installer and select option Run as Administrator, wait for Setup Wizard to initiate
|
Note: If it is not required to have Shared VDI or application delivery from same server, keep the AmZetta zPortal Session Host option unchecked |
-
- Clicking on Next button will navigate to Database Selection screen; on Database Selection screen
- Provide the Database Address in the format of <Server IP or FQDN>\<SQL Instance Name>. e.g. if SQL Express is installed on the same instance then Database address could be localhost\SQLExpress
- Provide the static port of Microsoft SQL Server e.g. 1433 (Default TCP Port for SQL Server)
- Database name: Provide the name of the database to be created, default name is EDCDB
- Select appropriate authentication mechanism, possible methods are
- SQL Server Authentication, which will require SQL Server User and Password (Recommended method)
- Windows Authentication, to use windows user credentials to connect to SQL Server

- Provide appropriate details and then click on Next button to proceed
- Next screen Log Database Selection provides option to configure log server with following options:
- Use Embedded Database (Deprecated)
- Microsoft SQL Server (Recommended method)
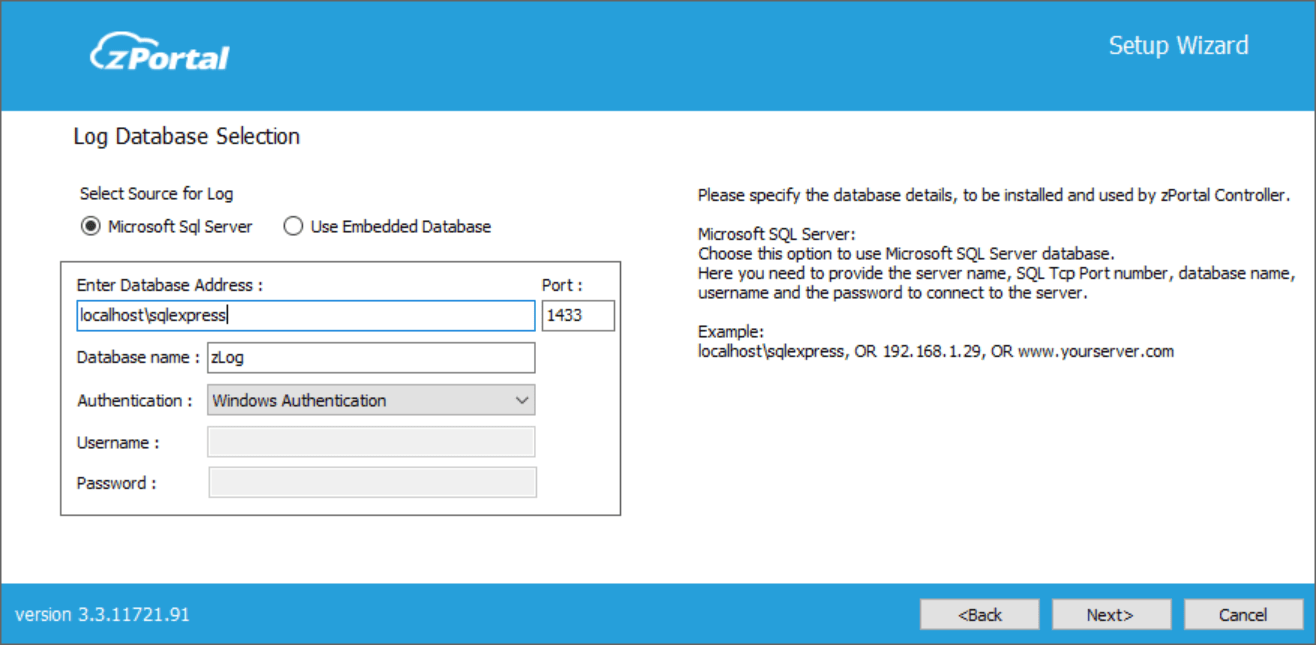
- Provide the Database Address in the format of <Server IP or FQDN>\<SQL Instance Name>. e.g. if SQL Express is installed on the same instance then Database address could be localhost\SQLExpress
- Provide the static port of Microsoft SQL Server e.g. 1433 (Default TCP Port for SQL Server)
- Database name: Provide the name of the database to be created, default name is zLog
- Select appropriate authentication mechanism, possible methods are
- SQL Server Authentication, which will require SQL Server User and Password
- Windows Authentication, to use windows user credentials to connect to SQL Server
- Next screen configures the Service Log-on Credentials for zPortal Controller Service, following two options are available based on SQL Server configurations done:
- Local System Account: (Recommended) Using Embedded or SQL Server with ‘sa’ user credentials will run the service with Local System Account
- Configuring SQL Server with Windows Credentials will require Logon Credentials to be used to run the zPortal Controller service
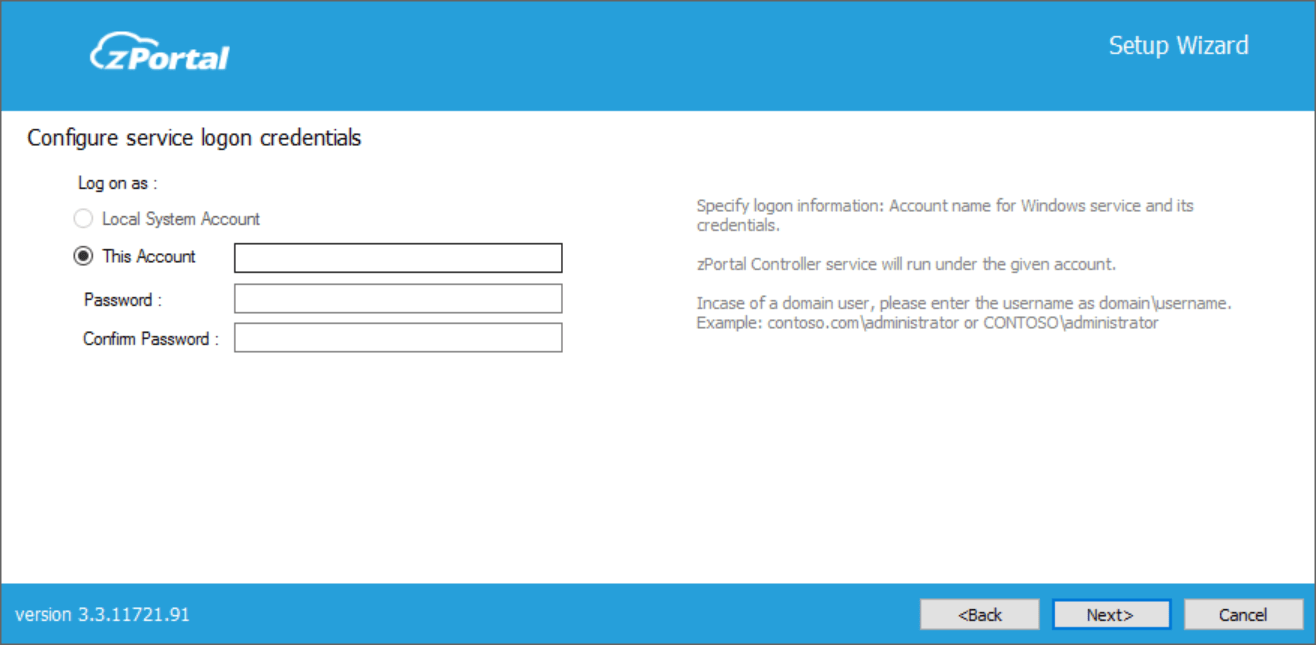
- After providing appropriate Service Log-on credentials, click on Next button to proceed.
- Clicking on Next button will navigate to Database Selection screen; on Database Selection screen
|
Important Note: Configured account must have logon as a service privileges on the system. Otherwise zPortal Controller service will fail to start after the installation. Below steps can be used to configure users accounts with logon as a service privileges 1. Click Start, point to Run, type mmc, and then click OK. 2. On the File menu, click Add/Remove Snap-in. 3. In Add/Remove Snap-in, click Add, and then, in Add Standalone Snap-in, double-click Group Policy Object Editor. 4. In Group Policy Object, click Browse, browse to the Group Policy object (GPO) that you want to modify, click OK, and then click Finish. 5. Click Close, and then click OK. 6. In the console tree, click User Rights Assignment, the option is available at following location: 7. In the details pane, double-click Log on as a service. 8. If the security setting has not yet been defined, select the Define these policy settings check box. 9. Click Add User or Group. 10. Add the appropriate account to the list of accounts that possess the Log on as a service right. |
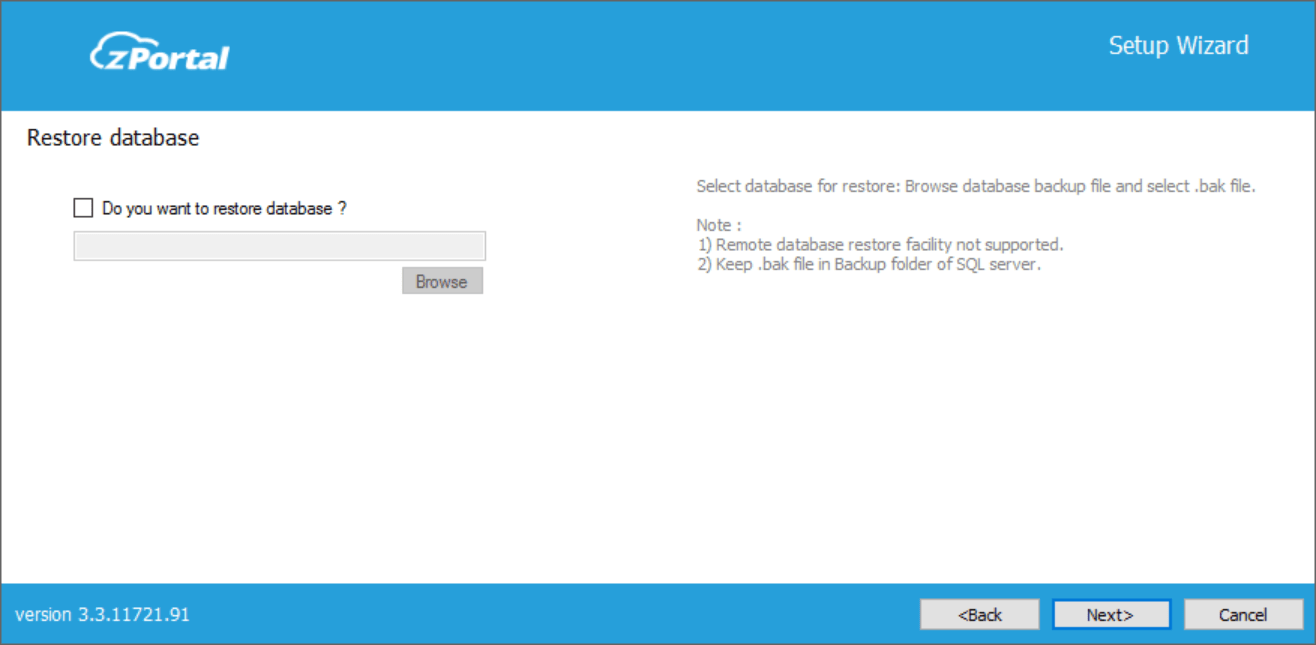
- Next screen Restore Database provides option to restore an existing database during installation which enables administrator to quickly set new server with existing configurations
- Ignore this screen for fresh installation and click on Next button to proceed
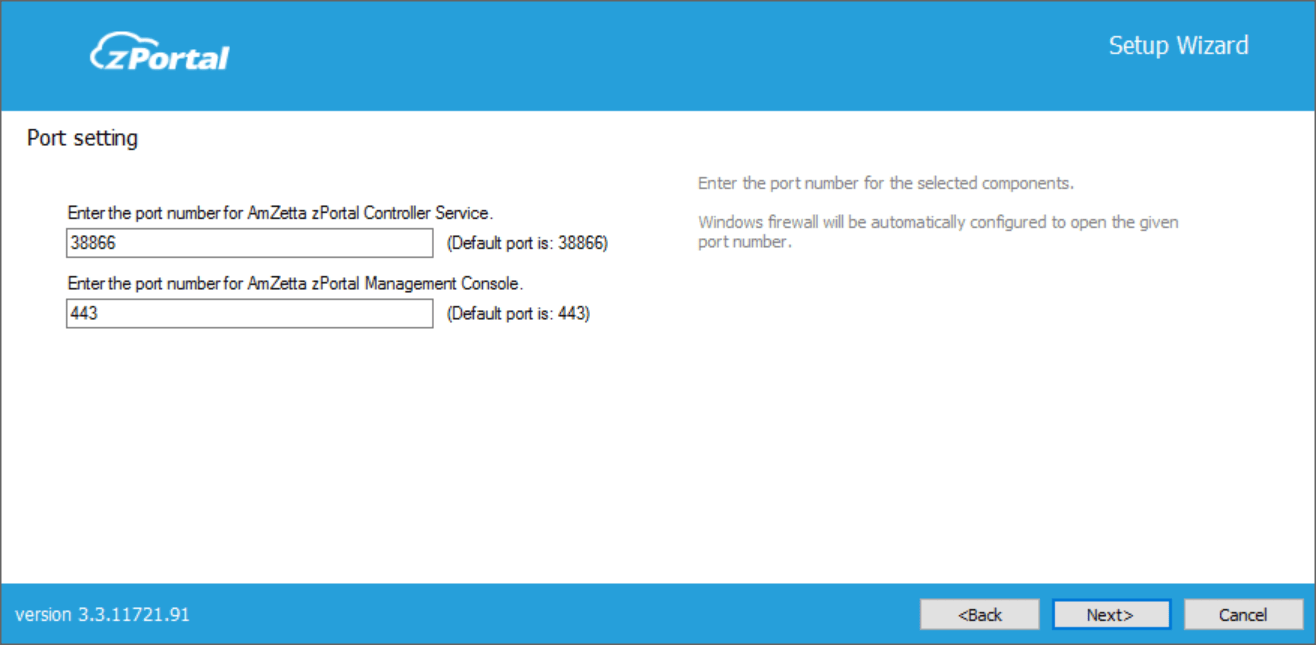
- Clicking on Next button will navigate the user to Port Setting screen
- Default port for AmZetta zPortal Controller Service is 38866, to change it enter any appropriate port number or leave it intact to continue with default port
- Default port for AmZetta zPortal Management Console is 443, to change it enter any appropriate port number or leave it intact to continue with default port
- Click on Next button to proceed with installation
- Next installation screen is for configuring zPortal Controller administrators. The following types of Administrator configurations can be done:
- Domain User Group configured as super-administrator. The following conditions must be met to use this option:
- System is in domain
- User is logged in with domain credentials
- Following inputs are provided correctly
- User will be needed to provide Domain User Group name
- Credentials of the one of the user accounts which belongs to the Domain user group specified
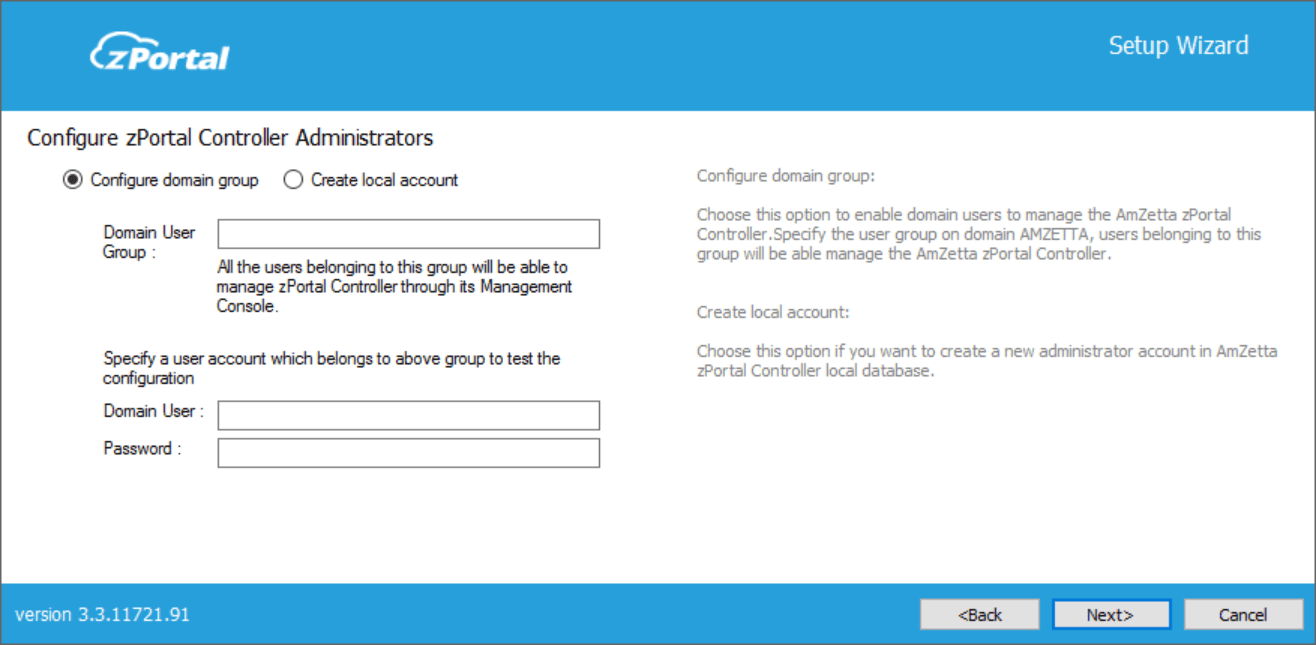
- Local zPortal user created and designated as super-administrator. For creating a local user administrator, user will be needed to provide the username (default is zAdmin), appropriate password and confirm password.

- Domain User Group configured as super-administrator. The following conditions must be met to use this option:
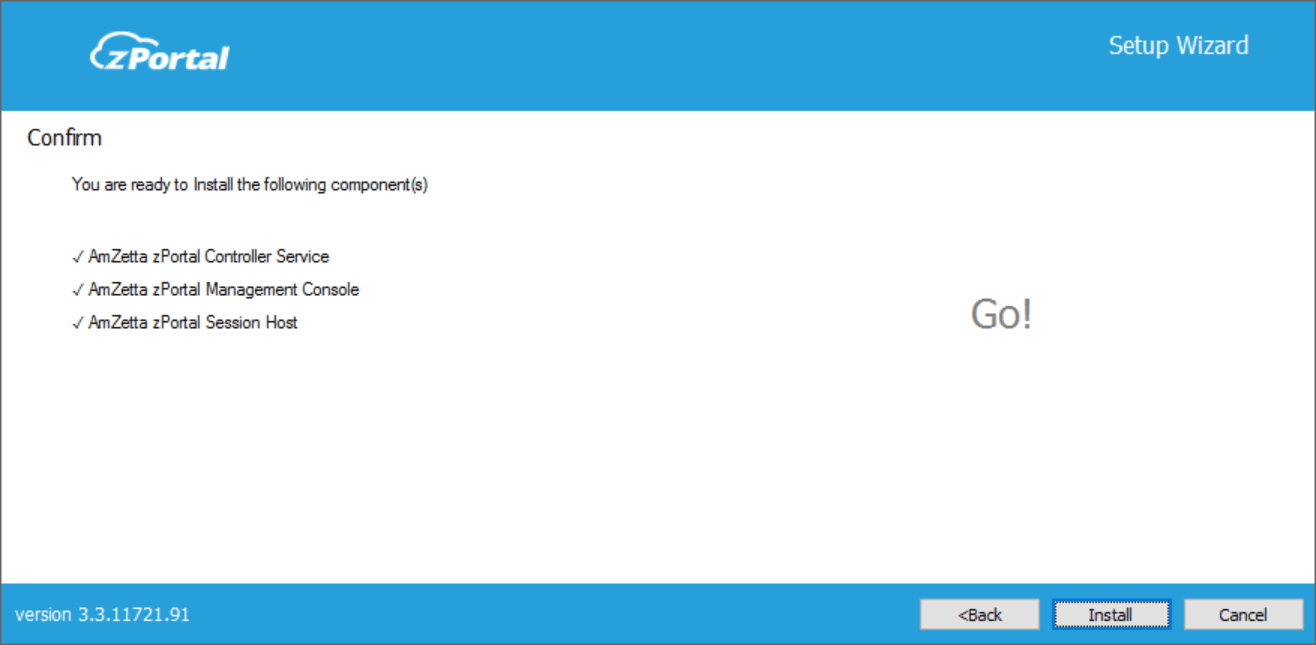
- On Confirmation screen, click on Install button to confirm the installation.
- The screen displays the information of the selected components.
- The screen displays the information of the selected components.
- Installation will be started and appropriate roles and feature will be installed. Next screen will display status and updates of installation progress. The screen displays the following information:
- Component being installed
- Installation status of the component
- Progress bar and related information of the changes being made to the system

zPortal Controller Service and Management Console installation, installs and configures following roles and features on Windows Servers:- Web Server (IIS) role with appropriate features will get automatically installed with AmZetta zPortal Controller Management Console.
- ASP .Net 4.5: Gets enabled automatically while installing zPortal Controller Management Console
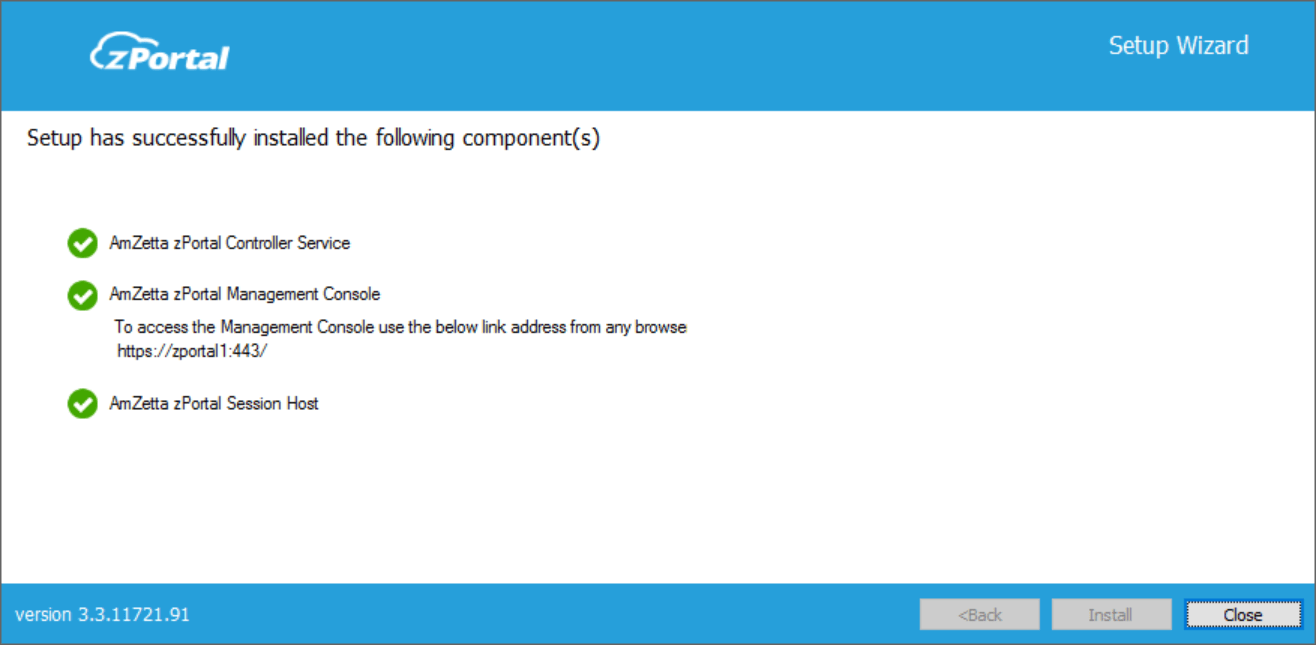
- Once the installation is completed, admin will be shown a screen displaying the following information:
- Installation status of individual components
- URL of AmZetta zPortal Management Console (if Installed)
Installation Verification
Administrator can verify the successful installation by verifying the installation logs and running services as mentioned below:
- Setup Status Prompt
Setup Status is displayed on the last screen of installation. It displays details about all the installed components and their respective status - Access and log-in to AmZetta zPortal Management Console
- After the successful installation, open Supported browser (IE11, Firefox or Google Chrome) and type the URL: https://<IP of zPortal Controller>:<port number> e.g. https://192.168.2.3:443
Note: If you are using default port number i.e. 443, there is no need to mention port number. - Provide appropriate credentials and Log-in
- After the successful installation, open Supported browser (IE11, Firefox or Google Chrome) and type the URL: https://<IP of zPortal Controller>:<port number> e.g. https://192.168.2.3:443