
-
SnapOS
-
-
- Articles coming soon
-
-
-
- Citrix HDX + USB Headset (Call-Center Baseline)
- OS/Firmware Update & Rollback
- Power Management and Session State
- Wi-Fi Roaming & Link Change Mid-Session
- Kiosk / Assigned-Access Auto-Launch
- Barcode Scanner (HID) with Line-of-Business App
- Printing to Local USB & Network Printers
- USB Device Management – Block Storage
- Multi-Monitor & 4K Performance
- Microsoft AVD/RDP + Teams Optimized Video
- VMware Horizon + Smart Card / CAC Login
-
-
-
-
zWAN
-
-
-
-
- Firewall & Layer 7 Application Filtering
- VPN Site-to-Site Tunnel Setup & Connectivity (z40 to Cloud vGR)
- Intrusion Prevention System (IPS) / Intrusion Detection System (IDS) Testing
- DNS Filtering
- DDoS Protection & Logging
- MAC Address Filtering & Geo-fencing
- Application Control & Protocol Blocking
- Authentication & Access Control (zID)
-
- WAN Link Failover & Load Balancing (ACI Mode)
- Dynamic Path Selection & Application-Aware Routing
- SaaS & Internet Breakout Validation
- QoS for Microsoft Teams (Datacenter vGR + Branch z40)
- Tunnel Failover (z40 ↔ vGR) — WAN00 (wired) primary, WAN03 (4G) & WAN04 (5G) backups
- IP Routing & Static Route Steering (z40 Branch)
- VLAN & Layer-2 Bridging
-
-
-
-
-
-
- Articles coming soon
-
-
-
-
- Articles coming soon
-
- Articles coming soon
-
-
-
-
-
-
- Articles coming soon
-
- Articles coming soon
-
- Articles coming soon
-
- Articles coming soon
-
-
-
-
-
- Articles coming soon
-
- Articles coming soon
-
- Articles coming soon
-
- Articles coming soon
-
-
-
-
-
- Articles coming soon
-
- Articles coming soon
-
- Articles coming soon
-
- Articles coming soon
-
-
- Articles coming soon
-
- IPsec Tunnel not Establishing
- SSL-VPN Tunnel not Establishing
- Mobile Network Issues
- Management Tunnel does not Establish
- DNS not Resolving from Local Network Appliance
- DNS Resolution Issues in Tunnel Configuration
- DHCP Server not Leasing IP to LAN PC
- Debugging EC Events - Unknown Status Issue
- Trusted-MAC Geofencing Issues
- DNS Issues from DC LAN PC
- Troubleshooting LAN Connectivity to Internet via WAN, Remote Branch LAN, or Local Branch LAN
- NetBalancer gateways displaying Faulty/Inactive
- Packet Drop Issues
-
-
zAccess
-
StorTrends
Domain Filtering
Overview
Domain Filtering allows an administrator to create lists of domains that are
always allowed or always blocked by the zWAN Edge Controller.
The Allowed List can be used when a trusted domain must remain accessible.
The Blocked List can be used to prevent access to an unwanted domain when the
Domain Blocklist feature is supported on the device.
Prerequisites
Before configuring Domain Filtering:
- Log in to the local zWAN Edge Controller web interface with an account that
can manage security settings. - Confirm that DNS is configured and enabled on the Edge Controller.
- Identify whether the domain must be added to the Allowed List or the
Blocked List.
If DNS is not enabled, the Edge Controller displays a warning and provides a
link to configure DNS in the Classic UI.
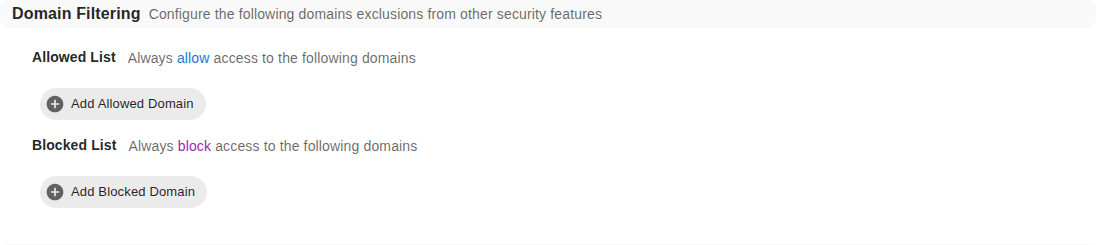
Domain Filtering in the current Local Web UI.
Functionality
Domain Filtering provides the following lists:
- Allowed List: Domains in this list are always allowed.
- Blocked List: Domains in this list are always blocked when the Domain
Blocklist feature is supported.
Each entry contains:
- Domain: The domain to allow or block. This field is required.
- Description: Optional information that identifies the purpose of the
entry.
A domain cannot be added to the Allowed List if it already exists in the Blocked
List. In the same way, a domain cannot be added to the Blocked List if it already
exists in the Allowed List.
Add a Domain to the Allowed List
- From the main menu, select Security.
- Select Domain Filtering.
- Select Allowed List.
- Click Add Allowed Domain.
- In Domain, enter the domain that must always be allowed.
- In Description, optionally enter information about the entry.
- Review the domain and click the confirmation control to add it.
- Confirm that the new domain appears in the Allowed List.

Add a domain to the Allowed List.
Note: If the domain already exists in the Blocked List, remove it from that
list before adding it to the Allowed List.
Add a Domain to the Blocked List
- From the main menu, select Security.
- Select Domain Filtering.
- Select Blocked List.
- Click Add Blocked Domain.
- In Domain, enter the domain that must always be blocked.
- In Description, optionally enter information about the entry.
- Review the domain and click the confirmation control to add it.
- Confirm that the new domain appears in the Blocked List.

Add a domain to the Blocked List.
Note: If the domain already exists in the Allowed List, remove it from that
list before adding it to the Blocked List.
Remove a Domain
- From the main menu, select Security.
- Select Domain Filtering.
- Open the Allowed List or Blocked List containing the domain.
- Locate the domain entry.
- Select the delete control for the entry.
- Confirm the removal when prompted.
- Confirm that the domain no longer appears in the list.
Removing an entry returns the domain to the behavior defined by the remaining
security configuration.
Verify the Configuration
After adding or removing a domain:
- Confirm that the entry appears in the intended list.
- Confirm that the same domain does not appear in the opposite list.
- Allow up to 30 seconds for the displayed list to refresh.
- Test access from an authorized client according to your organization’s change
and validation procedure.
If the result is not as expected, review the other DNS, firewall, and filtering
settings that may apply to the traffic.
Troubleshooting
DNS is not enabled
Domain Filtering requires DNS to be configured on the Edge Controller.
- Follow the warning displayed on the Domain Filtering page.
- Select the provided action to open DNS configuration in the Classic UI.
- Configure and enable DNS according to the DNS Server procedure.
- Return to Security → Domain Filtering and add the domain again.

Configure DNS before adding a Domain Filtering entry.
The domain is not accepted
- Confirm that the Domain field is not empty.
- Verify that the domain was entered correctly.
- If the interface reports that the value is invalid, use a domain format
supported by the installed release.
The domain exists in the opposite list
An allowed domain cannot also be present in the Blocked List, and a blocked
domain cannot also be present in the Allowed List.
- Open the opposite list.
- Locate and remove the existing entry.
- Return to the intended list.
- Add the domain again.
The saved entry does not appear immediately
The Domain Filtering lists refresh periodically. Wait up to 30 seconds and check
the list again.
Notes
- The Description field is optional but is recommended to explain why an
entry was created. - Confirm support for the Domain Blocklist feature before relying on the Blocked
List. - Test security changes from an authorized client before considering the change
complete. - Wildcard and subdomain matching can vary by product version. Use only formats
validated for the installed release. - To roll back a change, remove the entry from the list in which it was added.